Calculations: Calculating Field Values In Five
Calculating Field Values in Five
Hi and welcome to this how-to post on Calculating Fields in Five. This blog post teaches you how to use functions to perform a calculation in Five. Functions can be as simple or as complex as you need them to be: there is no limit. You can perform single-step or multi-step calculations in one function. Anything you can do in Excel, for example, can be done in Five (albeit in a different syntax from Excel formulas).
In this post, we explain how to calculate values in your fields and display the result in your interface using Five. The objective of the tutorial is to learn:
1. How to create a process in Five.
2. How to write and manage JavaScript / TypeScript functions in Five.
3. How to use functions to calculate field values
Performing Calculations in Five
To perform a calculation in Five, follow these steps:
1. Creating a Process
1. Let’s launch Five and click the yellow + button to create a new application. Assign it a name and press save. Then, select Manage to begin developing your application.
If you have an existing application, click straight on Manage.

2. Next, click on Tasks > Processes.

3. Click the yellow Plus button to create a new process. Give it a name, such as CalculateRecords.
4. Next, navigate to the Screen Fields tab. Here, you can introduce fields to our process.
5. Click the + button in the top right corner to add three fields. Name the first two Field 1 and Field 2, both with an integer display type. The third field should be named Result, also with an integer display type.
Here is what your screen fields should look like:

6. Last, click the Tick ✔️ Button to save.
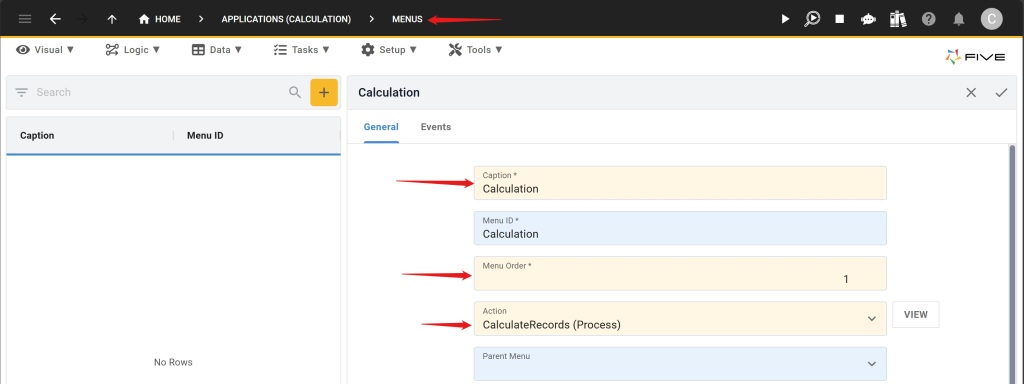
7. Last, we need to attach the process to a menu item. Click on Visual > Menus.
8. Click the yellow Plus button to create a new menu item, as shown here:

Menu items are shown in the left-hand side navigation of your final application. By adding a menu item, we make our process accessible to our end-users.
2. Writing the Function
Next, we will write the logic that does the calculation using JavaScript, in Five we can write our own code through the Code Editor.
1. To access the Code Editor, click on Manage, then on Logic, and then Code Editor.
2. Now click on the Plus icon. Write CalculateFields as the FunctionID. Keep JavaScript as the function language.

You now can write functions using standard JavaScript. In this guide, we willl craft a straightforward logic to compute values from the two fields and display the outcome in a third ‘Result’ field.
3. Copy the code below and paste it into Five’s Code Editor, replacing all existing code:
function CalculateFields(five, context, result) {
    const a = five.field.Field1;
    const b = five.field.Field2;
    five.field.Result = a + b;
    return five.success(result);
}
The function is quite readable. But to explain in plain language, we retrieve the values from our fields using five.field, assigning them to variables a and b. We then set the ‘Result’ field to the sum of a and b.
4. Last, click the Tick ✔️ Button to save.
Explainer: Using ChatGPT to Write Functions
If you are not proficient in JavaScript, those six lines of code can look a little intimidating. Thankfully, ChatGPT is a JavaScript expert and we can leverage AI to write functions for us.
For example, I can prompt ChatGPT with this:
I’d like to use JavaScript to add two fields. My fields are called Field1, Field2, and Result.
I have been provided with this piece of code.
function CalculateFields(five, context, result) {
return five.success(result);
}
Please add my calculation to this code.
Here is what ChatGPT returns in response:
function CalculateFields(five, context, result) {
    // Retrieve the values of Field1 and Field2 from the context.
    const field1Value = context.record.Field1 || 0; // Default to 0 if Field1 is undefined.
    const field2Value = context.record.Field2 || 0; // Default to 0 if Field2 is undefined.

    // Perform the addition and store it in the Result field.
    result.Result = field1Value + field2Value;

    // Return the result using the five.success method.
    return five.success(result);
}
Note how ChatGPT’s response and our response are almost the same.
Ignore any text starting with //. These are explanatory comments. The only change I need to make is to provide the context. In our case, we know that we are dealing with fields, so we replace context.record with five.field.
Once I have done the replacements, the AI-generated function will work in Five just as intended!
3. Attaching the Function
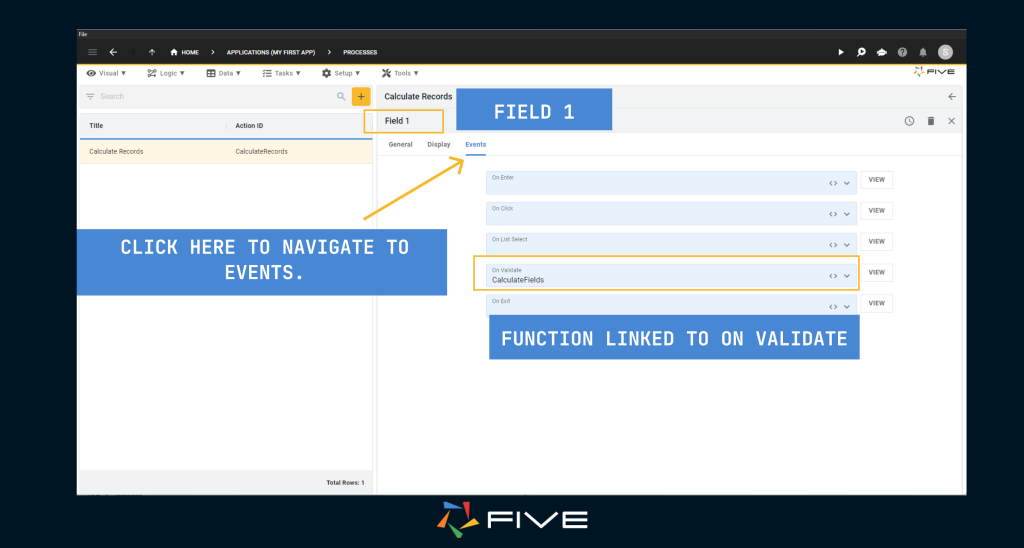
Last, let’s attach our function to our fields such that whenever we alter the values of the fields, our function is called and updates the result.
1. Start by navigating back to Processes inside the Task menu, select the process that we created earlier.
2. Click on Screen Fields, choose Field 1, then navigate to Events and select CalculateFields for the OnValidate event.

3. Next, repeat the process for Field 2. This ensures the function is triggered whenever the value of either field is modified.
4. Last, click the Tick ✔️ Button to save.
4. Run Your App to Test Your Calculation
Now, let’s test our calculation. Let’s run our application.

Here’s what your application should look like:

In terms of functionality, we have developed a simple calculator for adding two fields and for displaying the result. Whenever a new value is entered into either field 1 or field 2, the result field automatically updates.
Explainer: Event-Driven Programming
As we developed this application, we used a core concept of software development called event-driven programming. Event-driven programming means that a function gets triggered by an event that an end-user takes.
Almost everything in Five comes with events. Fields, for example, have on-enter, on-validate, or on-exit events. Functions can be attached to any of these events. By combining functions with events, Five can perform calculations, run processes, or alert users. For example, you could write a function that sends out an email or a notification to users, and attach it to an event.
By mastering functions and events, you can almost build anything with Five.
Finding Help
Have more questions? Join our user community to connect with others and get answers.

