Connecting to the FileMaker Data API: How-To and Common Questions
In today’s article, we explain how to connect Five to the FileMaker Data API and address common questions about integrating FileMaker with Five. More specifically, we show how to use the FileMaker Data API as a data source in Five to build a web interface on top of it.
This blog post focuses on a key feature of Five: the Connection Wizard.
It functions similarly to the well-known Postman API management tool. By using the Connection Wizard, developers can connect Five to any RESTful API endpoint, seamlessly integrating an API as a data source into the Five development environment.
Once an API has been set up in Five as a data source, Five can be used to develop custom applications, including forms, charts, or reports on top of it.
Table of Contents
1. How Do I Connect Five to the FileMaker Data API?
Step 1: Open Up the Connection Wizard
Inside Five, you can use your Filemaker Data API through the Connection Wizard.
1.1. Open up Five, and create a new application.
1.2. Click on the blue Manage button
1.3. Now, click on Data and then Connection Wizard.

Here’s what the Connection Wizards looks like:
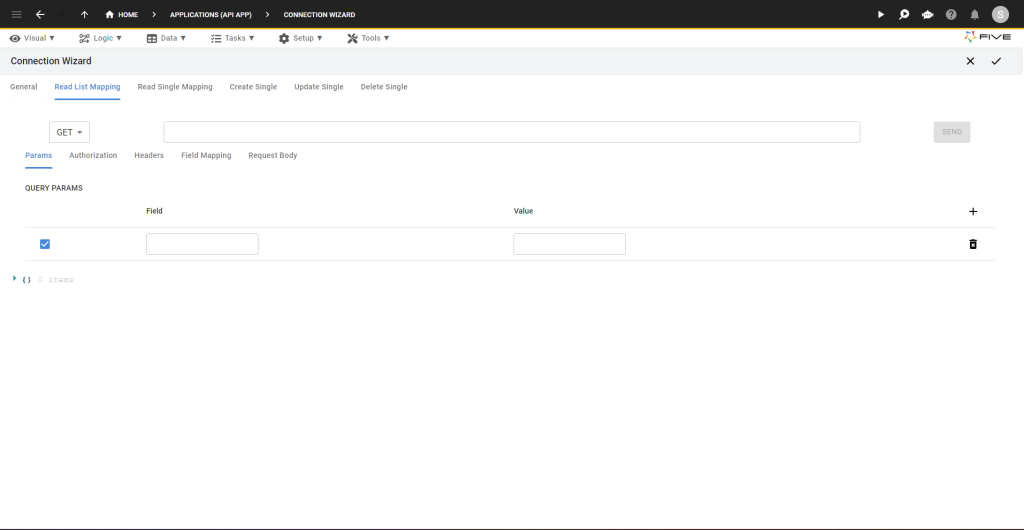
The Connection Wizard works similarly to Postman. It requires your endpoints for the FileMaker Data API.
Once you have the Connection Wizard open, you’ll notice several tabs at the top:
- General: This is where you give your API connection a name, for example.
- Read List Mapping: This requires an endpoint that returns all records from the API using a GET method.
- Read Single Mapping: This requires an endpoint that provides a single record.
- Create Single: This requires an endpoint that can be used to add a new record using a POST request.
- Update Single: This is for an endpoint where you can use a PUT or PATCH method to update an existing record.
- Delete Single: This tab expects an endpoint that, through a DELETE request, allows you to remove a record from the API.
For each of these endpoints, you will need to set their authentication separately.
In the next steps, we will walk you through the process of setting up your FileMaker Data API for use in Five.
Step 2: Authorization: Generating a Bearer Token
We first need to authorize our access to the FileMaker Data API. To do so, have your Basic Auth username and password ready. This can be configured inside of FileMaker. With your username and password ready, follow these steps inside Five to set up your API:
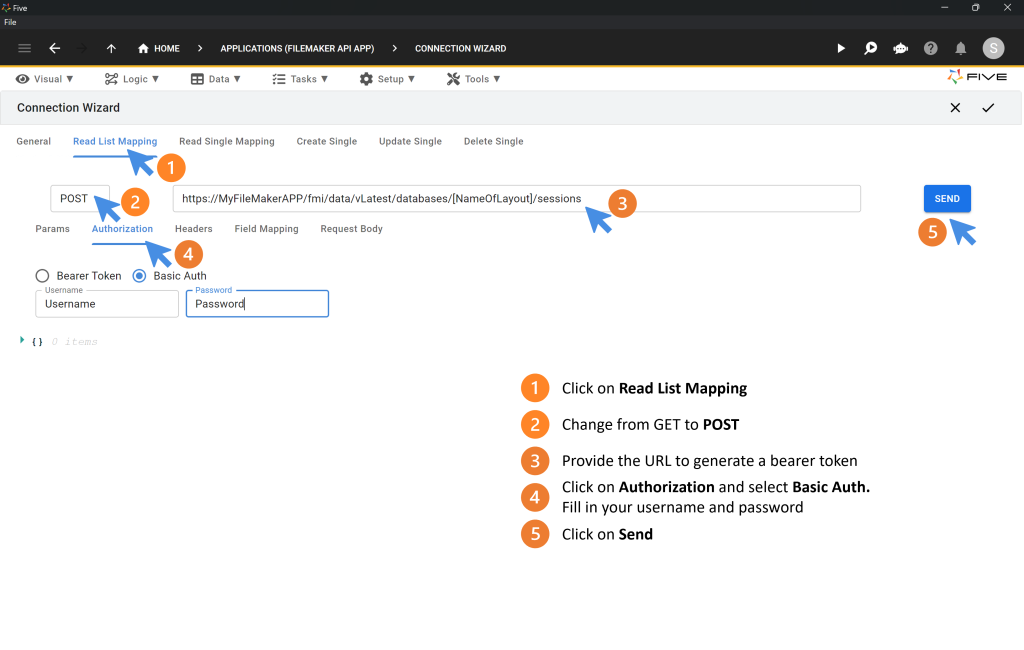
2.1. Inside the Connection Wizard, click on Read List Mapping. We skip the General section for now and come back to it later.
2.2. Change the dropdown box that says GET to POST.
2.3. Paste the URL to create a token for your layout in the empty text field. Usually, in FileMaker, the URL looks similar to this:
https://MyFileMakerServer/fmi/data/vLatest/databases/[FileName].fmp12/sessions
2.4. Next, click on Authorization and select Basic Auth. Fill in your username and password which you have created in FileMaker.
2.5. Now, click on send to generate a bearer token.
Check out the image below to better understand what your screen should look like before clicking Send.
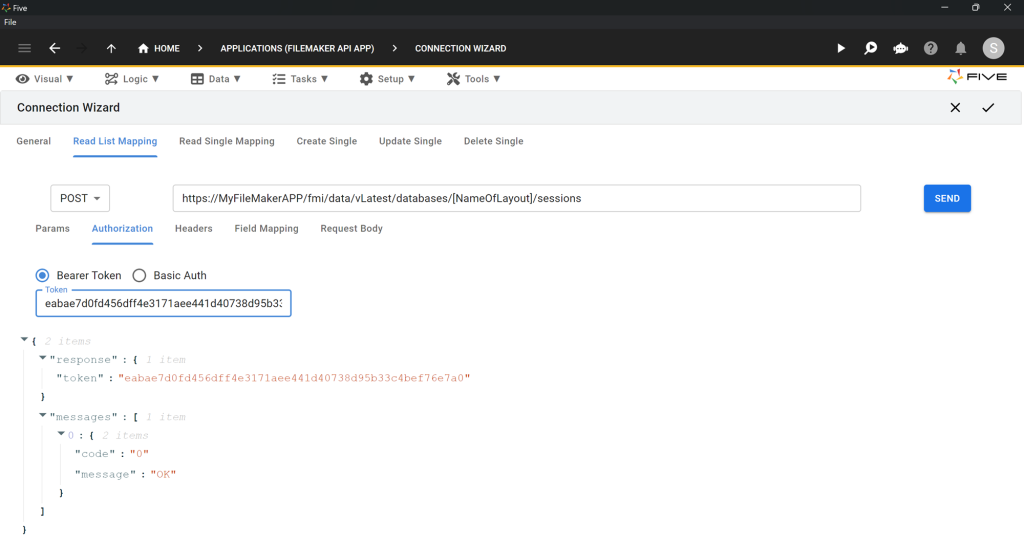
Once you click on Send, here is what the expected response should look like. This response will be shown right inside of Five.
"response":{1 item
"token":"e96077f0f5f56a8a55f28a3788858cfcd7ad1298af137a3a80b5"
}
"messages":[1 item
0:{2 items
"code":"0"
"message":"OK"
}
]
}
If you receive an error, ensure that your request type (POST), URL, and basic authentication (username and password) are correct.
2.6. Copy the token.
2.7. Now, click on Bearer Token, which is right next to Basic Auth.
2.8. Paste the token into the Token box.
Here is what your screen should look like:
Step 3: Read List Mapping: Setting Up Your GET Request
We will keep working on the same screen we were just on, i.e. we are continuing in Read List Mapping with the bearer token filled into the token field.
3.1. Start by changing the dropdown box that says POST to GET.
3.2. Replace the token-generating URL with your GET endpoint. Usually, in FileMaker, the GET URL looks similar to this:
https://MyFileMakerServer/fmi/data/vLatest/databases/[FileName].fmp12/layouts/[LayoutName]/records
3.3. Click on Send. The response now contains a list of all records from your layout in JSON format.
3.4. Next, click on Field Mapping. Field Mapping shows you how Five understands the data it receives: it maps the fields from your API to field IDs. Make sure you are happy with each field’s data type and display type.
3.5. Inside Field Mapping, tick the Primary Key box for the field that contains your primary key. In FileMaker, this field is usually called recordId. Note: You need to set the Primary Key for any tab that handles a GET request.
We have now successfully set up our first endpoint, the GET endpoint and we have checked our field mapping. Onto the next endpoint!
Step 4: Get a Single Record: Read Single Mapping
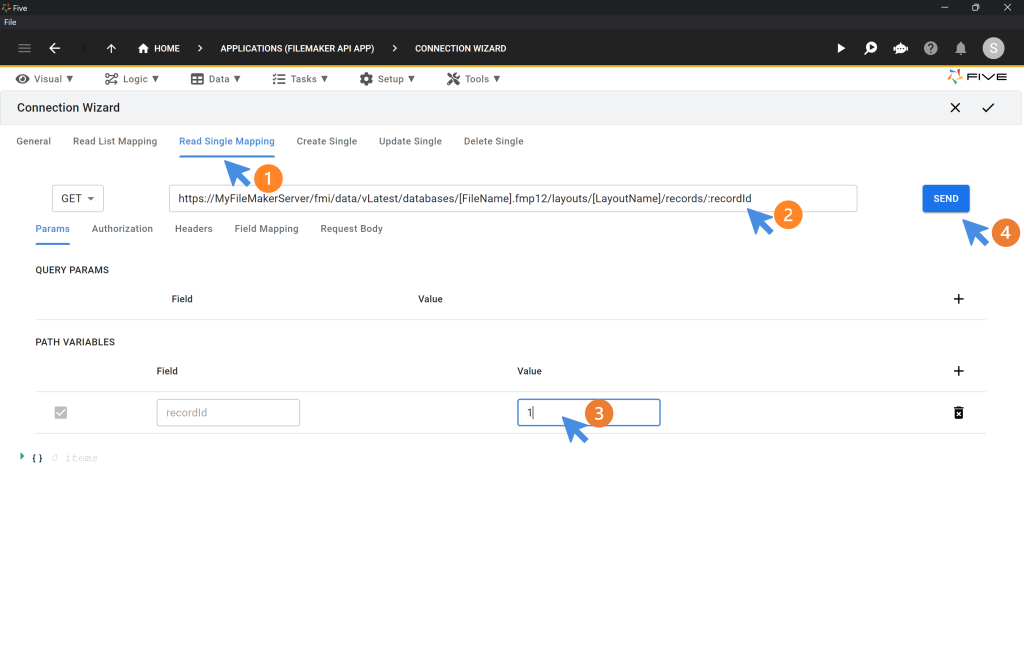
We now continue by setting up the next endpoint: Read Single Mapping.
4.1. Click on Read Single Mapping.
4.2. Paste the URL of your read-single endpoint into the empty field next to GET. Usually, in FileMaker, the URL looks similar to this:
https://MyFileMakerServer/fmi/data/vLatest/databases/[FileName].fmp12/layouts/[LayoutName]/records/:recordId
Now, test whether the endpoint works as expected. It supposed to return a single record from your API.
4.3. Inside Read Single Mapping, click on Authorization and then on Bearer Token. Paste the token you have generated in step 1.5. above.
4.4. Now click on Params.
4.5. Inside the Value field, fill in any integer, such as 1. This will return the first record.
4.6. Click on Send.
You should now be able to see your first record (recordId = 1) of your API.
Step 5: Create Single: Setting Up the POST Request
We now continue by setting up the next endpoint: Create Single.
5.1. Click on Create Single.
5.2. Paste the URL of your POST endpoint into the empty field next to POST. Usually, in FileMaker, the URL looks similar to this:
https://MyFileMakerServer/fmi/data/vLatest/databases/[FileName].fmp12/layouts/[LayoutName]/
Step 6: Update Single: Setting Up the PUT Request
We now continue by setting up the next endpoint: Create Single.
6.1. Click on Update Single.
6.2. Paste the URL of your PUT endpoint into the empty field next to PUT. Usually, in FileMaker, the URL looks similar to this:
https://MyFileMakerServer/fmi/data/vLatest/databases/[FileName].fmp12/layouts/[LayoutName]/records/:recordId
Step 7: Delete Single: Setting Up the DELETE Request
We now continue by setting up the next endpoint: Delete Single.
7.1. Click on Delete Single.
7.2. Paste the URL of your PUT endpoint into the empty field next to DELETE endpoint. Usually, in FileMaker, the URL looks similar to this:
https://MyFileMakerServer/fmi/data/vLatest/databases/[FileName].fmp12/layouts/[LayoutName]/records/:recordId
Step 8: Adding Your API as a Data Source
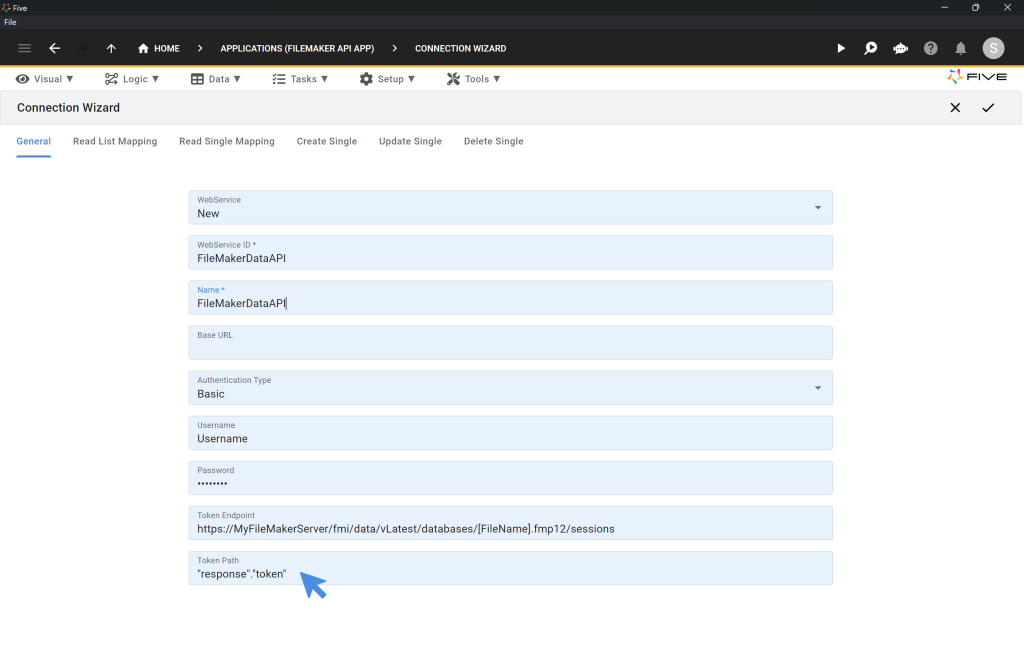
8.1. Now, click on General.
8.2. Select New from the WebService dropdown.
8.3. Give your WebService a WebService ID and Name.
8.4. Select Basic from Authentication Type.
8.5. Fill in your username and password, which you have defined for your FileMaker Data API.
8.6. Fill in the Token Endpoint from Step 1.3. above.
8.7. For Token Path, fill in “response”.”token”.
8.8. Last, click on the Tick ✔️ icon to save.
Here is what your General tab should look like:
Done – we have now successfully added a FileMaker Data API as a data source in Five!
Expansion: How to Build an App on the FileMaker Data API
Once you have successfully added the FileMaker Data API as a data source to Five, the API can be used to:
- Build a responsive web application, such as API dashboards, API admin panels, or API CRUD apps.
- Create forms, charts, dashboards, or PDF reports on top of it. Five’s Form and Chart Wizards make it extremely quick to build front-end elements for a responsive web application.
- Give a wider audience access to part or all of the data stored in your FileMaker database. Five’s fixed monthly pricing per application – without user limits – makes this viable.
- Push some of this data into Five’s MySQL database. Once the data from the API is stored inside Five’s database, it can be queried in standard SQL.
- Assign CRUD permissions to different user roles to the API.
Once the connection to your API is set up, the possibilities are almost limitless in Five. To get started developing your app, watch this video and learn how to create a form that connects to your API in Five (fast forward to 5 min 25 sec to see how to create a form on an API):
Common Questions About the FileMaker Data API
1. My Bearer Token Expires Every 15 Minutes. How Can Five Handle This?
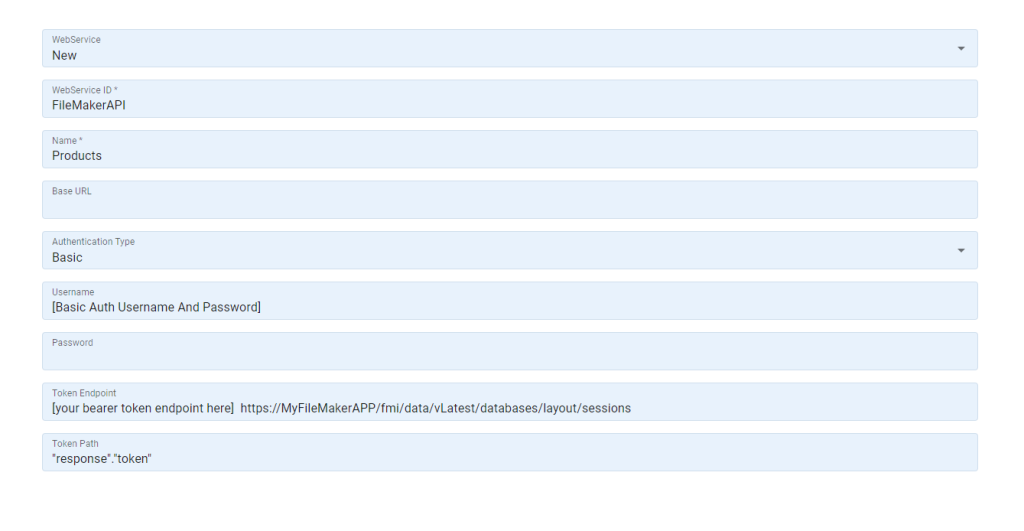
Five can automatically renew the bearer token. Setting this up is simple inside Five and was already part of Step 8 above. Click on the General tab in the Connection Wizard:
- Select New from the WebService drop-down.
- Give your API an appropriate WebService ID and Name.
- Select Basic for the Authentication Type.
- Add the credentials for your Basic Auth in the Username and Password field.
- Add the URL that generates a bearer token for your layout in the Token Endpoint field. This is the same endpoint discussed in the previous question.
- In the Token Path, add:
"response"."token". This indicates where FileMaker stores your token in the JSON response after calling the API.
Here is what your screen should look like:
2. How Can I Use My API In My Applications?
When you set up an API through the Connection Wizard, Five tries to understand the response and maps the data it receives into fields. This enables Five to immediately use your API as a data source for your applications.
To better understand how this works, click on Read List Mapping, paste your API URL, and click on Send. Now, click on Field Mapping, which is right below where you pasted your URL.
Here you will see how Five is mapping all your fields. The field mapping translates the JSON response into fields and assigns each field a Field ID. It also gives each mapped field a Data Type and Display Type.
Last, the field mapping tries to automatically understand what your Primary Key is. You can confirm or change the primary key through the checkbox in the Primary Key column.
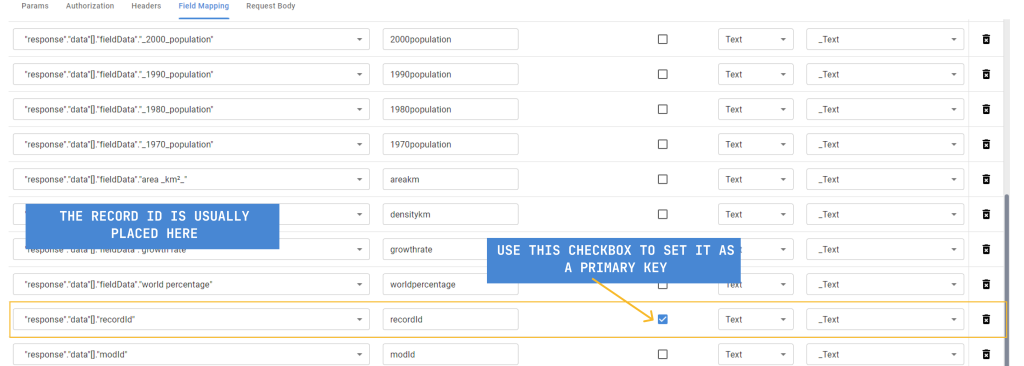
After you are done, click on Save, and you should be able to use this API directly as a data source in forms, charts, or PDF reports.
3. What Is A Data Source in Five?
A data source is required when creating forms, reports, charts, or any other component dealing with data in Five. A data source can be:
- A database table from Five’s integrated MySQL database,
- A database table from an external database, connected to Five via a connection string,
- An SQL query, or
- An API connection
The Connection Wizard saves your API as a data source, enabling its direct use in your applications.
4. Does Every User Have Permission to Write Back to My API?
User permissions can be set by accessing the “Roles” menu under “Setup.” In this menu, you can define default and individual-level permissions for each data source in your application.
Of course, you can also govern access to the data stored in your FileMaker database through FileMaker. Follow the FileMaker Data API Guide to learn more.
5. Is My API Connection a Live Connection? Will My Data Be Up to Date When I Run My Apps?
Yes, since your API acts directly as a data source, it is a live connection to the Data API. If you prefer not to have a live connection, you can use custom JavaScript functions to manage your data.
6. Can I Store My API Data in the Five’s MySQL Database?
You can create custom JavaScript functions in Five to handle your data. When using code, you have complete control over your data. For example, in just a few lines of code, you can extract and store the data from your API in Five’s integrated MySQL database. This then enables you to query your data. Alternatively, you can just use Five to create a CRUD front-end directly on your API, for example.
7. How Do I Continue From Here?
Five treats your API as a data source. To better understand what you can do with a data source in Five, visit our documentation or post your questions on our community.
Last, to push your application to the web, so that your end-users can access it, subscribe to one of our plans.
Get Your App Online For US$29.99 Per Month
Five lets you develop your application locally free of charge. Simply use our free download and build your application until it’s ready for your end-users.
To deploy your application, sign up for one of our paid plans, starting from US$29.99 per month and application. Your plan includes unlimited end-users and provides you with a custom URL to access the application online.