Code-Along: Build & Launch a Business Partner Portal
Hi and welcome to our step-by-step guide on building and launching a business partner portal in Five.
Goals and Objectives
In this step-by-step tutorial, we develop a simple, web-based business partner portal in just 30 minutes. Using the portal, business partners can:
- Login to the portal using their unique login information.
- View and update their contact information.
- Submit timesheets and see a chart.
The portal also comes with a back office login that lets internal staff:
- Create, view, update, or delete business partners’ information.
- See all business partners’ contact information and timesheets.
- Add new business partners to the portal.
Sounds like a lot? You will be surprised by how quickly we can develop such a business partner portal in Five!
Before we continue, make sure to sign up for free access to the Five development environment.
- Preview A Five Portal: The Student Portal
- What Is a Business Partner Portal?
- Step 1: Creating a New Application
- Step 2: Switching on Multiuser
- Step 3: Running Your Application
- Explainer: Five’s Application’s User Interface
- Step 4: Data > Table Wizard: Creating Database Tables
- Step 5: Data > The Database Modeler
- Checkpoint: Is Your Database Setup Correctly?
- Step 6: Visual > Form Wizard: Creating Forms
- Step 7: Visual > Menus: Creating The Menu Structure
- Checkpoint: Checking Your Menu Structure
- Step 8: Creating User Roles
- Checkpoint: Are Your User Roles Setup Correctly?
- Step 9: Data > Queries: Creating a Timesheet Query
- Explainer: Queries with Parameters
- Step 10: Visual > Charts: Adding a Chart
- Step 11: Visual > Menus: Adding the Chart to The Application
- Checkpoint: Launch Your App
- Step 12: Visual > Forms: Display Types
- Congratulations: Developing a Business Partner Portal
- Finding Help in Five
Preview A Five Portal: The Student Portal
Visit the student portal, a comprehensive management application for schools and universities, to preview a portal developed in Five. This portal has unique logins for school administrators, lecturers, and students and enables the seamless exchange of information in a simple-to-use online interface. It comes with reports, dashboards, self-service interfaces and email notifications.
Follow the steps below to develop a simple portal in Five.
What Is a Business Partner Portal?
A business partner portal is a specially designed web app that serves as a single point of access for information and various services. A business partner can submit or access information in a self-service portal.
It acts as a gateway, bringing together different resources and functionalities into one user-friendly interface. Business partner portals typically offer each partner unique logins to access specific content or tools relevant to their needs or roles.
Step 1: Creating a New Application
1.1. To create a new application in Five, click on Applications.
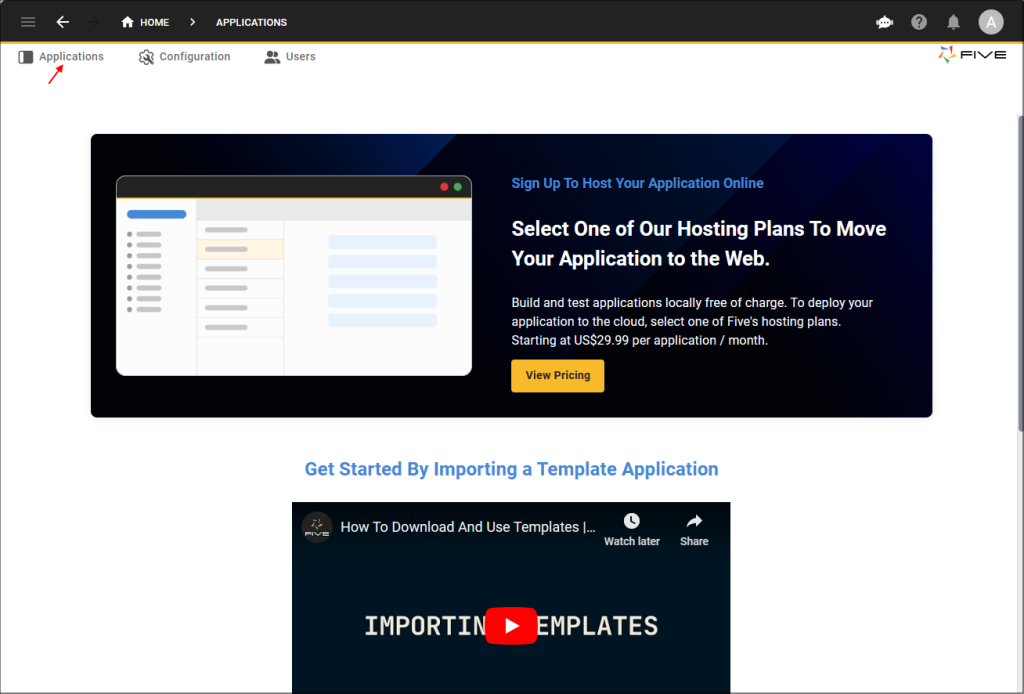
1.2. Next, click the yellow Plus icon.
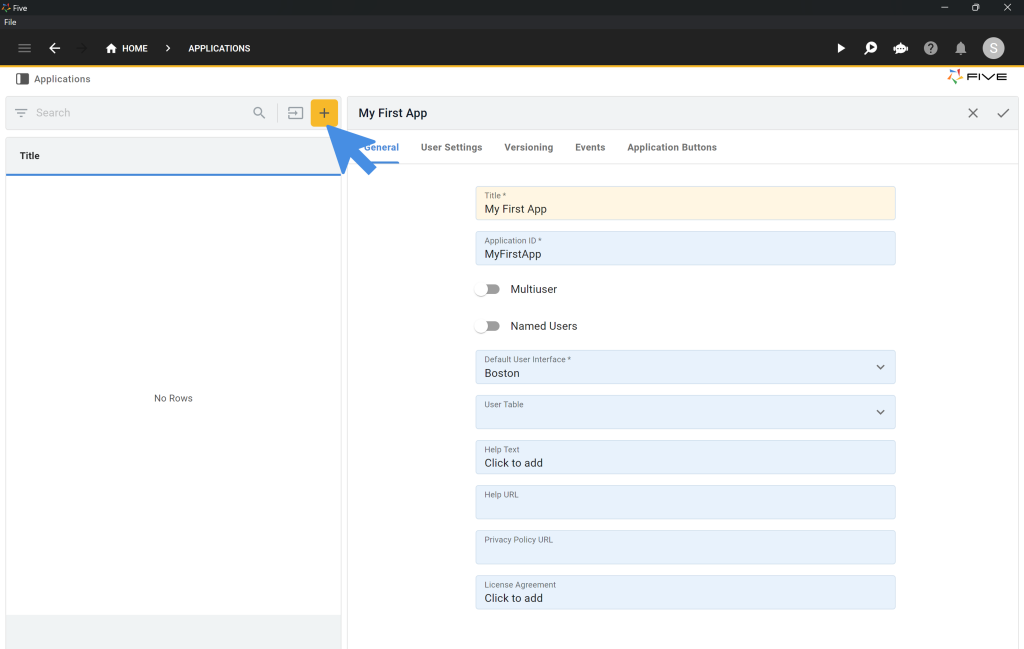
1.3. Type BPP for Business Partner Portal in the Title field.
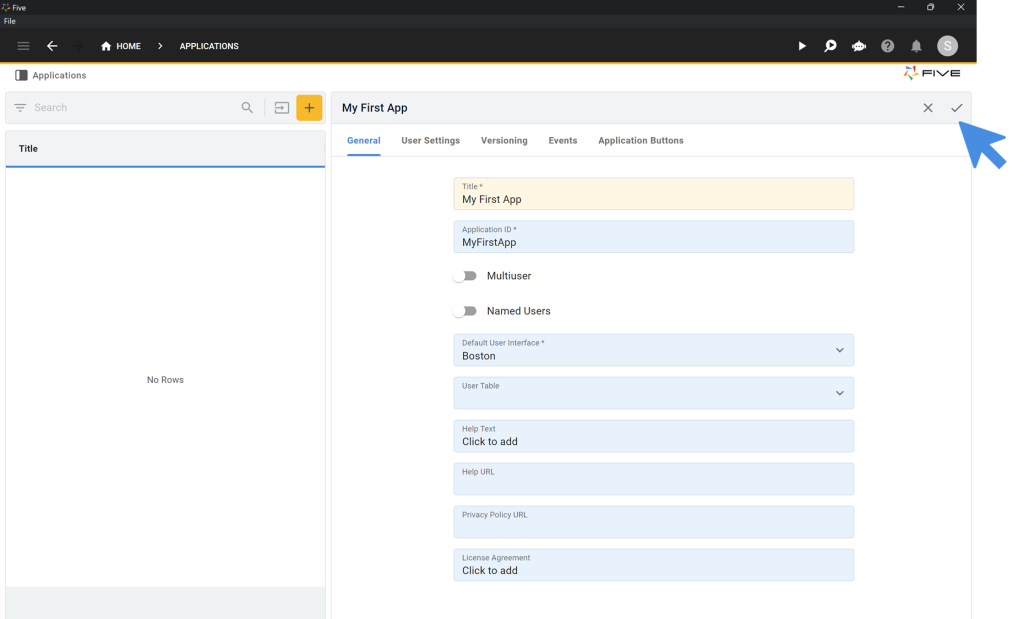
1.4. Click on the Tick ✔️ icon to save.
Step 2: Switching on Multiuser
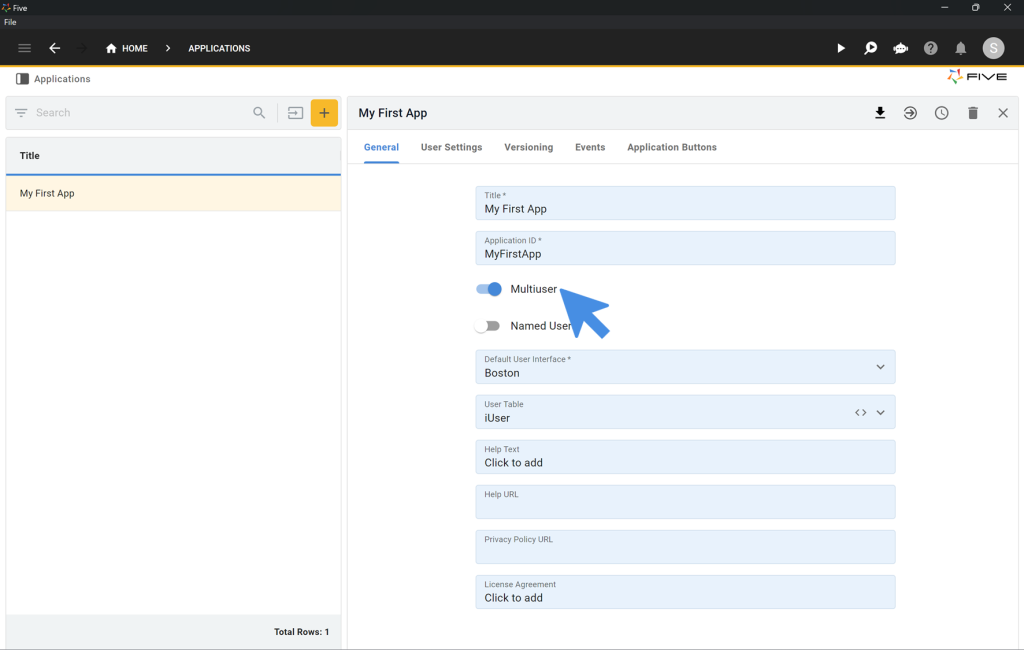
2.1. Set the toggle for Multiuser to on. This automatically adds a login screen to your application.
Step 3: Running Your Application
You can run and preview your application at any time.
3.1. To do so, click the Deploy to Development button in the top navigation bar. Note that the first deployment of your app can take a few minutes.
Once your application is deployed, the Deploy to Development button turns into a Run ▶️ button in the top right corner.
3.2. Click Run ▶️ to preview your application. A new window opens up, showing the current state of your application.
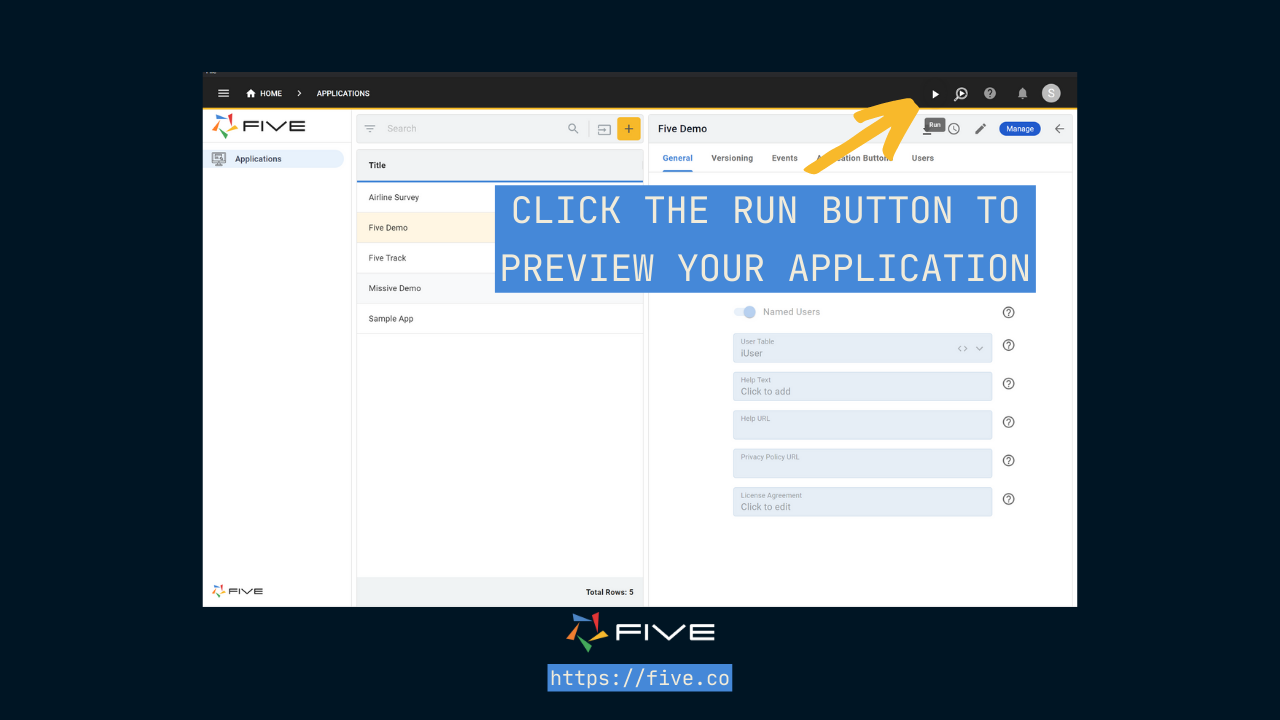
3.3. Let’s take a first look at our app. Once you click Run ▶️, this is what you see:
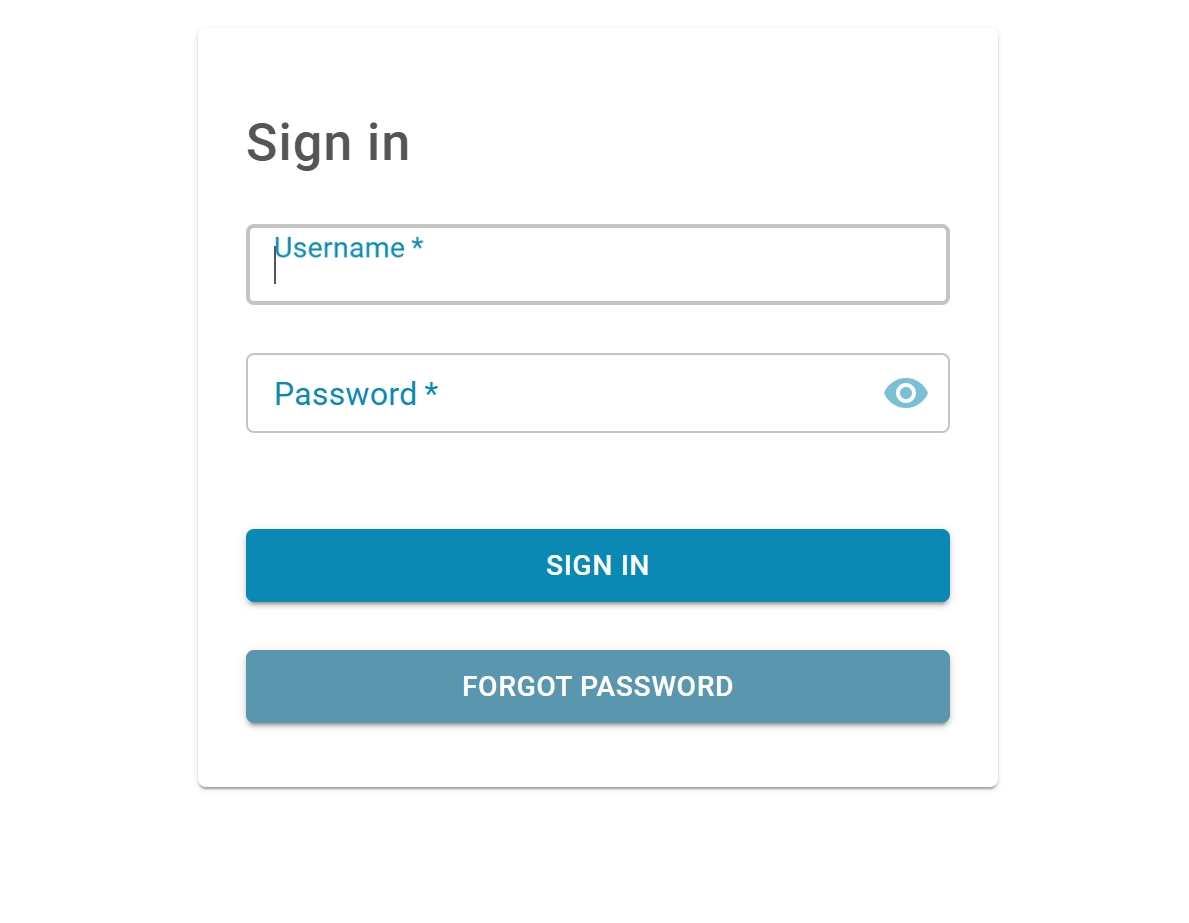
3.4. Login to your app with user admin and password admin.
Five will automatically ask you to change your password. Pick a more secure password and note it down somewhere.
Here is what our application currently looks like:
Explainer: Five’s Application’s User Interface
Applications developed in Five come with a standard, responsive user interface (UI). Here is a quick explainer its default features:
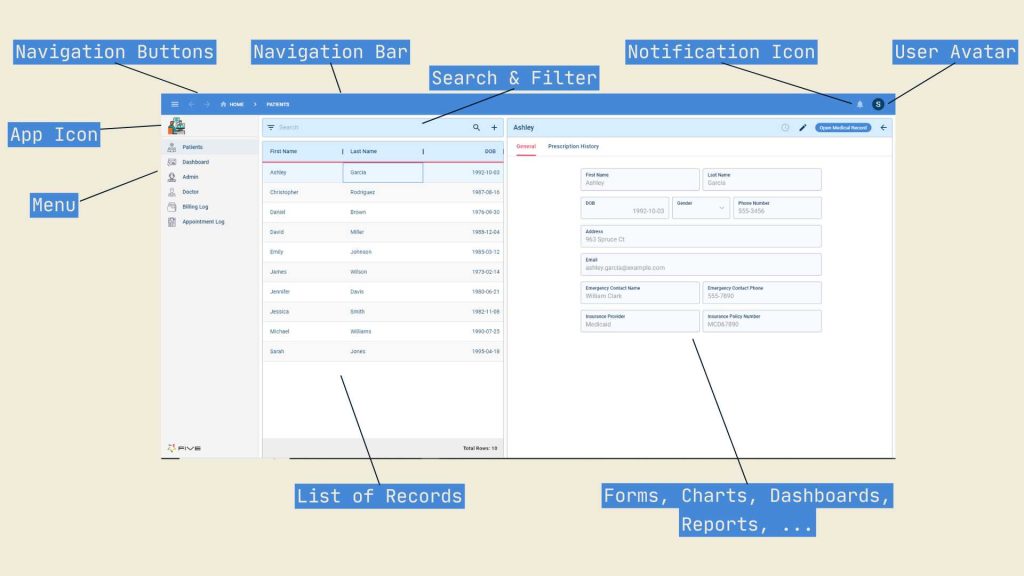
Five’s UI includes:
1. A user avatar that lets users manage their access credentials, find help, or log off.
2. A navigation bar and navigation buttons that aid users navigate the app.
3. A built-in search bar and filter function.
4. A customizable menu that incorporates your logo.
5. Space for placing lists, forms, charts, dashboards, or reports.
Step 4: Data > Table Wizard: Creating Database Tables
Now, let’s start developing our application’s database.
4.1. Click on the blue Manage button.
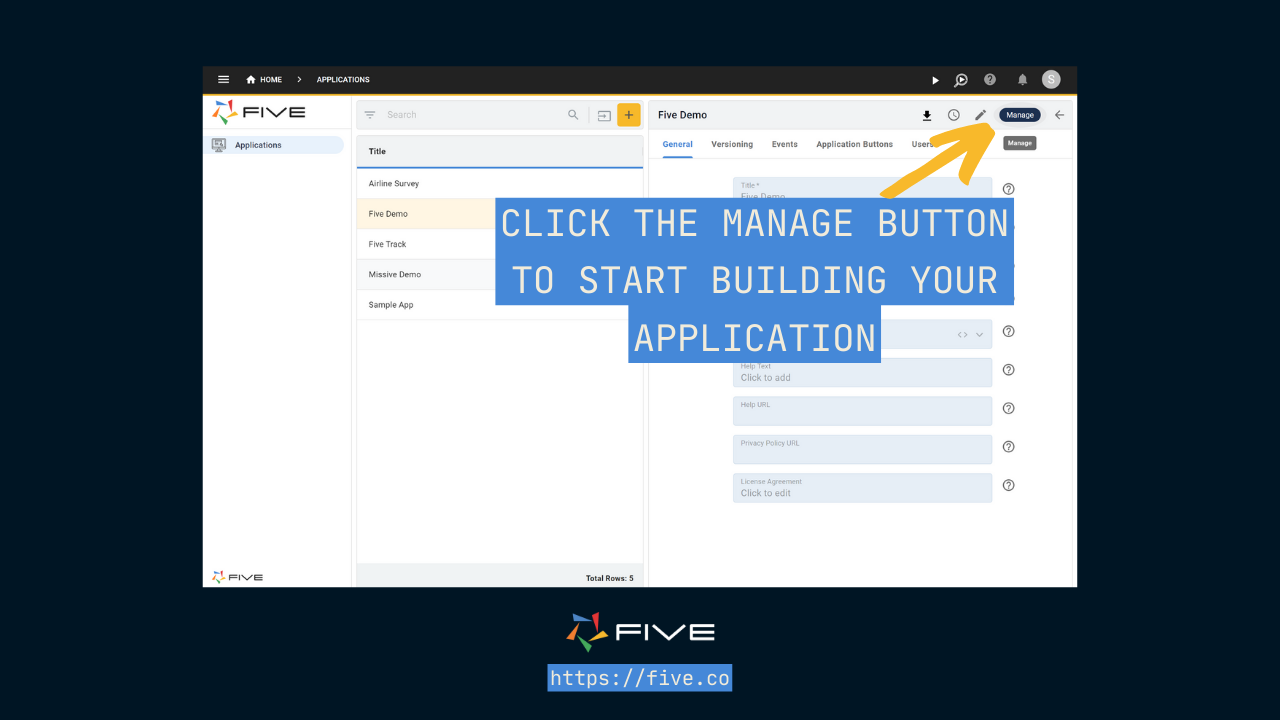
4.2. Our business partner portal requires a database, i.e. a place to store records. To add tables to the database, click on Data > Table Wizard.
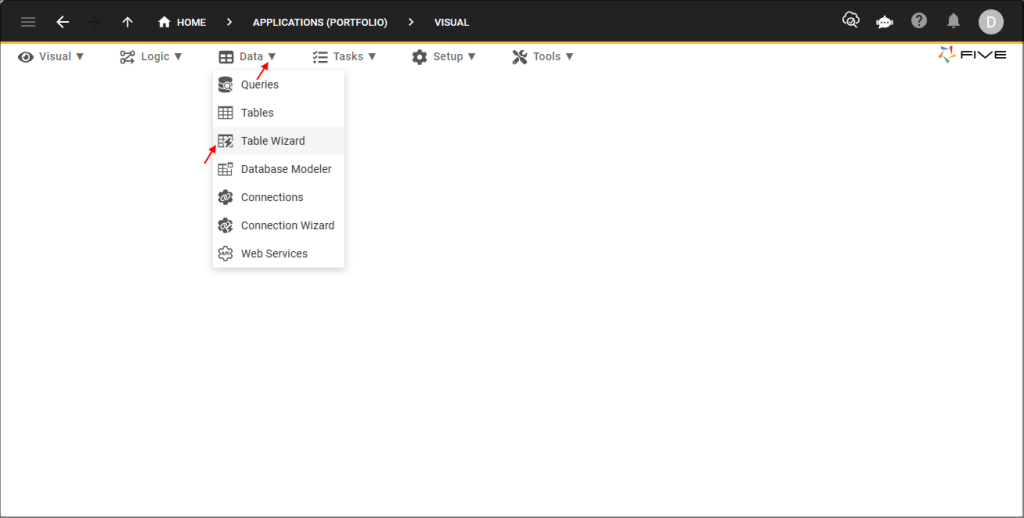
We are creating three separate tables: BusinessPartner, ContactInfo, and Timesheet.
The Business Partner Table
To create a table, follow these steps:
4.3. Give your table the name BusinessPartner inside the Name field. To add fields to your table, click the Plus ➕ icon on the right side of the screen.
4.4. Add three fields to your table: Name, Type, and Active. Here is what your BusinessPartner table should look like:
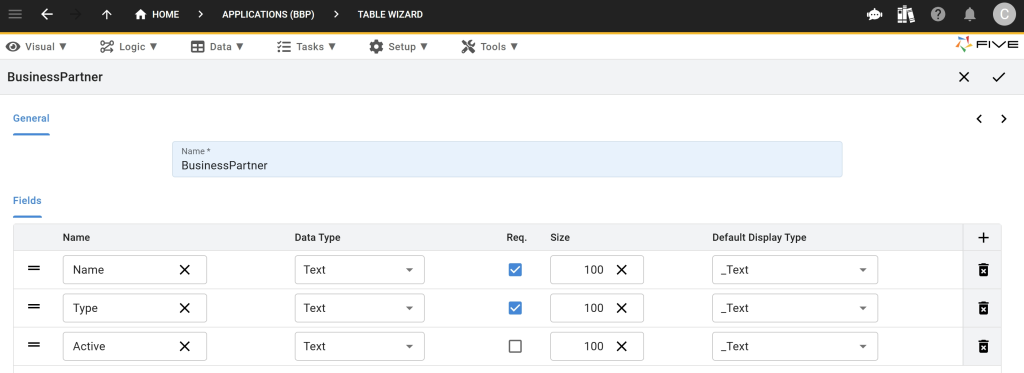
Once your table looks exactly like the image above, click the Tick ✔️ icon to save. A Table Upgrade pop-up will appear. You can safely ignore this and click Save.
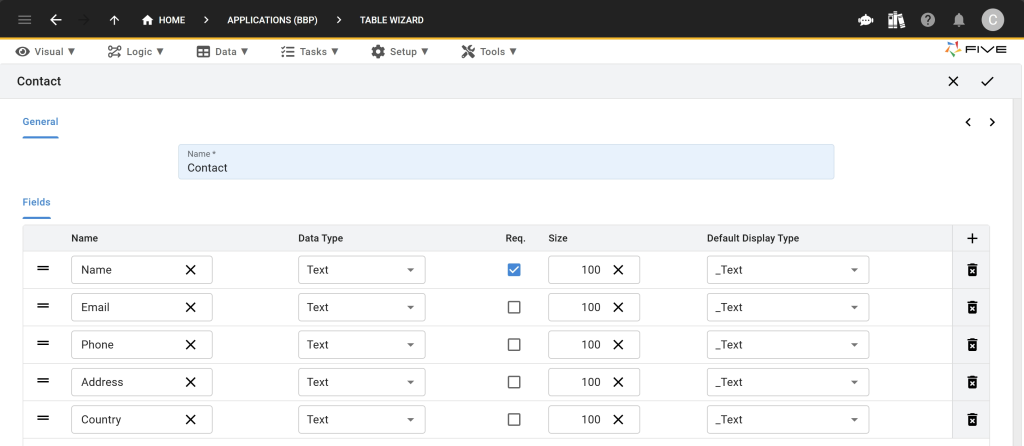
The Contact Table
4.5. Repeat steps 4.2 – 4.4 for the Contact table. Add five fields to your table: Name, Email, Phone, Address, and Country. Here is what your Contact table should look like.
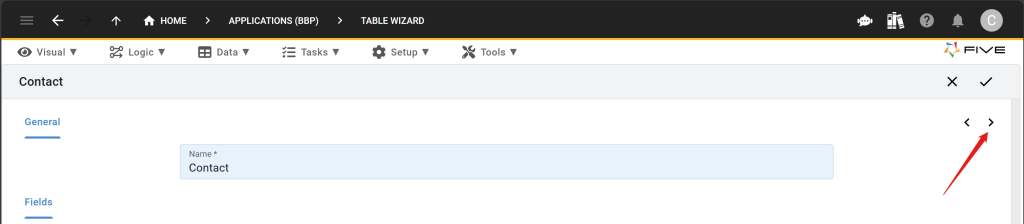
4.6. Do not click on Save yet. Instead, click the small Next arrow > that is pointing to the right, as shown here:
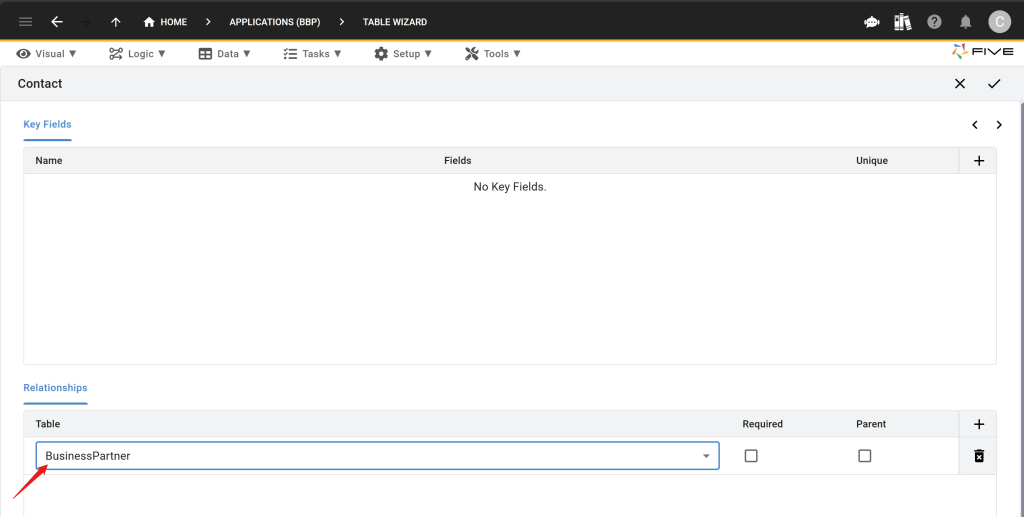
4.7. We will now create a relationship between the BusinessPartner table and the Contact table. To do so, select the BusinessPartner table in relationships here:
4.8. Click the Tick ✔️ icon to save the Contact table. A Table Upgrade pop-up will appear. You can safely ignore this and click Save.
The Timesheet Table
Last, let’s create the Timesheet table.
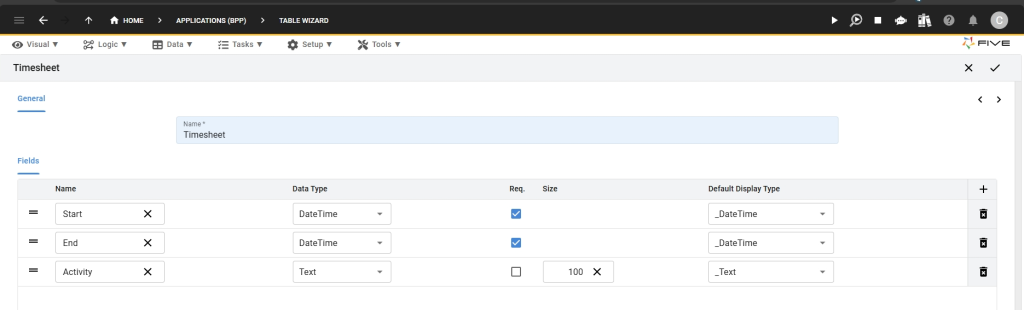
4.9. Repeat steps 4.2 – 4.4 for the Timesheet table. Add three fields to your table: Start, End, Activity. Here is what your Contact table should look like.
4.10. Do not click on Save yet. Instead, click the small Next arrow > that is pointing to the right.
4.11. Select the BusinessPartner table in relationships.
4.12. Click the Tick ✔️ icon to save the Timesheet table. A Table Upgrade pop-up will appear. You can safely ignore this and click Save.
Step 5: Data > The Database Modeler
5.1. To check whether your database is set up correctly, click on Data > Database Modeler.
5.2. Here is what your database should look like (drag and drop your tables to get a visual Entity-Relationship-Diagram that looks exactly like Image 5.1.)
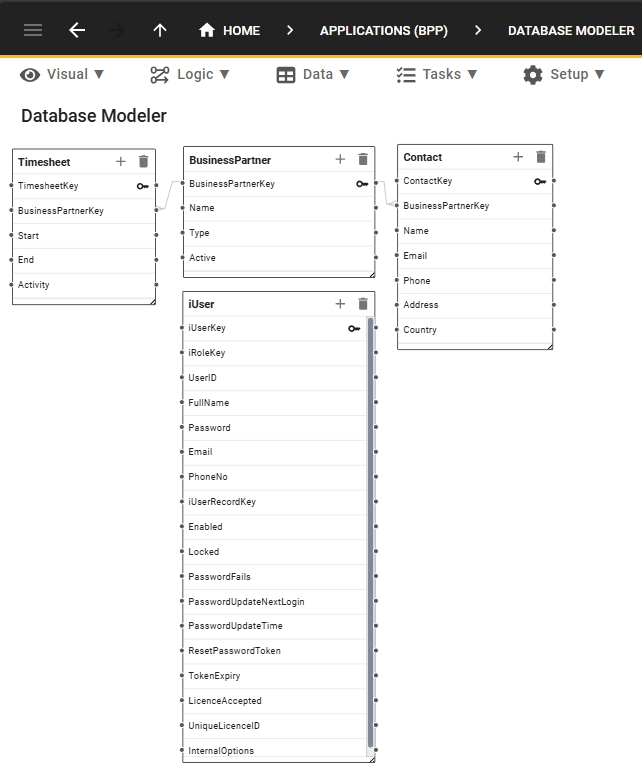
Checkpoint: Is Your Database Setup Correctly?
Make sure your database looks exactly as shown in the database modeler. The database is our application’s foundation. Mistakes in the database definition are likely to create errors in our further development.
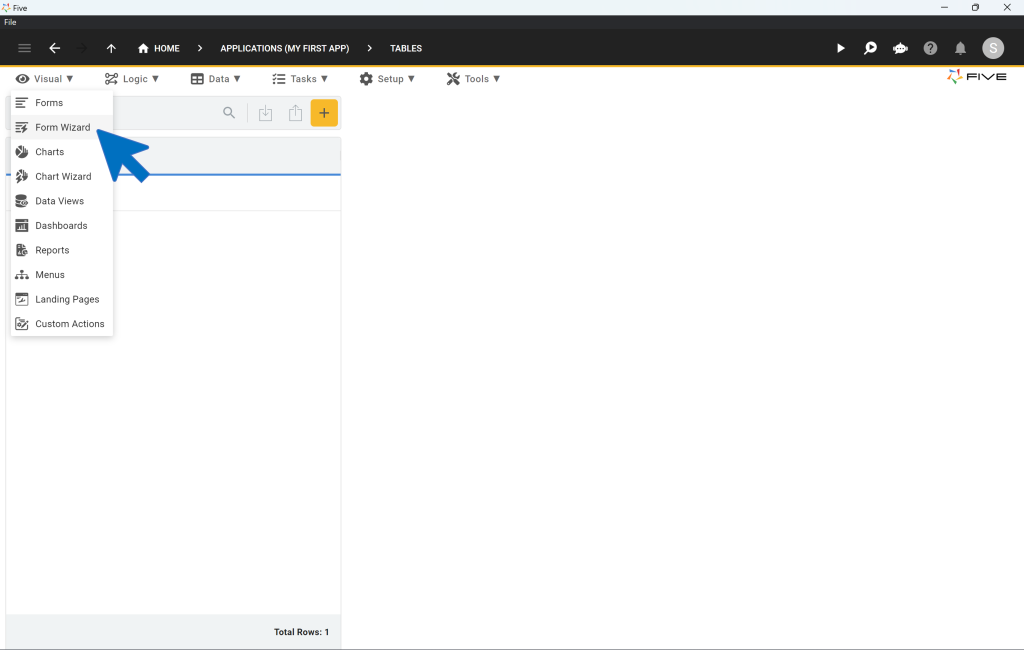
Step 6: Visual > Form Wizard: Creating Forms
Now, let’s develop forms for our user interface. These forms connect to the database tables that we have just created.
6.1. To create forms, click on Visual > Form Wizard.
Creating the Business Partner Form
6.2. In the Main Data Source field of the Form Wizard, select Business Partner.
6.3. In the Caption field inside the Menu section of the Form Wizard, add a space between “Business” and “Partners”.
6.3. Click on the Tick ✔️ icon to save.
Creating the Contact Form
6.4. Next, select Contact in the Main Data Source field of the Form Wizard.
6.5. Click the small Next arrow > that is pointing to the right.
6.6. Tick the List box ☑️ for the Name field, as shown here:
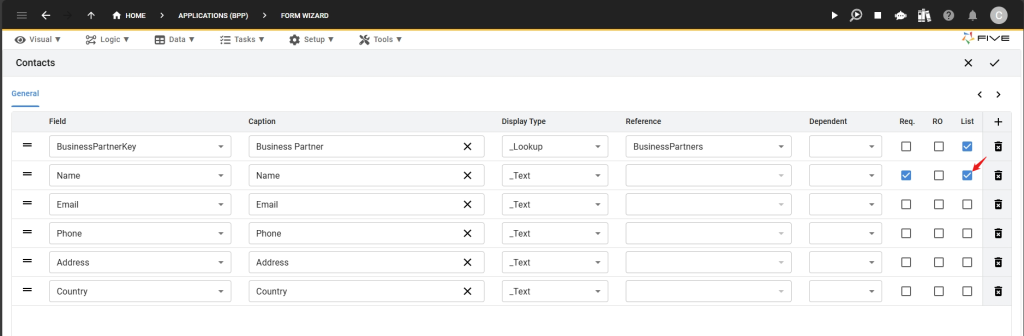
6.7. Click the Tick ✔️ icon to save.
Creating the Timesheet Form
6.8. Now select Timesheet in the Main Data Source field of the Form Wizard.
6.9. Click the small Next arrow > that is pointing to the right.
6.10. Tick the List box ☑️ for the Start and End fields, as shown here:

6.11. Click on the Tick ✔️ icon to save.
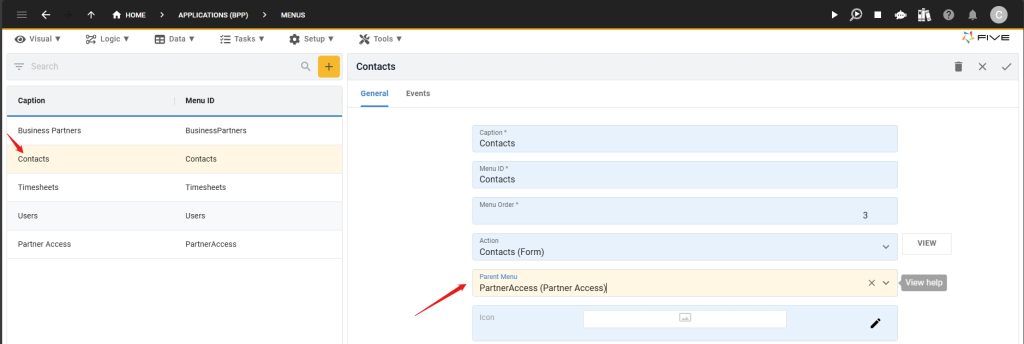
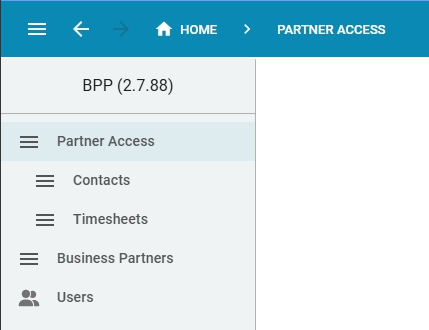
Step 7: Visual > Menus: Creating The Menu Structure
7.1. Go to Visual > Menus
7.2. Click the yellow Plus icon.
7.3. Write Partner Access into the Caption field.
7.4. Click on the Tick ✔️ icon to save.
7.5. Next, select the Contacts menu and select PartnerAccess (Partner Access) in the Parent Menu dropdown box. Click on the Tick ✔️ icon to save.
7.6. Repeat the same steps for the Timesheets menu, selecting PartnerAccess as its parent menu. Click on the Tick ✔️ icon to save.
Checkpoint: Checking Your Menu Structure
Run the application and confirm that the forms and menu structure are set up correctly. Here is what your application should look like:
We will also use this checkpoint to fill in some dummy data.
First, click on Business Partners, and add a business partner to your database. To do so, click the yellow Plus ➕ icon and fill in the fields. Here’s an example.
Now, let’s also fill in contact and timesheet data. Click on the respective menu items and provide some dummy data.
Now, that you are familiar with the UI and its workings, let’s continue developing.
Step 8: Creating User Roles
8.1. Go back into the development environment, and go to Setup > Roles.
8.2. Next, click the yellow Plus icon.
8.3. In the Name field, type Business Partner Role.
8.4. Fill in the remaining fields as shown here:
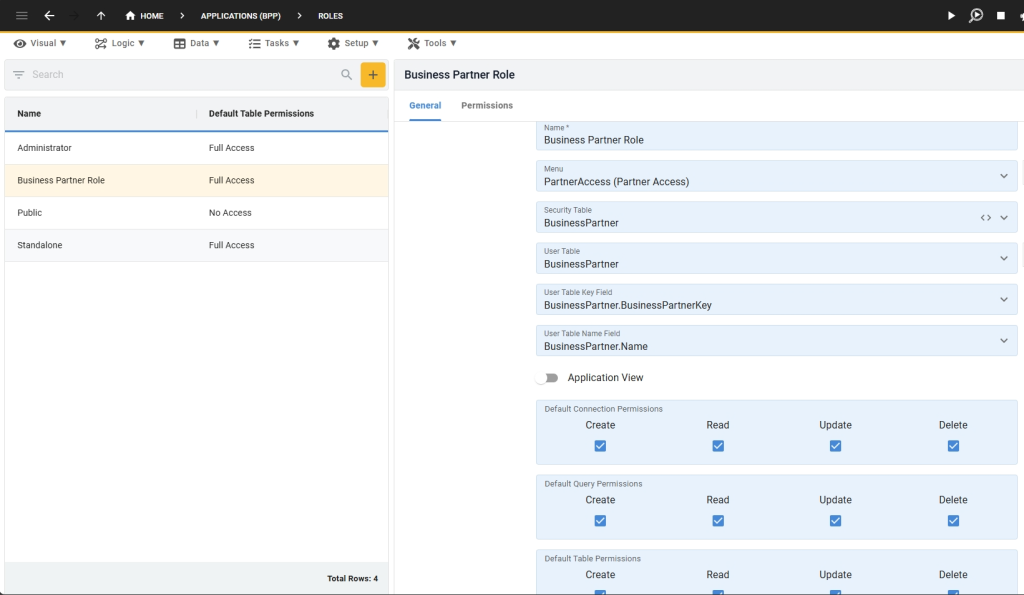
8.5. Towards the bottom of the page, make sure to select Create, Read, Update, and Delete permission for all three levels: Connection, Query, and Table.
8.6. Click on the Tick ✔️ icon to save.
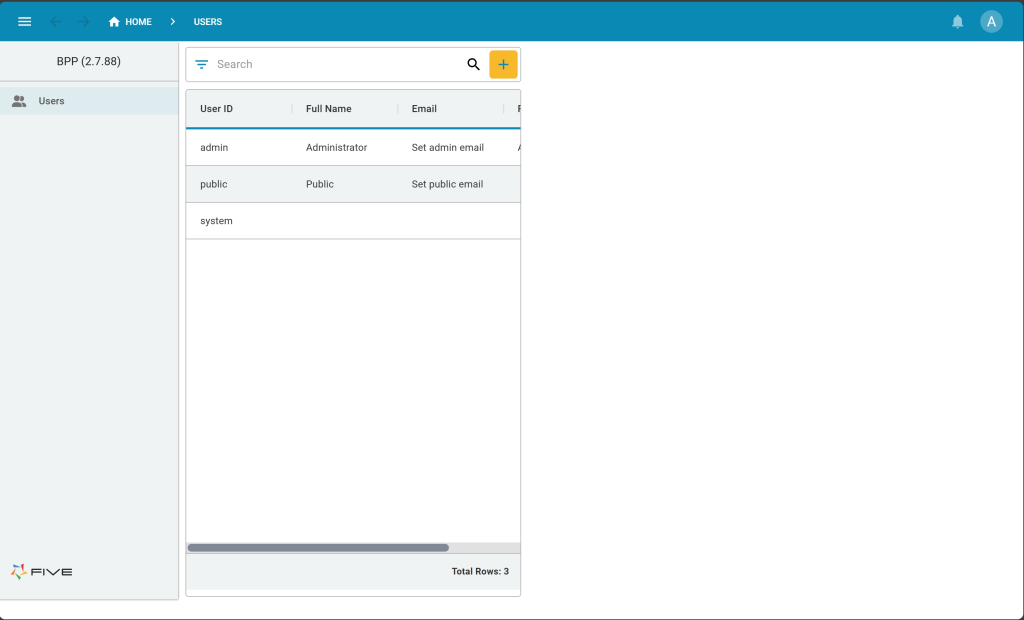
Checkpoint: Are Your User Roles Setup Correctly?
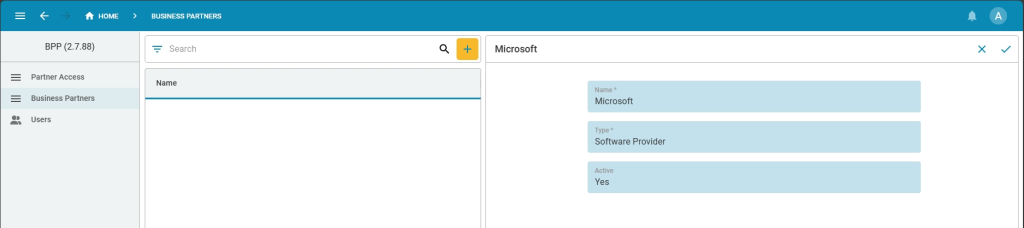
Launch the app again, log in with your admin account, and click on Users. Create a new user by clicking the yellow plus button, and filling in the details as shown here.
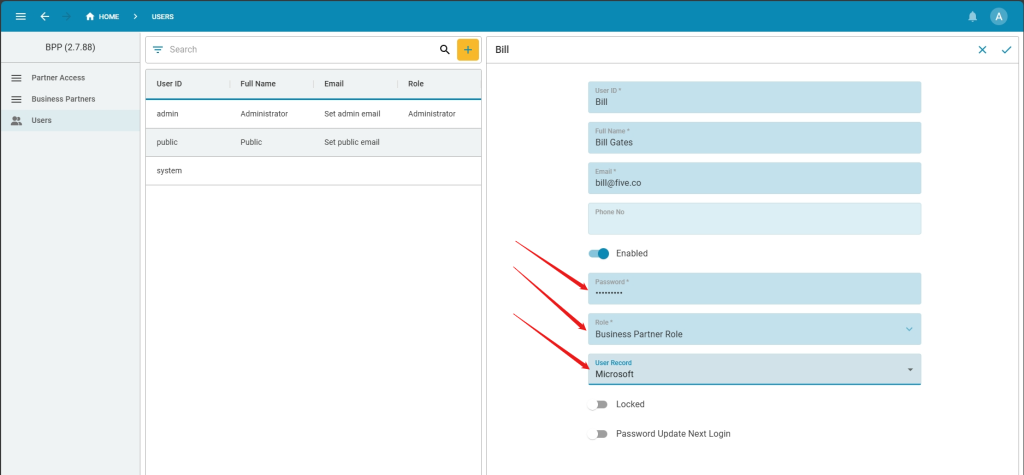
You might be wondering what exactly we are doing here. To explain, in the previous step, we first created a new user role for our business partners. Now we want to assign this role to our first business partner, in our case Microsoft.
Once the role has been assigned, Bill from Microsoft will be able to access the application using his login credentials. As Microsoft is only supposed to edit their data, and no one else’s, we select the Business Partner Role in the Role field, and Microsoft as the user record. This associates user Bill with the data of Microsoft.
Now, let’s test this account. Log out as an admin. To do so, click on the circle that contains an A in the top-right corner and click logout. Login with the newly created user.
Let’s compare the admin and Bill’s access. Shown below is a side-by-side comparison. On the left, is the admin’s UI. On the right is Bill’s UI.
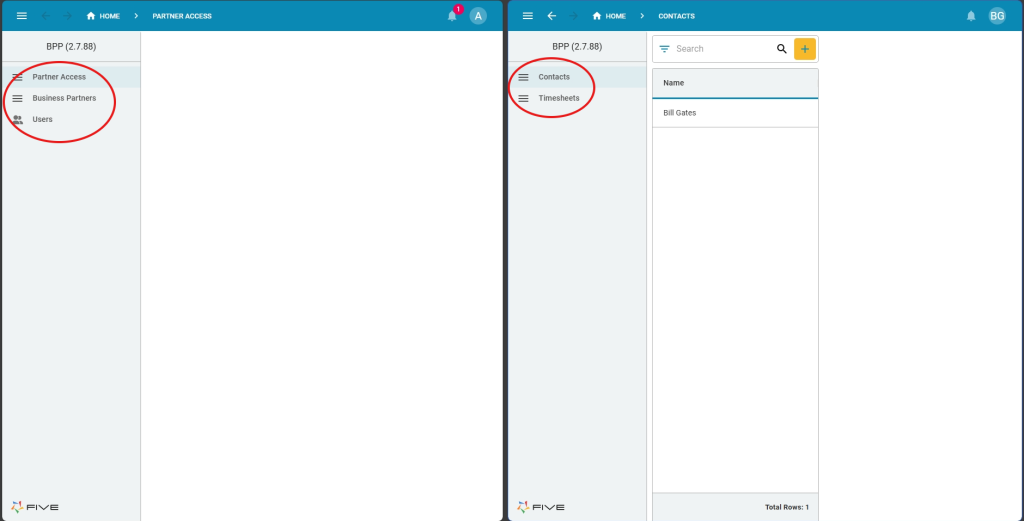
The difference is that the admin has three menu items: Partner Access, Business Partners, and Users. Our user Bill, on the other hand, only has access to Contact and Timesheets. Bill can only work on information about Microsoft, whereas the admin can see, create, update, or delete all business partners and their records.
You have now learned how to create a simple app with forms that business partners can use to update data.
Next up, we would like to give each of our business partners a chart that shows the monthly hours they have delivered to us.
Step 9: Data > Queries: Creating a Timesheet Query
9.1. Back in the development environment, go to Data > Queries.
9.2. Click the yellow Plus ➕ icon.
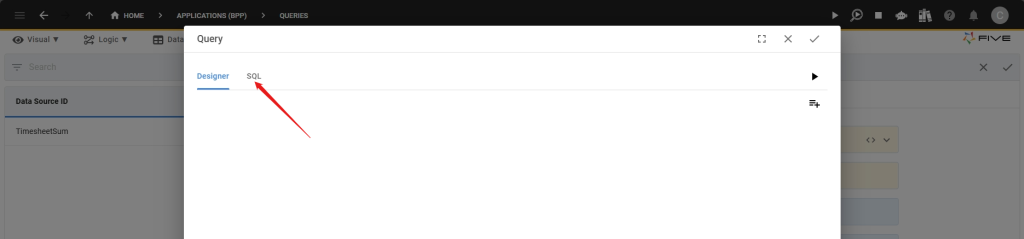
9.3. Fill in the field Data Source ID with TimesheetSummary.
9.4. Click the Query field, which says Click to add.
9.5. Next, click SQL, as shown here:
9.6. Paste this SQL statement into the SQL code editor.
SELECT
  `BusinessPartner`.`Name`,
  MONTH(`Timesheet`.`Start`) AS 'Month',
  SUM(TIMESTAMPDIFF(HOUR, `Timesheet`.`Start`, `Timesheet`.`End`)) AS 'TotalHours'
FROM
  `BusinessPartner`
  INNER JOIN `Timesheet` ON (
    `Timesheet`.`BusinessPartnerKey` = `BusinessPartner`.`BusinessPartnerKey`
  )
WHERE  `BusinessPartner`.`BusinessPartnerKey` =  ?
GROUP BY
  `BusinessPartner`.`Name`,
  `Month`
ORDER BY
  `Month`
If you are unfamiliar with SQL, this might look a little intimidating. However, take a moment to read the statement and you will discover that it is simple. We select each business partner and calculate the hours they deliver to us every month. For a more in-depth interpretation of this SQL query, paste it into ChatGPT and prompt it for analysis.
9.7. Click the Tick ✔️ icon to save.
9.8. Next, click on Parameters, and Plus to add a new parameter.
9.9. Fill in the fields. For ParameterID write BusinessPartnerKey, for ParameterType choose Expression, and for Parameter write {{five.stack.BusinessPartner.BusinessPartnerKey}}

9.10. Click the Tick ✔️ icons (there are two) to save the parameter and the query.
Explainer: Queries with Parameters
We just added a query to our application. A query lets us ask a question about our data, such as “How many hours does each business partner deliver per month?”. Using SQL, we can pose this question to our database, and the database returns an answer.
Since we only want each business partner to see their hours, we also add a parameter to our query. Inside the SQL statement, line 10 contains a WHERE clause:
WHERE BusinessPartner.BusinessPartnerKey = ?
This WHERE clause ensures that the query dynamically adjusts to each business partner, as the question mark is replaced by the parameter.
Now, let’s put this query to work by creating a chart on it.
Step 10: Visual > Charts: Adding a Chart
10.1. Go to Visual > Chart Wizard.
10.2. Fill in the required fields of the Chart Wizard, as shown here:
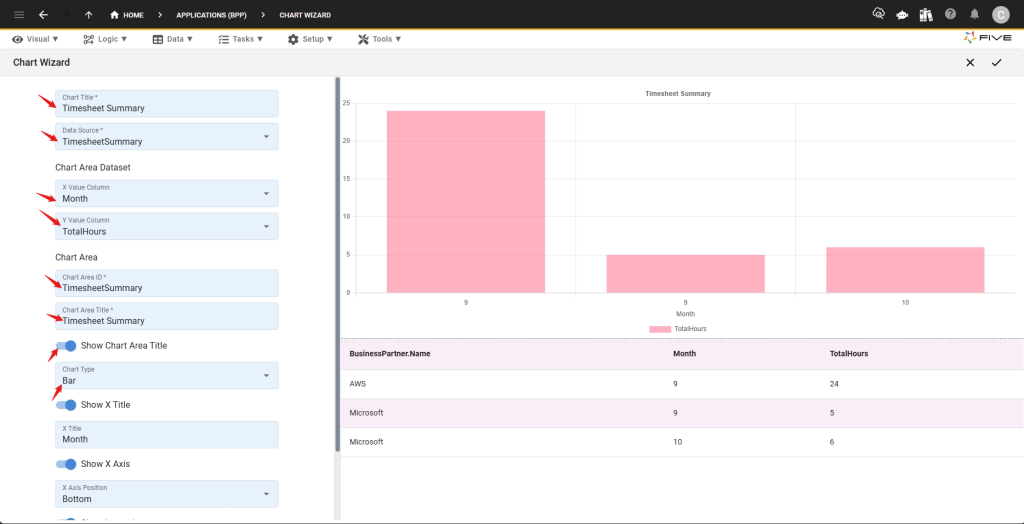
In our chart, we are mapping months on the X-axis against hours spent on the Y-axis. Five comes with library of prebuilt charts. For our purposes, we are using a bar chart.
10.3. Click the Tick ✔️ icon to save
Step 11: Visual > Menus: Adding the Chart to The Application
Now let’s add the chart to our app.
11.1. Go to Visual > Menus.
11.2. Click the Plus ➕ icon.
11.3. Fill in the required fields for a new menu item, as shown here:
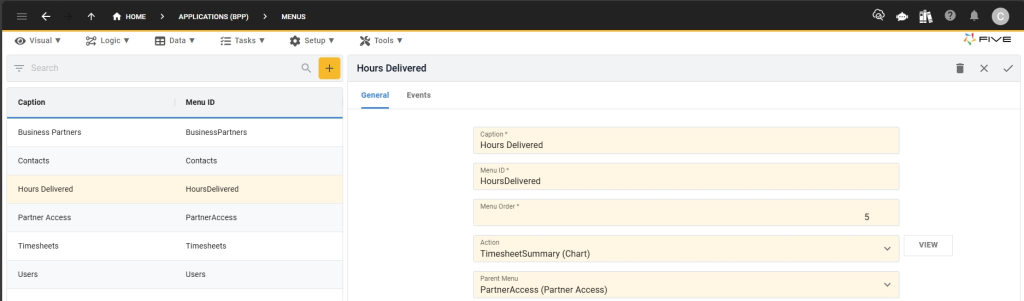
11.4. Click the Tick ✔️ icon to save.
Checkpoint: Launch Your App
Let’s launch our app again. Log in as a business partner. You should now have three menu items in your business partner app: Contacts, Timesheets, and Hours Delivered. Click on Hours Delivered to view your bar chart inside the application.
If your chart is not displaying any data or only one bar, make sure to add more timesheet data. Once you have timesheets for several months, the chart will contain more bars (one for each month).
By default, the bar chart occupies the entire screen. We could easily change this and add more than one chart to one page, turning this into a proper dashboard.
Step 12: Visual > Forms: Display Types
We will continue building our app by adding a few smaller features. These features are optional and you don’t have to follow along.
12.1. Go to Visual > Forms and select your BusinessPartners form.
12.2. Click Pages, and then General.
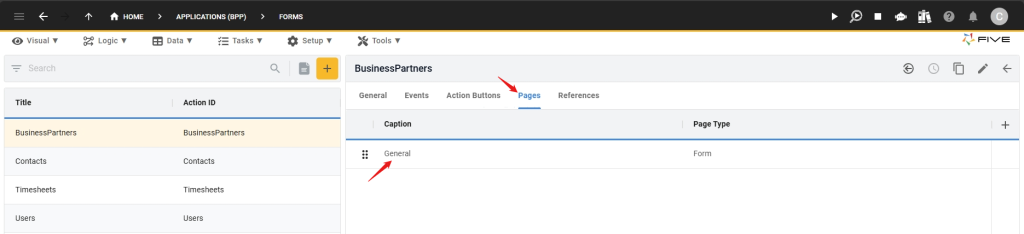
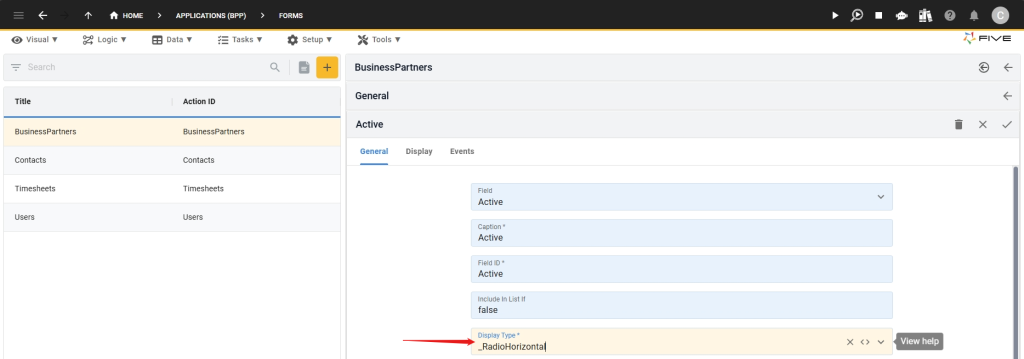
12.3. Now click Fields, and click the Active field.
12.4. Change the Display Type field from _Text to _RadioHorizontal.
12.5. Scroll down to the Field Data field and click on it. A pop-up asking for key-value pairs appears. Fill it in as shown here:
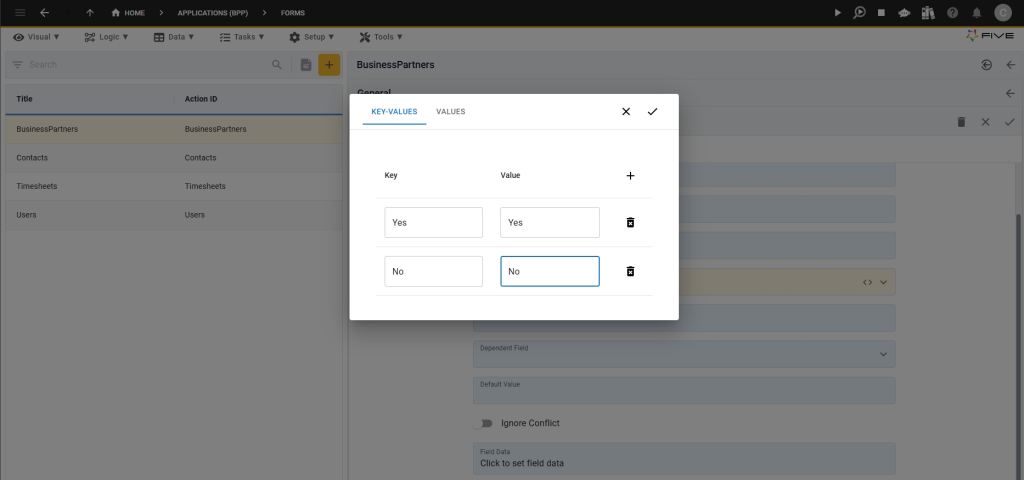
12.6. Click the Tick ✔️ icon to save the key-value pair, and the Tick icons in the top right to save all changes.
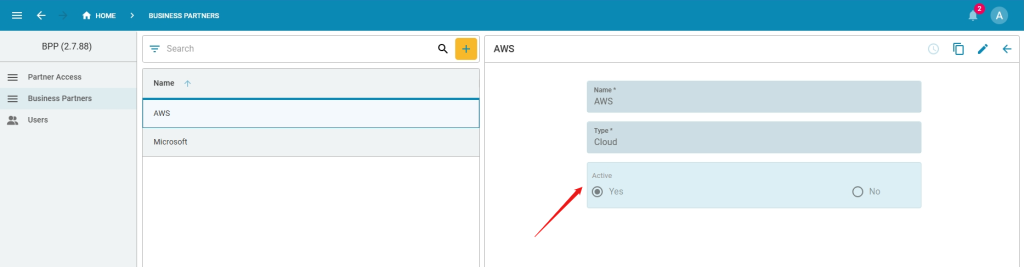
This change will affect the appearance of your business partner form. The “Active” field will now be shown as a radio button:
To make further adjustments to your form, you can use Five’s Form Designer, which lets you adjust the width and order of your fields, you can set fields to read-only, or make them dynamically appear or disappear based on pre-defined conditions. You can also create custom display types, using Regular Expressions, for example or create error messages for invalid inputs.
Forms, fields and display types are highly flexible in Five, and we are just scratching the surface in this tutorial.
Click the Plus ➕ icon.
Click the Tick ✔️ icon to save
Congratulations: Developing a Business Partner Portal
Congratulations on making it this far: you have developed your first app in Five. As a quick recap: we have created a database, forms, user roles, a SQL query, and a chart to our app.
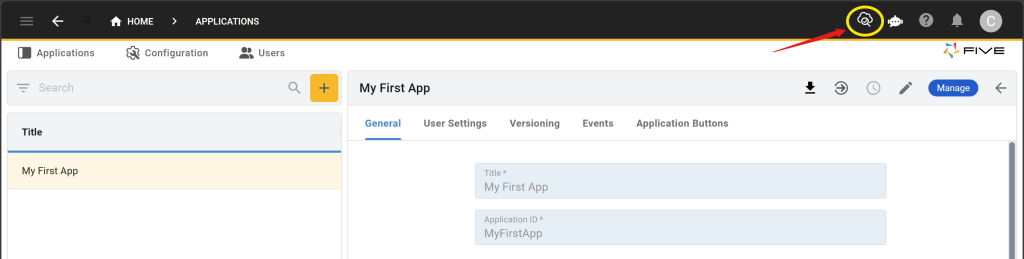
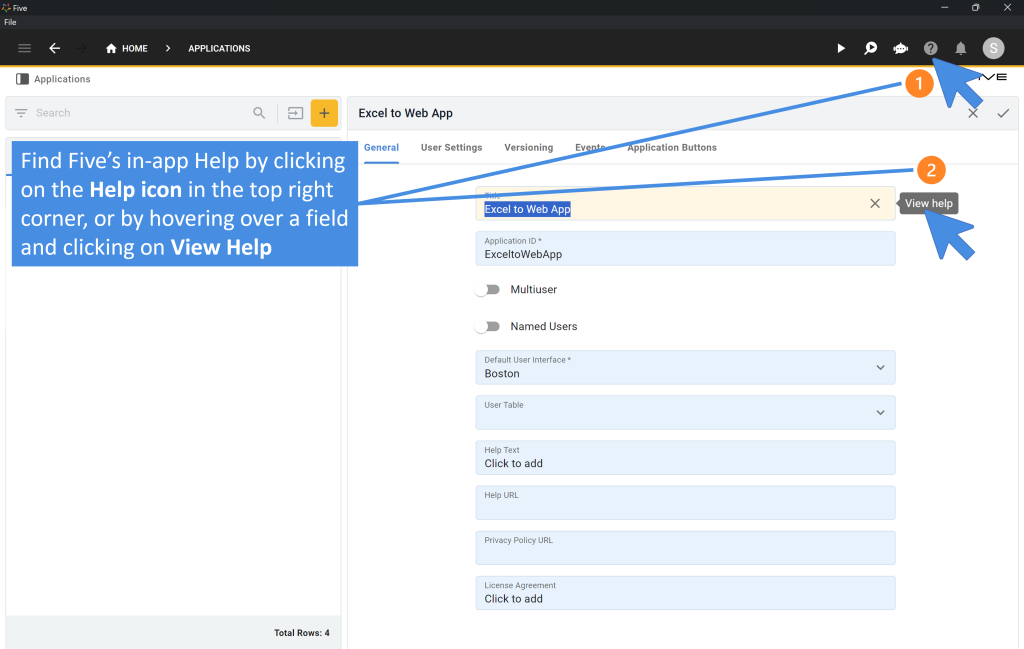
Finding Help in Five
In case you get stuck during the development process, we’re here to help! Continue developing your application by accessing these resources:
- Five’s User Community: Visit https://five.org to ask questions or get inspiration from other users.
- Five’s Documentation: Visit help.five.org to access Five’s comprehensive documentation.
Five’s In-App Help
Last, find useful tips for your application development by clicking on Five’s in-app help available in the top right corner or on almost any field.
Get Your App Online For US$29.99 Per Month
Five lets you deploy applications starting from as little as US$29.99 per application and month.