Code-Along: How to Develop a REST API GUI
Hi and welcome to our step-by-step guide on building your first web app with Five.
Follow the steps below to build a responsive web app on a REST API and MySQL database in Five.
Goals and Outcomes: How to Develop a REST API GUI
By the end of this step-by-step guide, we have developed a responsive web app with a MySQL backend and a live connection to the DummyJSON API. The data from the API is shown in our front end on a form. The app further has a button that extracts data from the API and pushes it into our database, so that users can work with or perform CRUD operations on the data from the API.
Before we continue, make sure to sign up for free access to the Five development environment.
Table of Contents
- Goals and Outcomes: How to Develop a REST API GUI
- Get Your REST API GUI Online From US$29.99 Per Month
- Resources and Downloads: How to Build a REST API GUI
- Video: Develop a REST API GUI
- Step 1: Creating a New Application
- Step 2: Running Your Application ▶️
- Step 3: Data > Table Wizard: Creating Database Tables
- Step 4: Data > The Database Modeler
- First Checkpoint: Is Your Database Setup Correctly?
- Step 5: Data > Tables: Importing a CSV
- Step 6: Visual > Form Wizard: Creating Forms
- Step 7: Visual > Forms: Adding a Page to a Form
- Second Checkpoint: Run Your Application
- Step 8: Data > Connection Wizard: Adding an API As a Data Source
- Step 9: Visual > Form Wizard: Creating a Form on the API
- Third Checkpoint: Run Your Application
- Step 10: Logic > Functions: Adding JavaScript Functions to the Application
- Explainer: Understanding the Five API
- Step 11: Visual > Forms: Adding a Button to a Form
- Fourth Checkpoint: Run Your Application
- Finding Help in Five
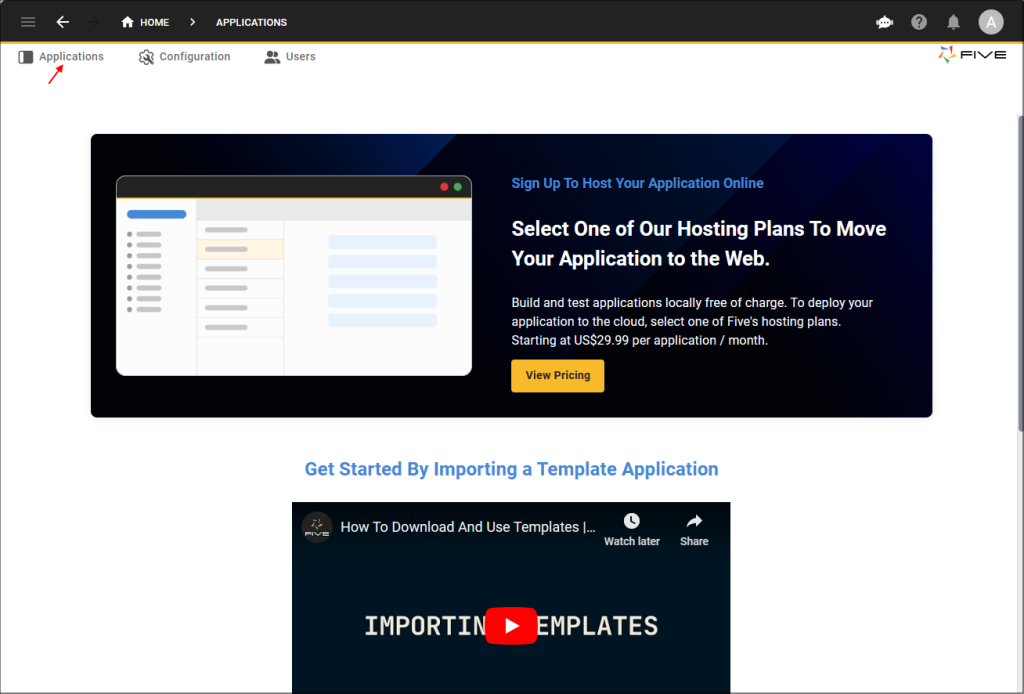
Get Your REST API GUI Online From US$29.99 Per Month
Host Your App Online
Select one of our hosting packages.
Starting from US$29.99 per app and month.
To deploy your application to the web, sign up for one of our paid plans, starting from US$29.99 per month and application.
Resources and Downloads: How to Build a REST API GUI
Download the Finished Application
Download the finished application as a Five Definition File (FDF) and import it into Five. Once imported, run the application by clicking the “Deploy to Development” button, located in the top-right corner of Five.
CSV File
Download the CSV file here.
JavaScript Functions
Download the JavaScript functions here.
Video: Develop a REST API GUI
Follow this video to develop a REST API GUI in Five (fast forward to 9 minutes to skip the introduction):
Step 1: Creating a New Application
1.1. To create a new application in Five, click on Applications.
1.2. Next, click on the yellow Plus icon.
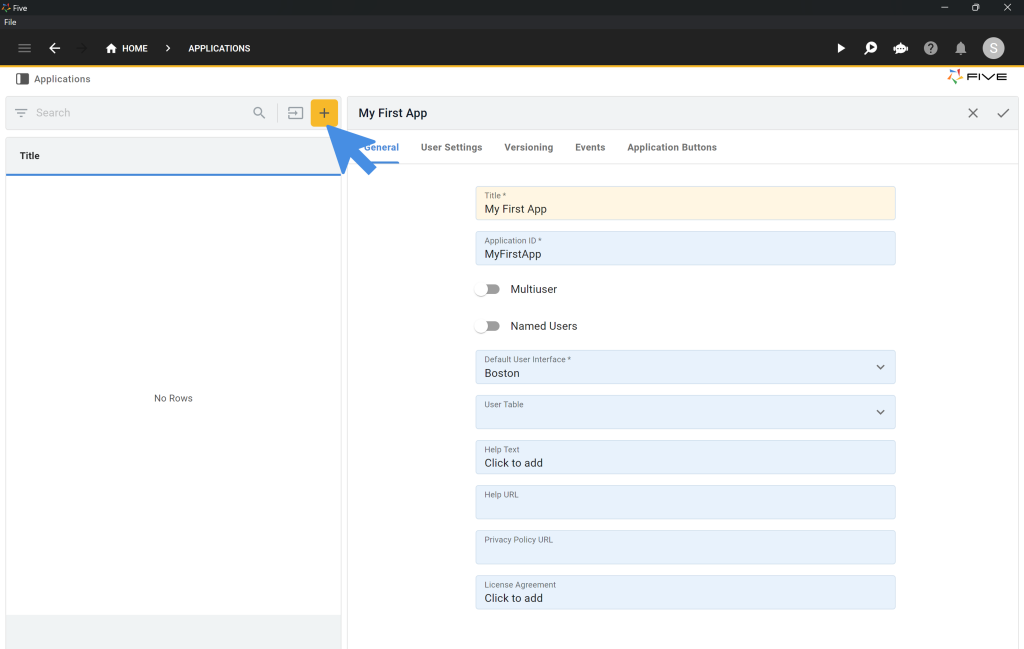
1.3. Type My First App in the Title field.
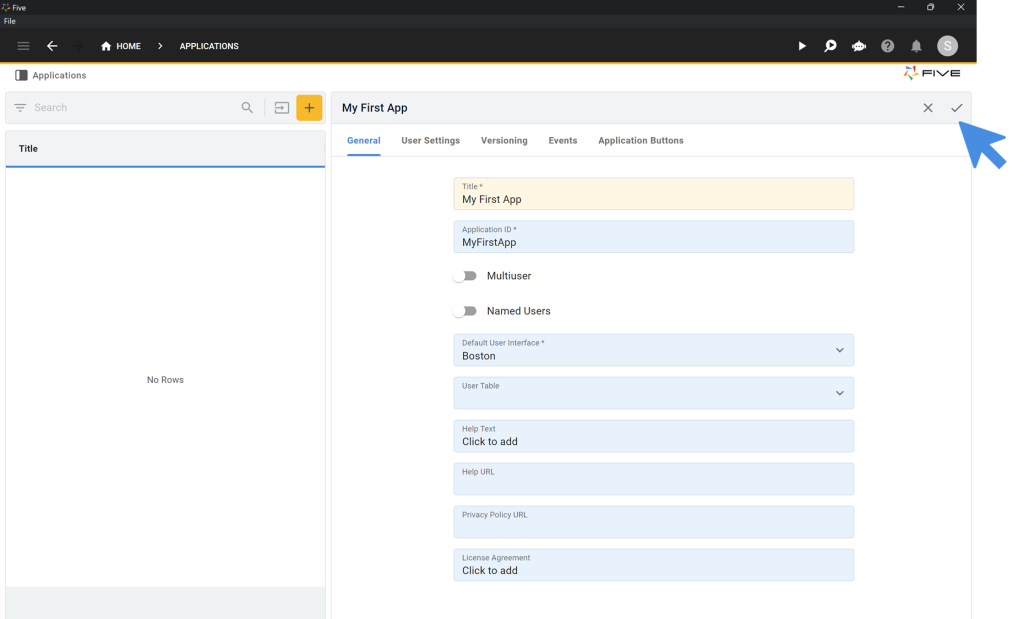
1.4. Click on the Tick ✔️ icon to save.
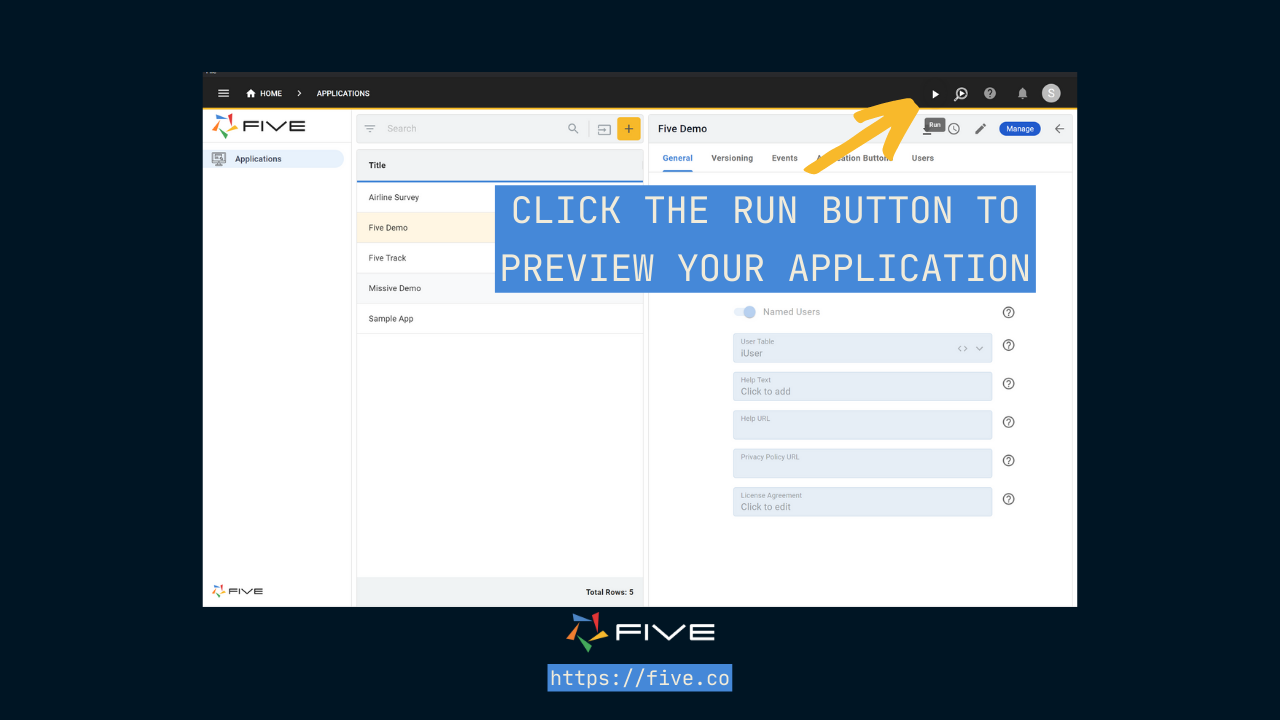
Step 2: Running Your Application ▶️
You can run and preview your application at any time. Click on the Run ▶️ icon in the top right corner. A new window opens up, showing the current state of your application.
Step 3: Data > Table Wizard: Creating Database Tables
Let’s start developing our application.
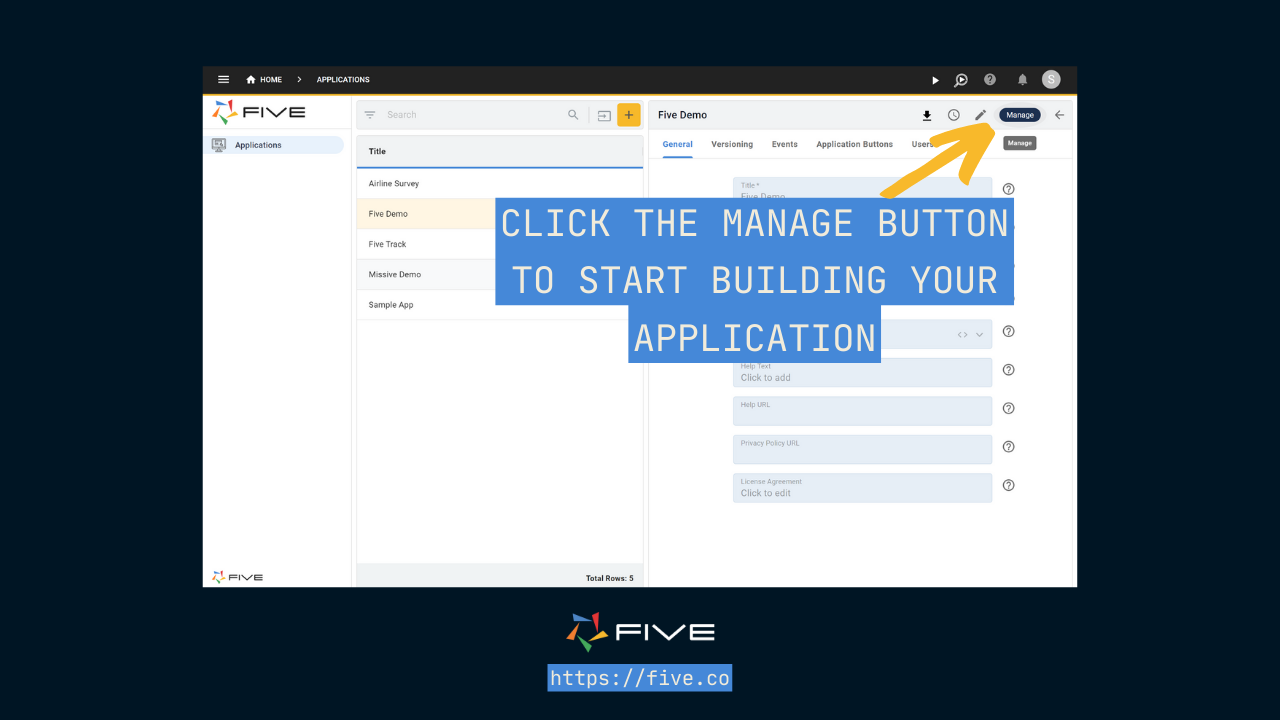
3.1. Click on the blue Manage button.
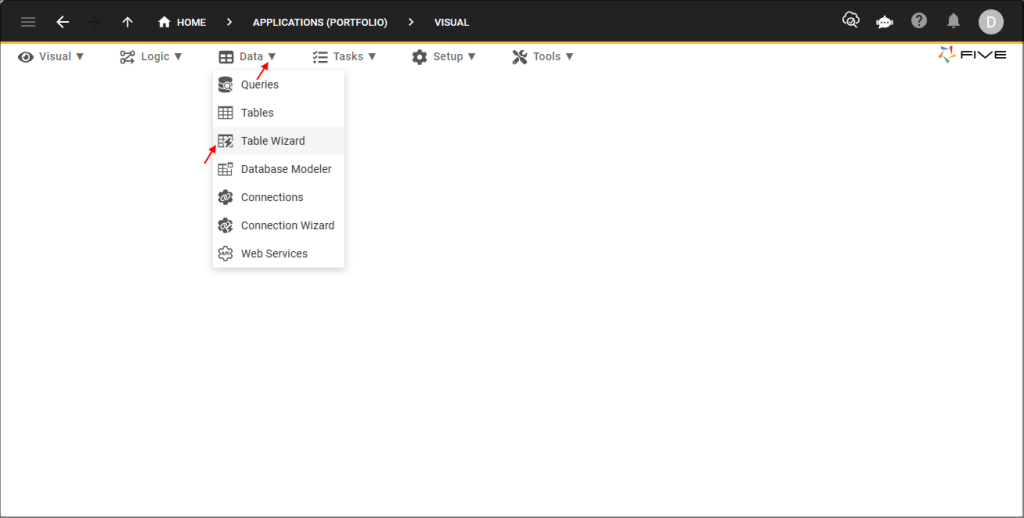
3.2. To add tables to Five’s integrated MySQL database, click on Data > Table Wizard.
We are creating three separate tables: Products, Orders, and ProductOrders.
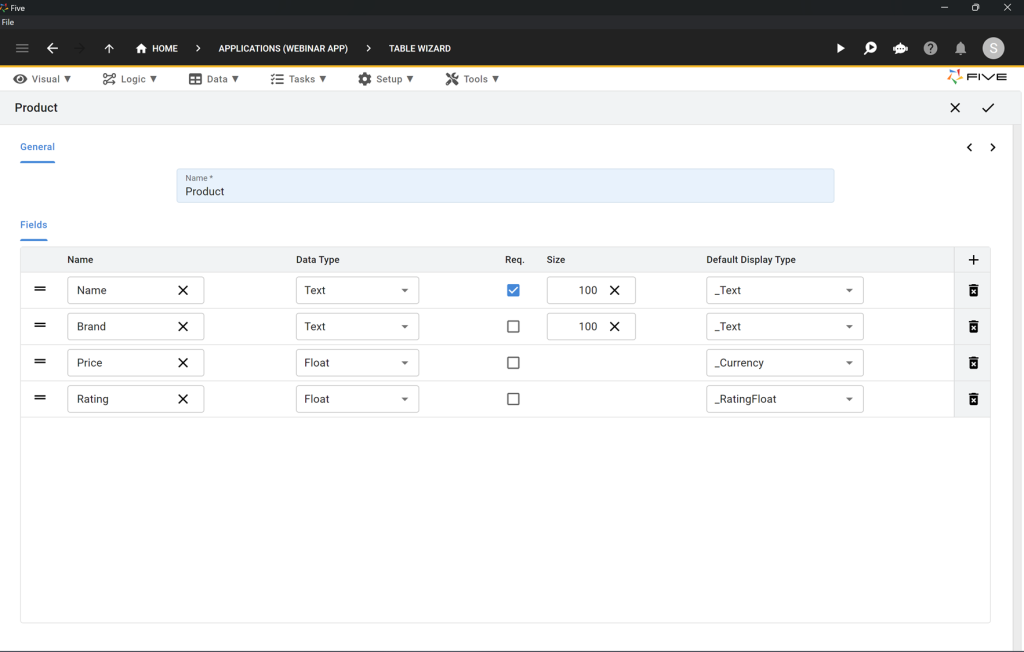
The Product Table
3.3. Here is what your Product table should look like. Make sure to get the Data Type and Display Type for your fields right. To add fields to a table, click on the Plus ➕ icon on the right.
| Name | Data Type | Req. | Size | Default Display Type |
| Name | Text | ✔️ | 100 | _Text |
| Brand | Text | 100 | _Text | |
| Price | Float | _Currency | ||
| Rating | Float | _RatingFloat |
3.4. Once your Product table looks exactly as shown below, click on the Tick ✔️ icon to save.
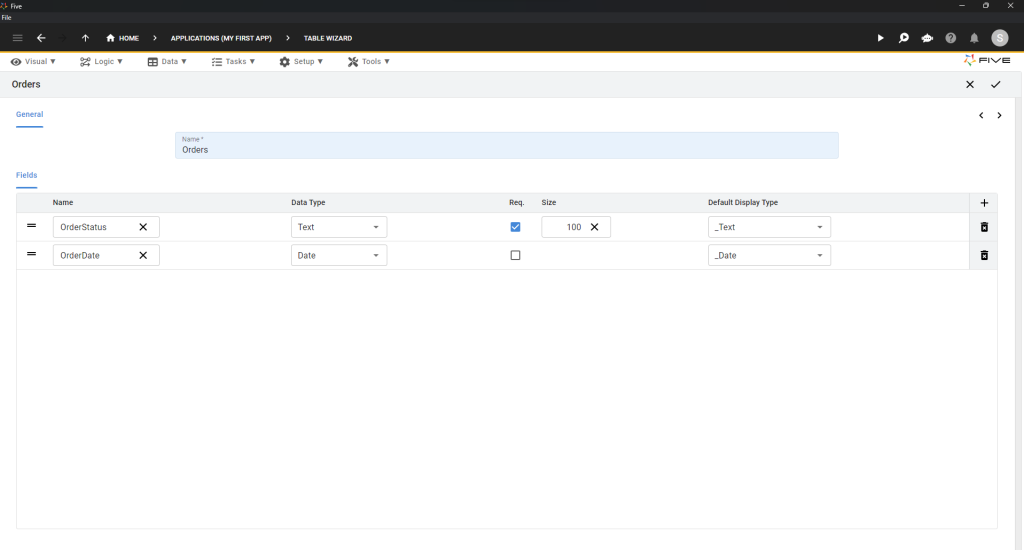
The Orders Table
3.5. Here is what your Orders table should look like.
| Name | Data Type | Req. | Size | Default Display Type |
| OrderStatus | Text | ✔️ | 100 | _Text |
| OrderDate | Date | _Date |
3.6. Once your Orders table looks exactly as shown below, click on the Tick ✔️ icon to save.
The ProductOrders Table
The ProductOrders table is a junction table between our Product and Orders table. It does not contain any fields. It only contains the Foreign Keys of the Product and Orders table.
3.7. To create this table, open up the Table Wizard.
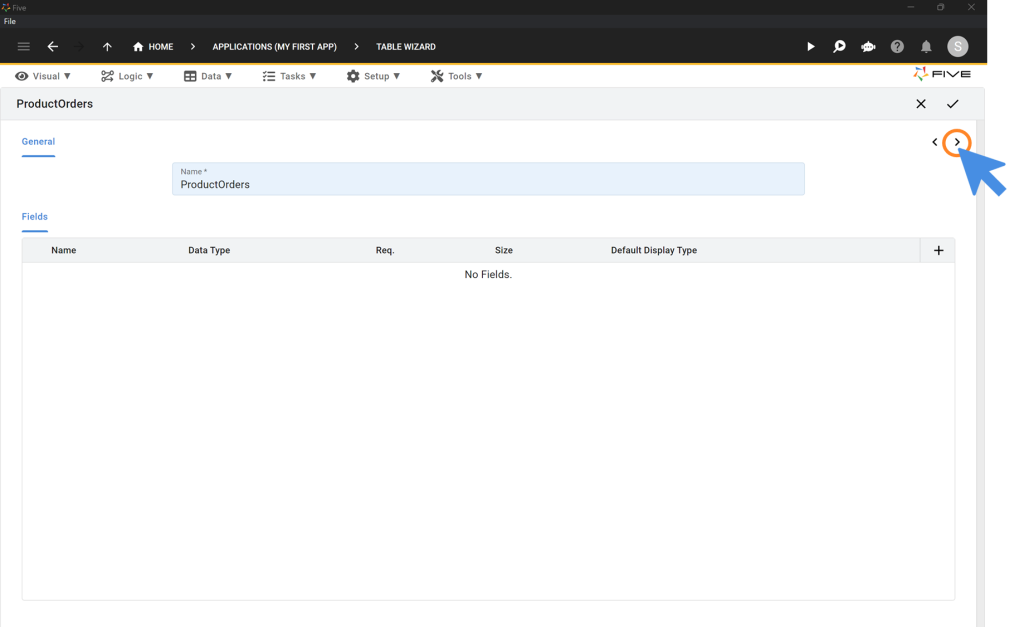
3.8. Type ProductOrders into the Name field.
3.9. Click on the Right Arrow > as shown in this image:
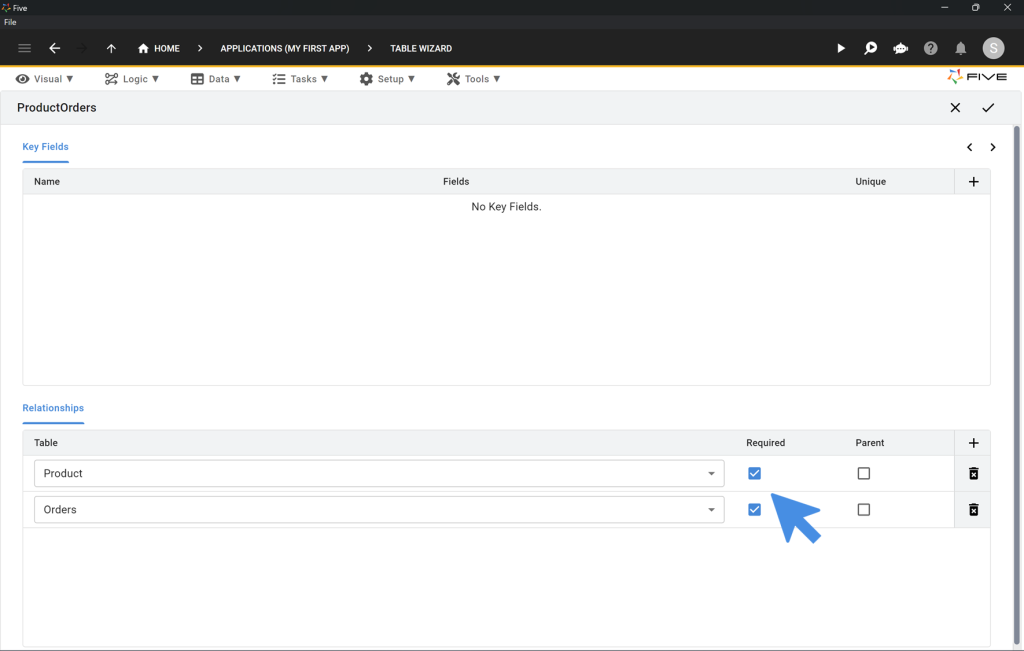
3.10. Click the Plus ➕ icon in the Relationships area at the lower part of the screen.
3.11. Add a relationship to the Product and Orders table and tick the Required box for both. Here is what this should look like.
3.12. Once the relationships are defined exactly as shown below, click on the Tick ✔️ icon to save.
Step 4: Data > The Database Modeler
4.1. To check whether your database is set up correctly, click on Data > Database Modeler
4.2. Here is what your database should look like:
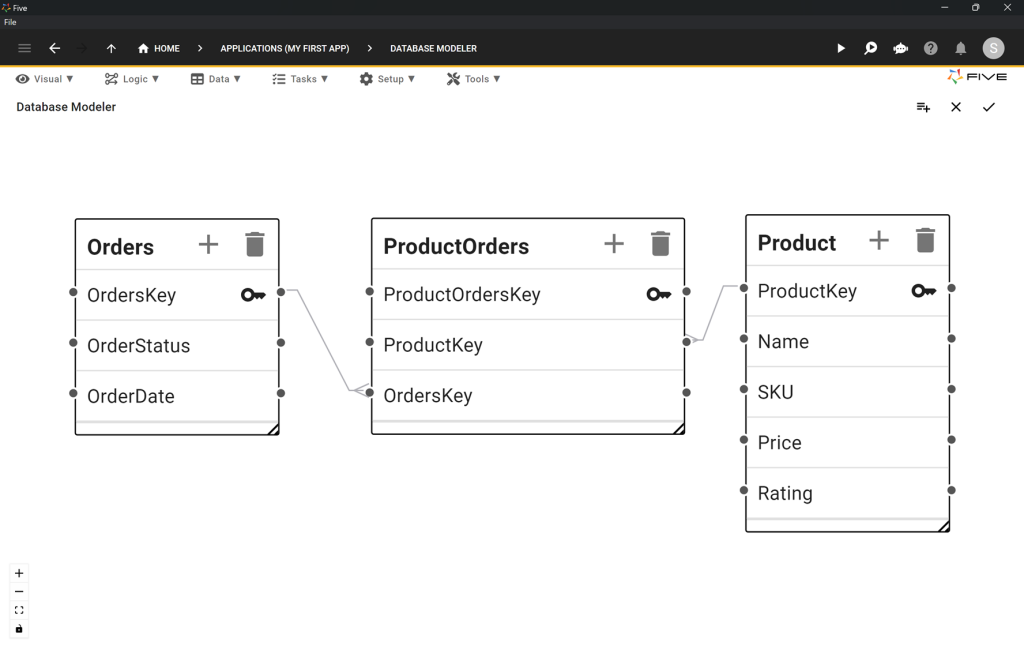
First Checkpoint: Is Your Database Setup Correctly?
Make sure your database looks exactly like the one shown in the database modeler. Our query and report, which will be developed later, refer to the field names shown above.
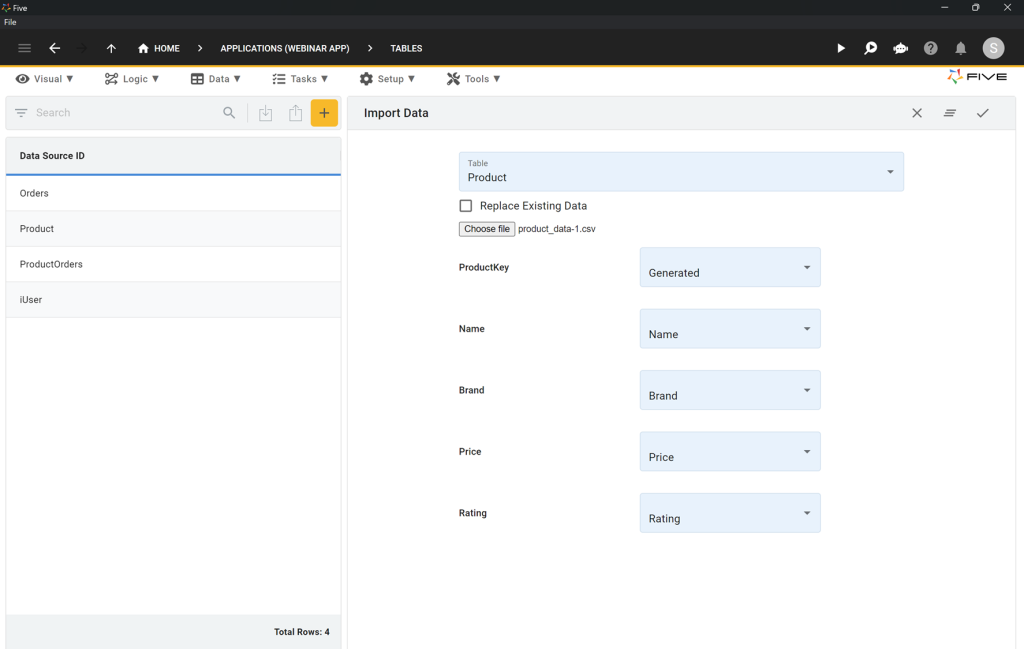
Step 5: Data > Tables: Importing a CSV
5.1. To import a CSV file into your database table, click on Data > Tables.
5.2. Now click on the Import CSV into Table 📥 button.
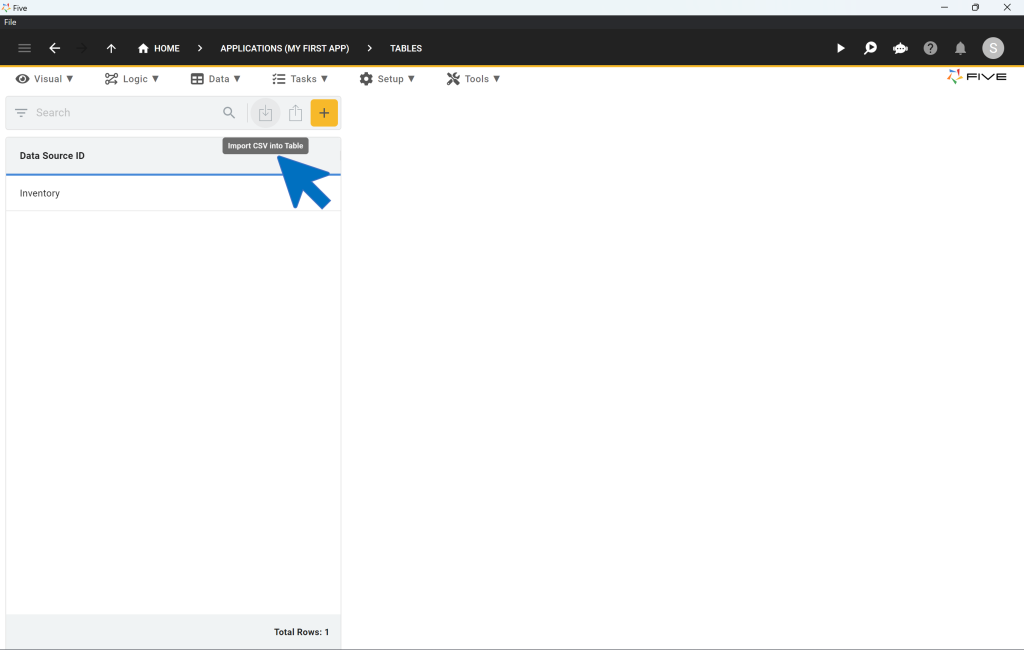
5.3. From the dropdown, select the Product table. This is the table we are importing data into.
5.4. Click on Choose File and select the CSV file.
5.5. For ProductKey select Generated. For all other fields, Five automatically maps the fields of your database to the columns of your CSV file.
Here’s what your CSV import should look like:
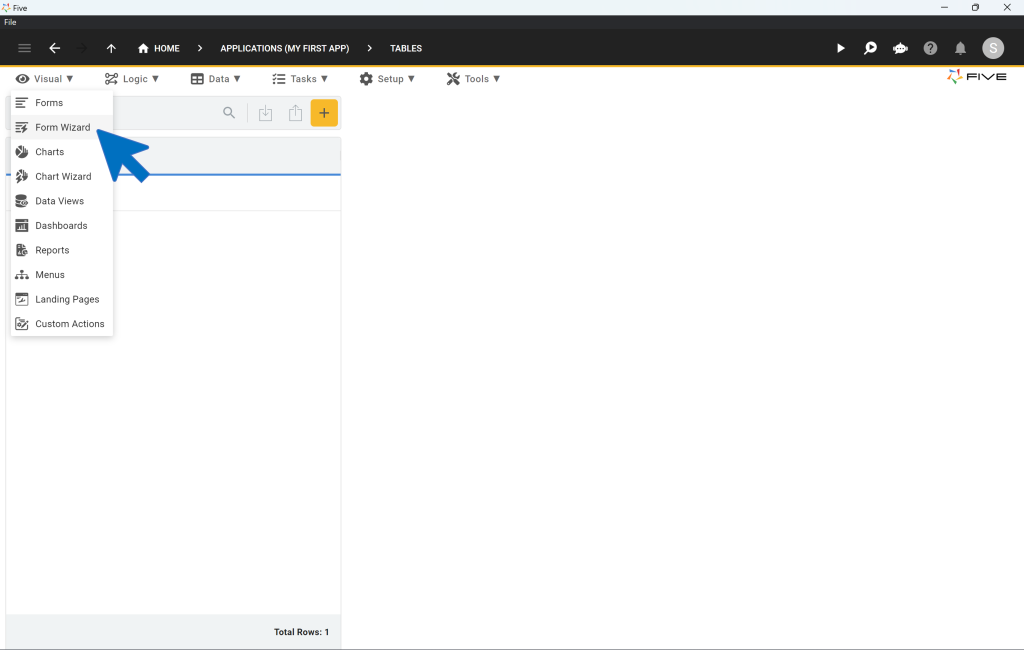
Step 6: Visual > Form Wizard: Creating Forms
6.1. To create forms, click on Visual > Form Wizard.
Create the Product and Orders Form
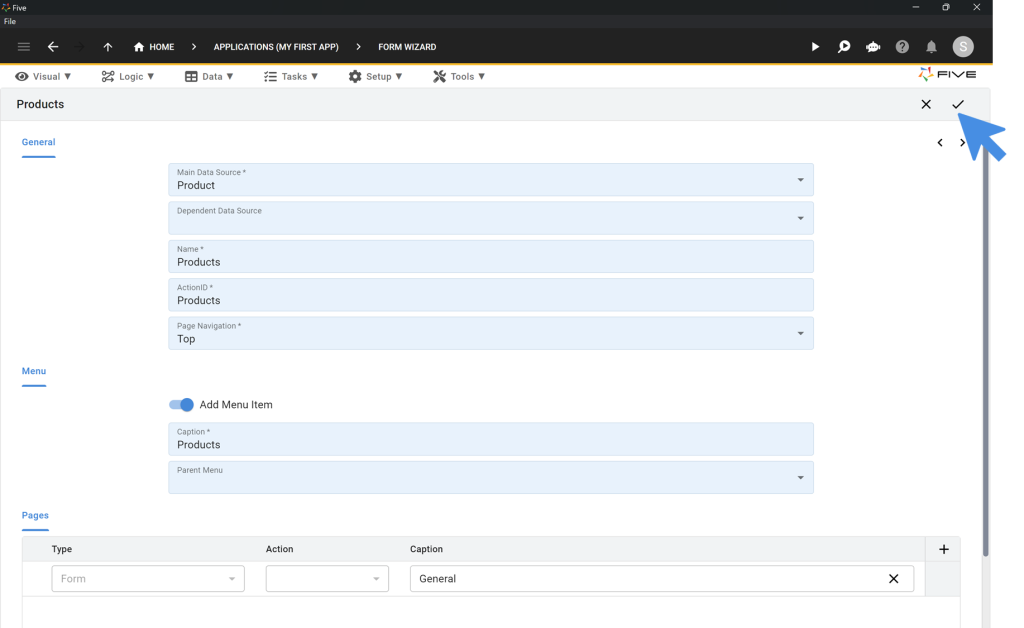
6.2. In the Main Data Source field of the Form Wizard, select Product.
6.3. Click on the Tick ✔️ icon to save.
6.4. After saving your Product form, repeat the steps above for Orders and save again.
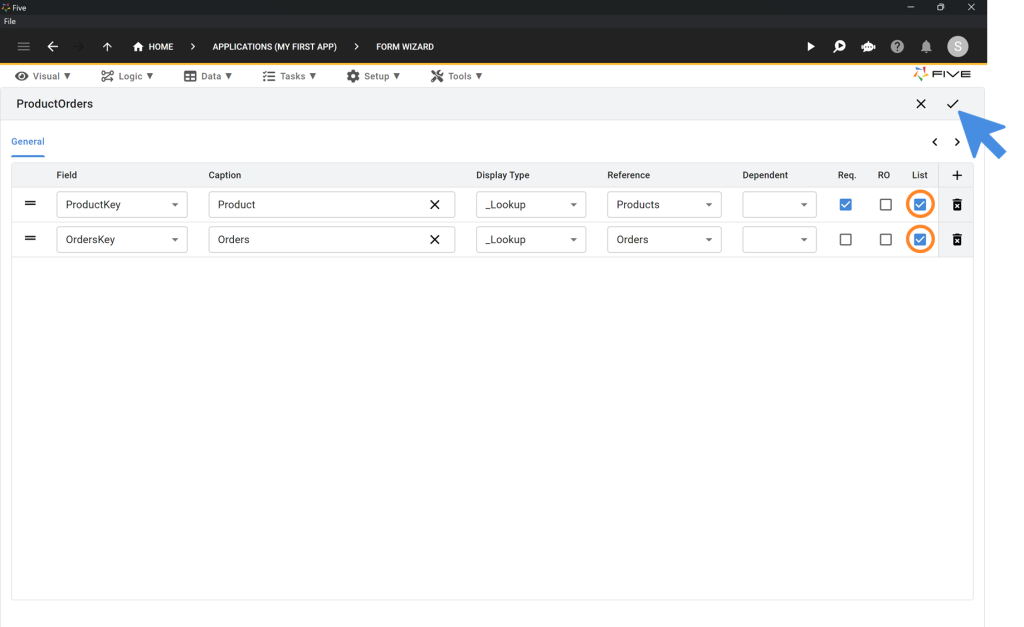
Create the ProductOrders Form
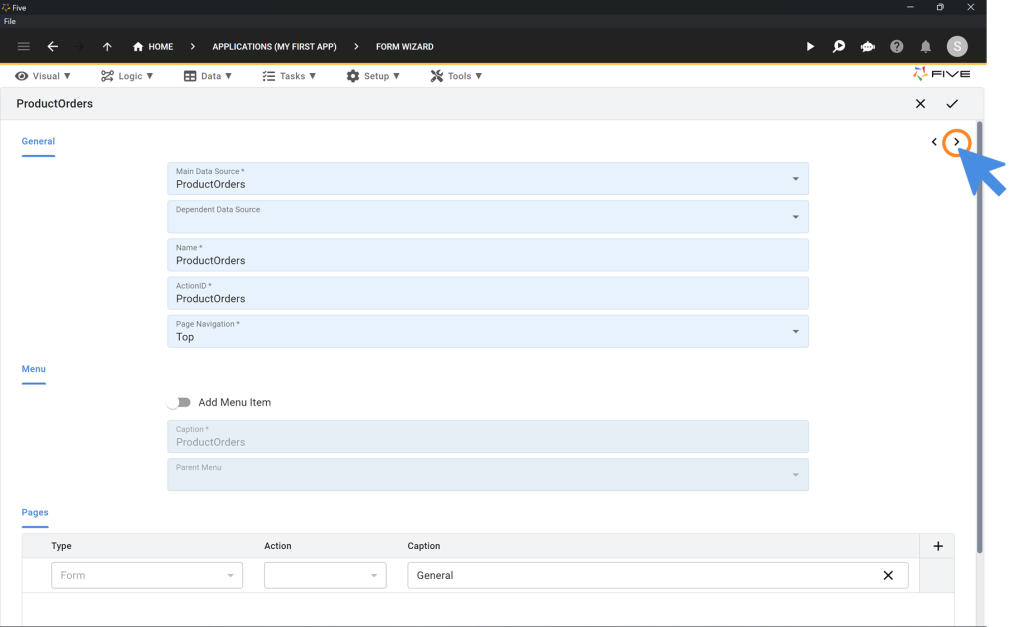
6.5. In the Main Data Source field of the Form Wizard, select ProductOrders.
6.6. Toggle the Add Menu Item to off.
6.7. Click on the Right Arrow > as shown here:
6.8. Tick the Boxes ☑️ for List for both fields: ProductKey and OrdersKey.
6.9. Click on the Tick ✔️ icon to save.
Step 7: Visual > Forms: Adding a Page to a Form
7.1. Click on Visual > Forms
7.2. Select the Orders form from the list on the left.
7.3. Click on Pages.
7.4. Click on the Plus ➕ icon.
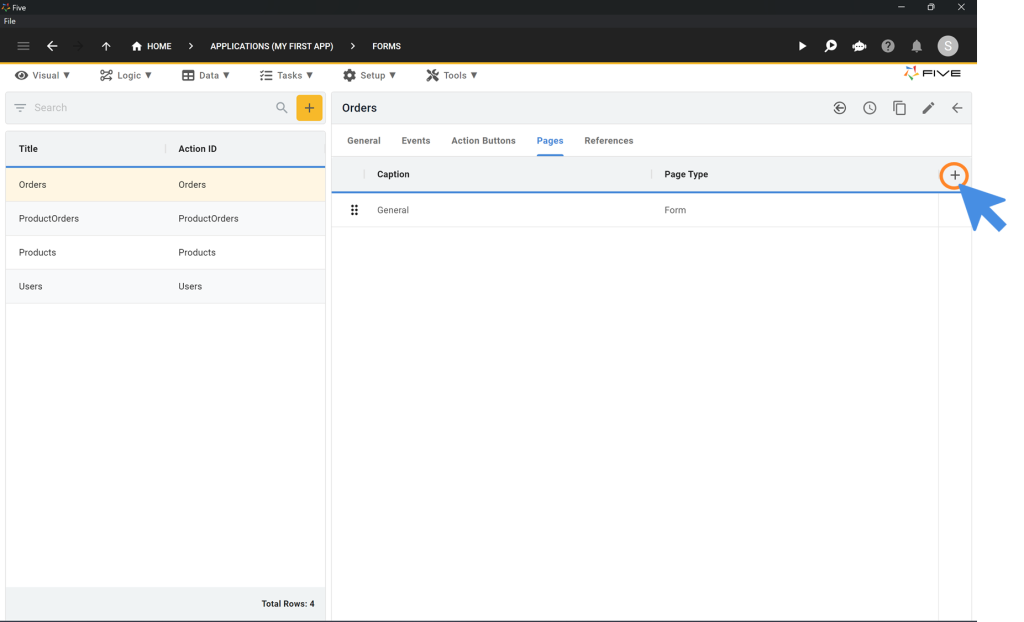
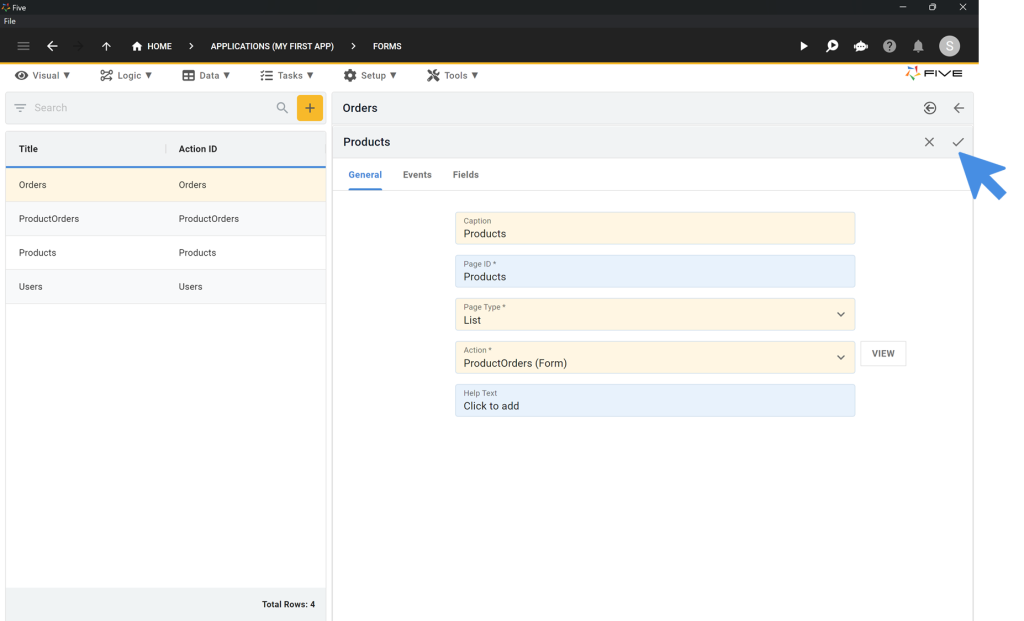
7.5. Change the Page Type to List.
7.6. Type Products in the Caption field.
7.7. Click on the Tick ✔️ icon to save. Here is what your screen should look like before saving:
Second Checkpoint: Run Your Application
It’s time to run your application for the first time. As shown in Step 2 above, you can always preview your application by clicking on the Run ▶️ icon in the top right corner.
Here’s what your app should look like:
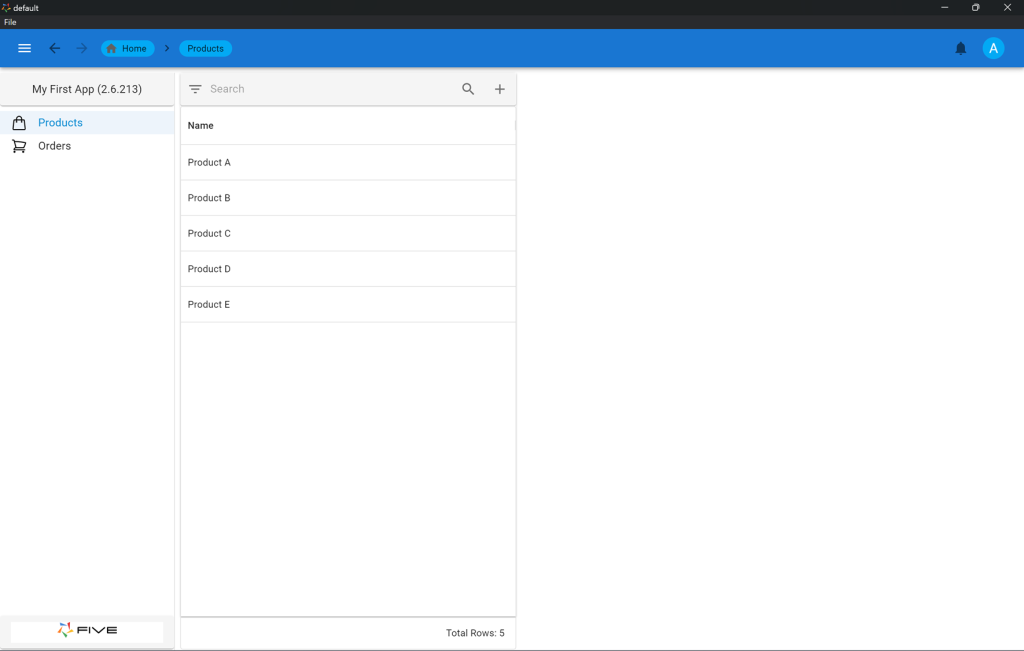
Go ahead and get familiar with Five’s auto-generated user interface (GUI). Check out the filter and search bar above your products, for example.
Step 8: Data > Connection Wizard: Adding an API As a Data Source
Note: The ‘Connection Wizard’ menu is not available in the basic version. Upgrade your Five account here.
We will now use Five’s Connection Wizard to connect Five to an external API. Once the API is connected to Five, it can be used as a data source inside of Five.
8.1. Click on Data > Connection Wizard.

8.2. Next, click on Read List Mapping inside the Connection Wizard.
8.3. We will use the DummyJSON API available here: https://dummyjson.com/
8.4. Inside Read List Mapping, paste the URL for the get all products request: https://dummyjson.com/products
8.5. Click on Send. Five now shows you the API’s response: a list of products in JSON format.
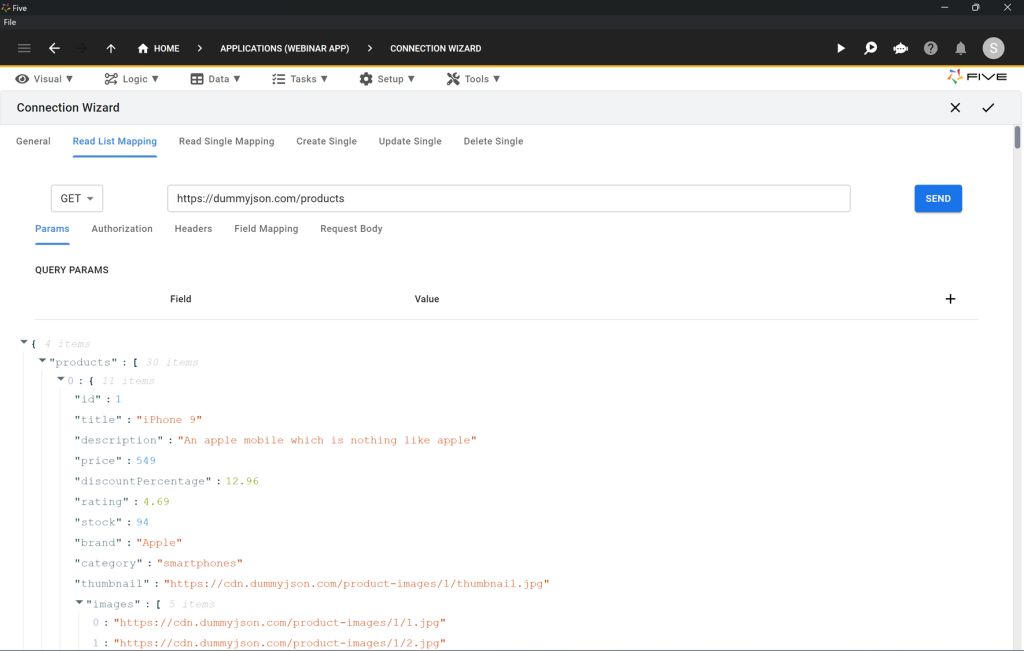
8.6. Click on Field Mapping to understand how Five treats the API response: Five maps the fields from the API response into fields, and tries to identify the primary key of the data.
8.7. Inside the Field Mapping, change the Default Display Type of the “products”[].”description” field to _Memo.
8.8. Make sure that the id field is selected as the Primary Key.

8.9. Next, click on Read Single Mapping.
8.10. Inside Read Single Mapping, paste the URL for the get single product request: https://dummyjson.com/products/:id
8.10.1 – In the PATH VARIABLES, add 1 to the field Value, this will make the “:id” in the URL to be replaced by the value 1.
8.10.2 – Click on Send. Five now shows you the API’s response: a list of products in JSON format.

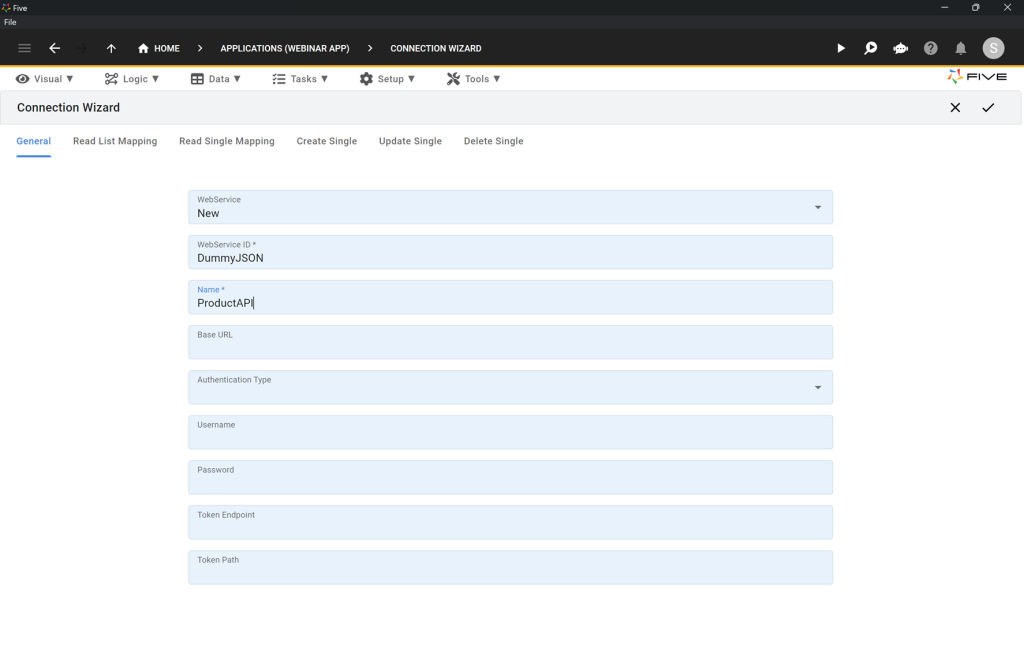
8.11. Click on General.
8.12. In the WebService dropdown, select New.
8.13. Fill in the required fields. Write DummyJSON into the WebService ID field, and ProductsAPI into the Name field.
8.14. Here’s what your API connection should look like. Click on the Tick ✔️ icon to save.
To confirm that your API has been set up as a data source in Five correctly, click on Data in the top navigation, and then on Connections. Your API connection should now appear in the list of connections.
Step 9: Visual > Form Wizard: Creating a Form on the API
9.1. Click on Visual > Form Wizard.
9.2. Select ProductsAPI as the data source.
9.3. Click on the Tick ✔️ icon to save.
Third Checkpoint: Run Your Application
It’s time to run your application again. As shown in Step 2 above, you can always preview your application by clicking on the Run ▶️ icon in the top right corner.
Here’s what your app should look like. On the left, you should now see a new menu item called ProductsAPIs. By clicking on the menu item, users can see all of the API’s data in a form created by Five.
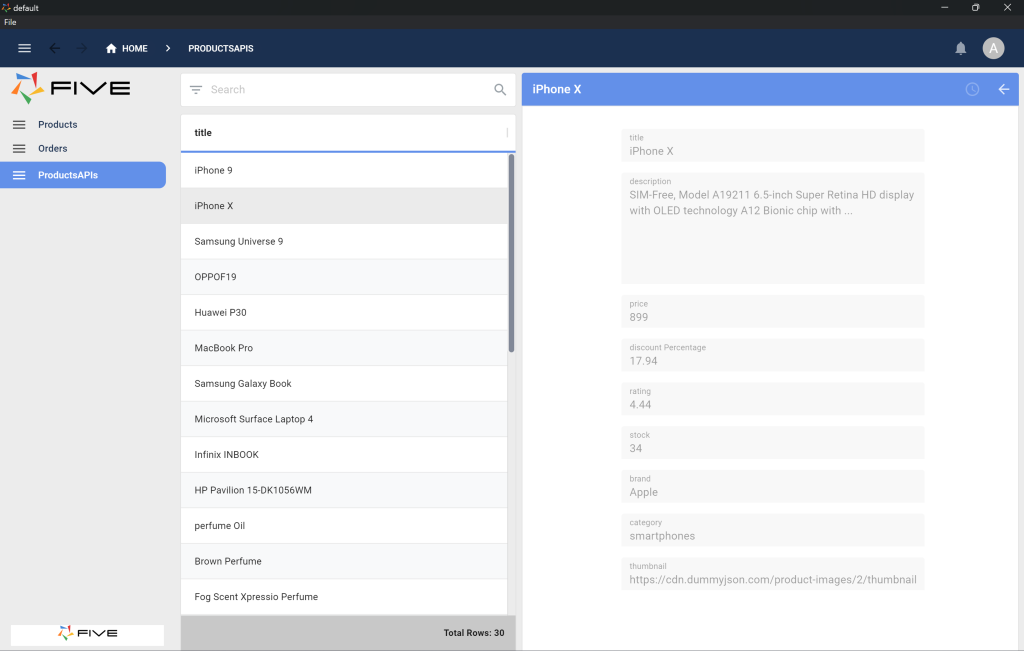
Next up, we want to build a feature that extracts product data from the API and stores the data in the Product database table.
Step 10: Logic > Functions: Adding JavaScript Functions to the Application
We will now add two JavaScript functions to our application.
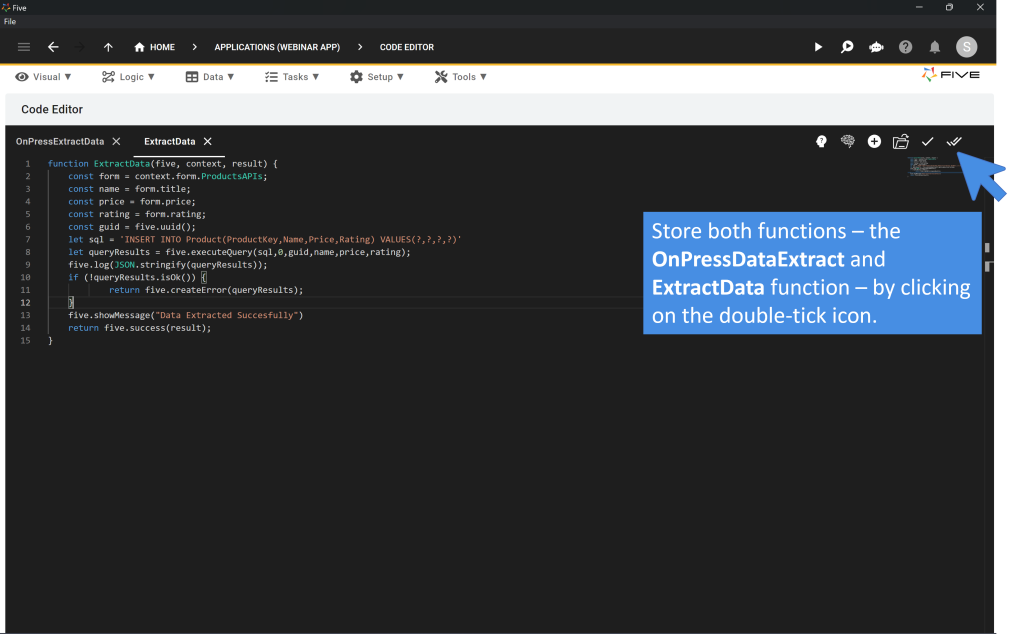
10.1. Click on Logic > Code Editor.
10.2. Click on the Plus icon to Add New Code.
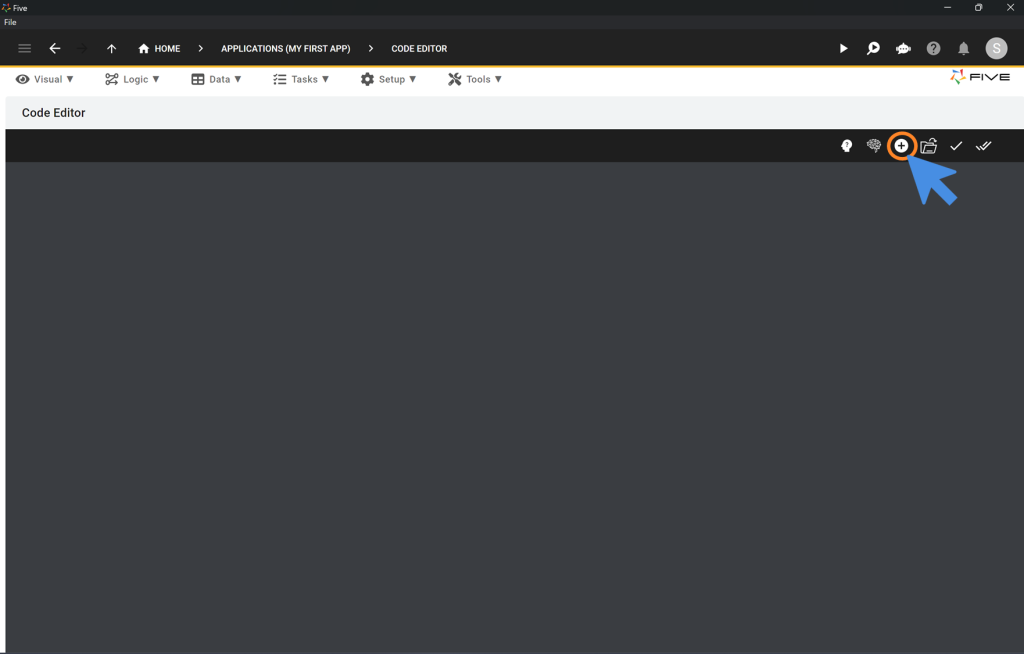
10.3. The first function we add to our application is called OnPressExtractData. Put this into the FunctionID field.
10.4. Paste this code into Five’s Code Editor.
function OnPressExtractData(five, context, result) {
    let variables = {
        form: five.form
    }
    const functionName = 'ExtractData';
    five.executeFunction(functionName, variables, null, null, null, function (result) {

    });
    return five.success(result);
}
10.5. Click on Add New Code again to add a second function.
10.6. Call the function ExtractData in the FunctionID field.
10.4. Paste this JavaScript function into Five’s Code Editor.
function ExtractData(five, context, result) {
    const form = context.form.ProductsAPIs;
    const name = form.title;
    const price = form.price;
    const rating = form.rating;
    const brand = form.brand;
    const guid = five.uuid();
    let sql = 'INSERT INTO Product(ProductKey,Name,Price,Rating,brand) VALUES(?,?,?,?,?)'
    let queryResults = five.executeQuery(sql,0,guid,name,price,rating,brand);
    five.log(JSON.stringify(queryResults));
    if (!queryResults.isOk()) {
            return five.createError(queryResults);
    }
    five.showMessage("Data Extracted Succesfully")
    return five.success(result);
}
10.5. Click on Save All Tabs, indicated by a double tick icon ✔️✔️ to save both functions.
Explainer: Understanding the Five API
Our second function, the ExtractData function uses the Five API. The Five API lets you interact with Five when adding code to your application. For example, five.showMessage("Message Body") triggers a pop-up message in your end-user application. There are many other useful commands, such as five.now(), which inserts the current universal time into a date field.
For a full list of supported commands visit our documentation.
Step 11: Visual > Forms: Adding a Button to a Form
Let’s add a button to our ProductsAPIs form.
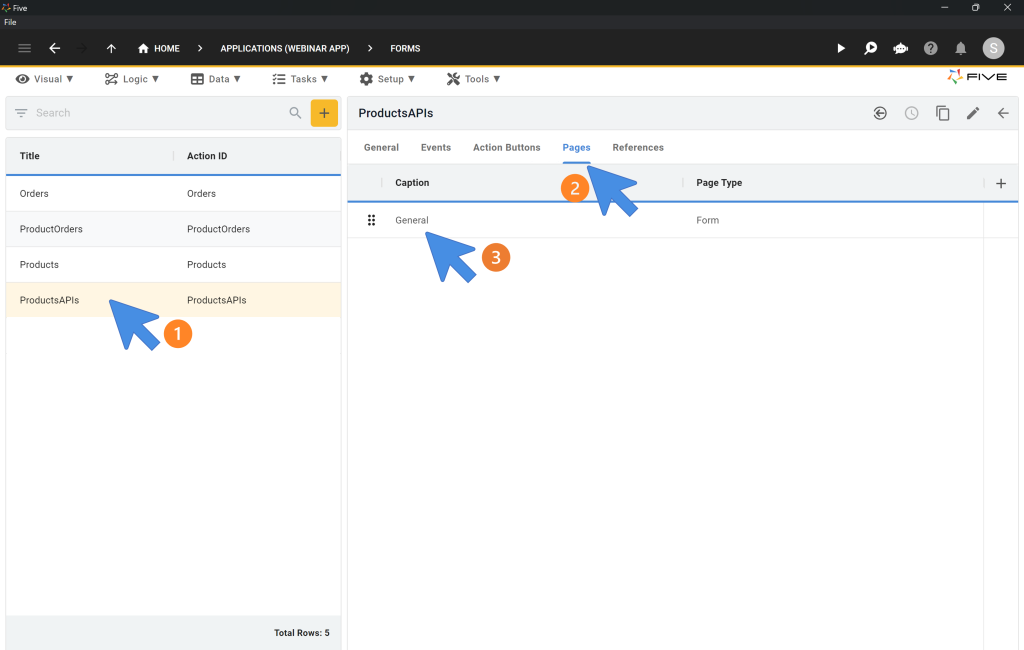
11.1. Click on Visual > Forms.
11.2. Now, click on ProductsAPIs in the list.
11.3. On the right side of the screen, click on Pages.
11.4. Click on General.
11.5. Now, click on Fields.
11.6. Click on the Plus icon on the right side of the screen to Add Fields.
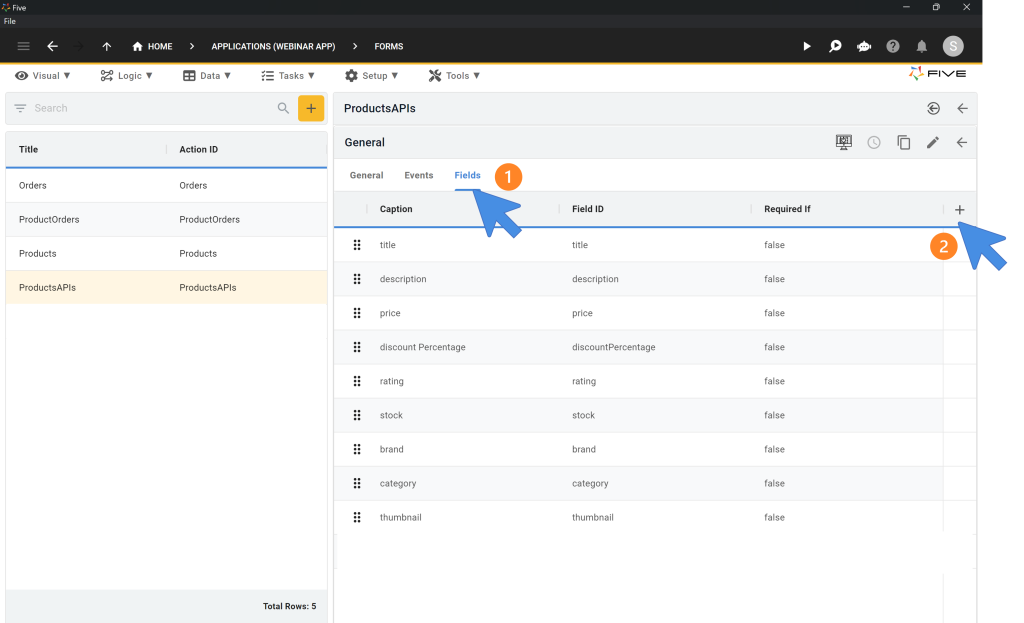
You can now configure your new field.
11.7. From the Display Type drop-down, select _Button.
11.8. Write Push Into DB as Caption, and ExtractButton as Field ID.
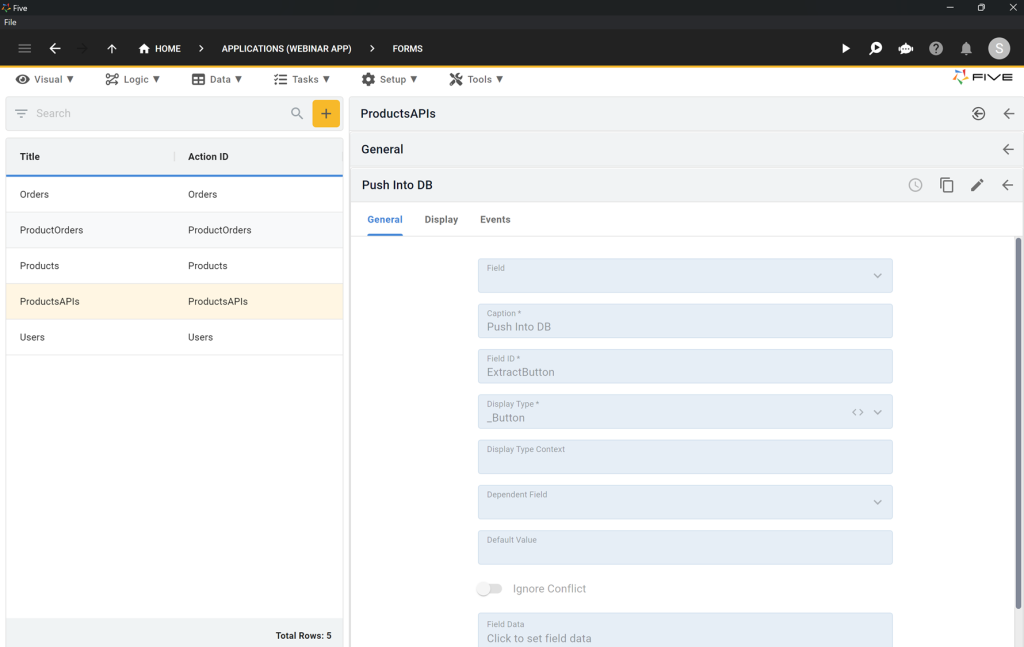
11.9. Click on Events.
11.10. Select the OnPressDataExtract for the OnClick event. This associates our function with the event of clicking the button.
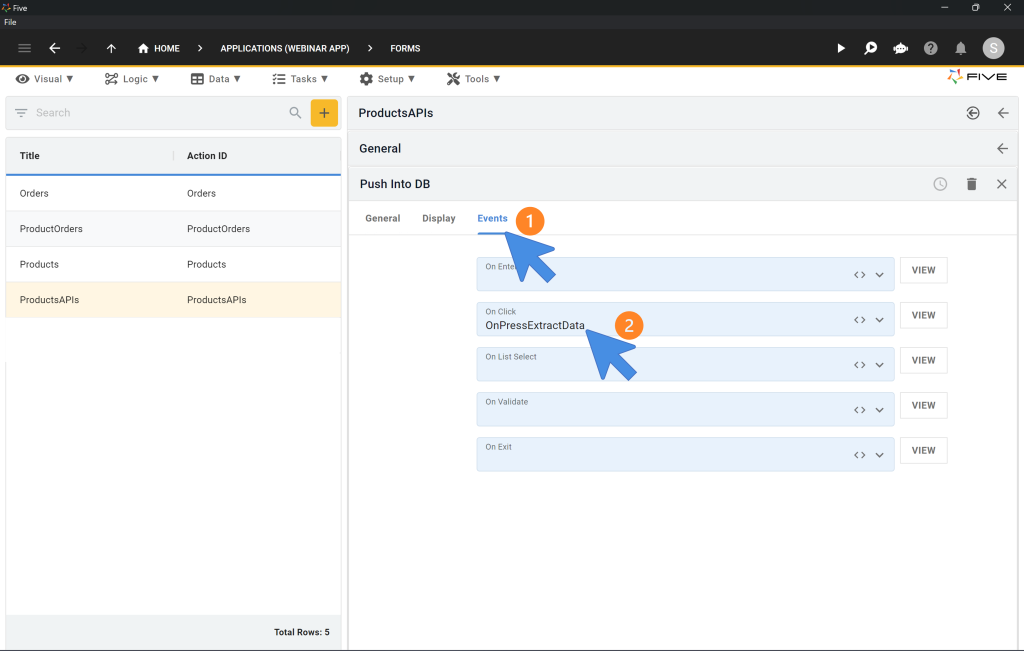
11.11. Click on the Tick ✔️ icon to save.
11.12. Click on the Tick ✔️ icon to save again.
Fourth Checkpoint: Run Your Application
It’s time to run your application again. As shown in Step 2 above, you can always preview your application by clicking on the Run ▶️ icon in the top right corner.
1. Click on the ProductsAPIs menu item in your end-user application.
2. Select any product shown in the list, such as Samsung Universe 9, for example. Once you have clicked on the product, you can see its details. At the bottom of its details, the button that we have just added to our form is now visible with the caption Push Into DB.
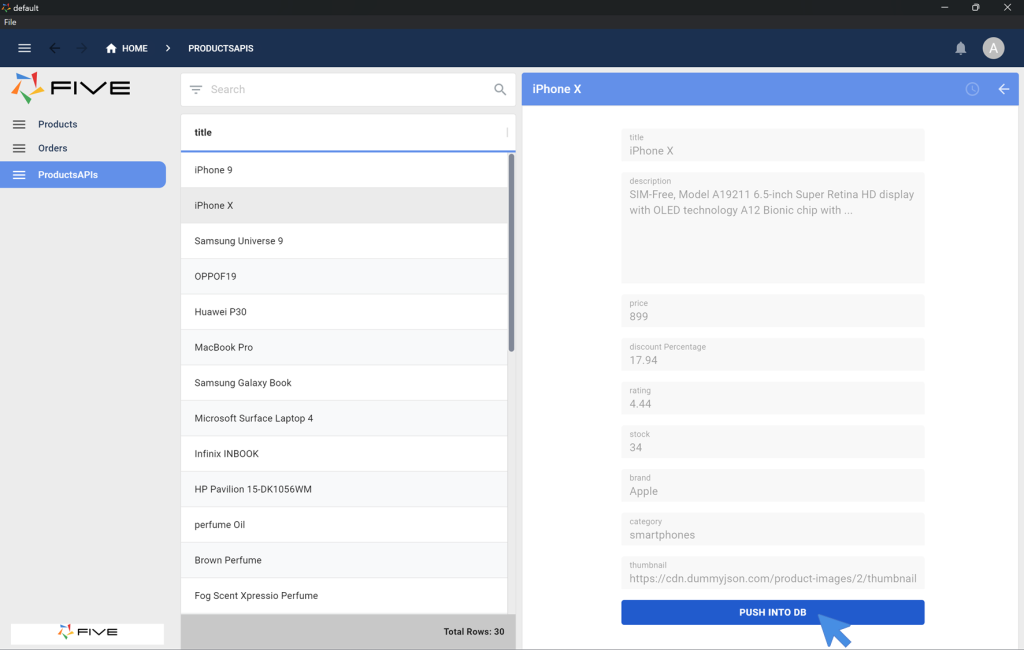
3. Click this button to extract data from your API and push it into your database. Do this for a few products.
4. Next, click on Products in your end-user application.
Confirm that the products that you have pushed from the API into your database appear in your list of products stored inside your database.
Congratulations! You have successfully built an app with two data sources: a MySQL database and an API, and you have successfully created a mechanism to push products from the API into your database!
Next Steps: Creating Charts and Reports or Adding Logins to Your Application
Continue from here by writing SQL queries, developing charts or PDF reports for your applications, or by adding user logins, roles, and permissions to your application.
To learn more about all of these features, visit our step-by-step guide here. Our recommendation: continue from Step 8.B.: Data > Queries: Write SQL In Five.
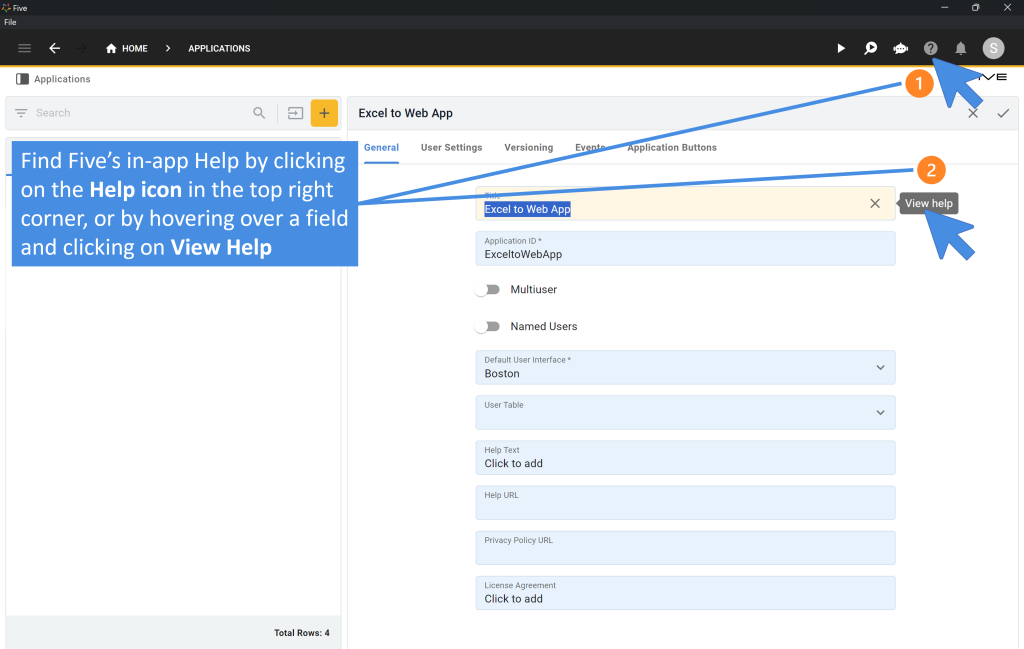
Finding Help in Five
In case you get stuck during the development process, we’re here to help! Continue developing your application by accessing these resources:
- Five’s User Community: Visit https://five.org to ask questions or get inspiration from other users.
- Five’s Documentation: Visit help.five.org to access Five’s comprehensive documentation.
Five’s In-App Help
Last, find useful tips for your application development by clicking on Five’s in-app help available in the top right corner or on almost any field.
Get Your App Online For US$29.99 Per Month
Five lets you deploy applications starting from as little as US$29.99 per application and month.