How to Build a Cloud Application [Full Tutorial]
Hi and welcome to our step-by-step guide on building your first cloud web application with Five.
Goals and Objectives:
In this step-by-step tutorial, we’ll build a cloud application in just 30 minutes. We will:
Step 1: Develop a Responsive Cloud-Native Application
- Set up an online MySQL database.
- Create tables with a many-to-many relationship.
Step 2: Create a Data Visualization Chart
- Write an SQL query to fetch data.
- Use a chart wizard to visualize this data in the cloud.
Step 3: Validate Data Inputs
- Implement custom display types.
- Use regular expressions to ensure data integrity.
Step 4: Integrate with Slack (Optional)
- Set up a Slack webhook.
- Configure the app to send notifications to Slack.
Step 5: Add PDF Reporting (Optional)
- Create a report template.
- Include data from the SQL database in the PDF report for easy access
Plus using Five you can also build so much more.
Sounds like a lot? You’ll be surprised how quickly we can build a simple cloud application in Five! Before we continue, make sure to sign up for free access to the Five development environment to start building your cloud application today.
- Step-by-Step Guide: Building a Cloud Application from Scratch
- Second Checkpoint: Build Your Cloud Application
- Third Checkpoint: Ensuring Your App Functions Correctly
- Fourth Checkpoint: First Login
- Congratulations: You’ve Built Your Cloud Web Application
Resources and Downloads
CSV File
Download the CSV file here.
SQL Query
Download the SQL query here.
JavaScript Function
Download the JavaScript function here.
Theme
Download the CSS theme here.
Report Template
Download the report template or copy the HTML from here.
Step-by-Step Guide: Building a Cloud Application from Scratch
Step 1: Creating a New Cloud Application
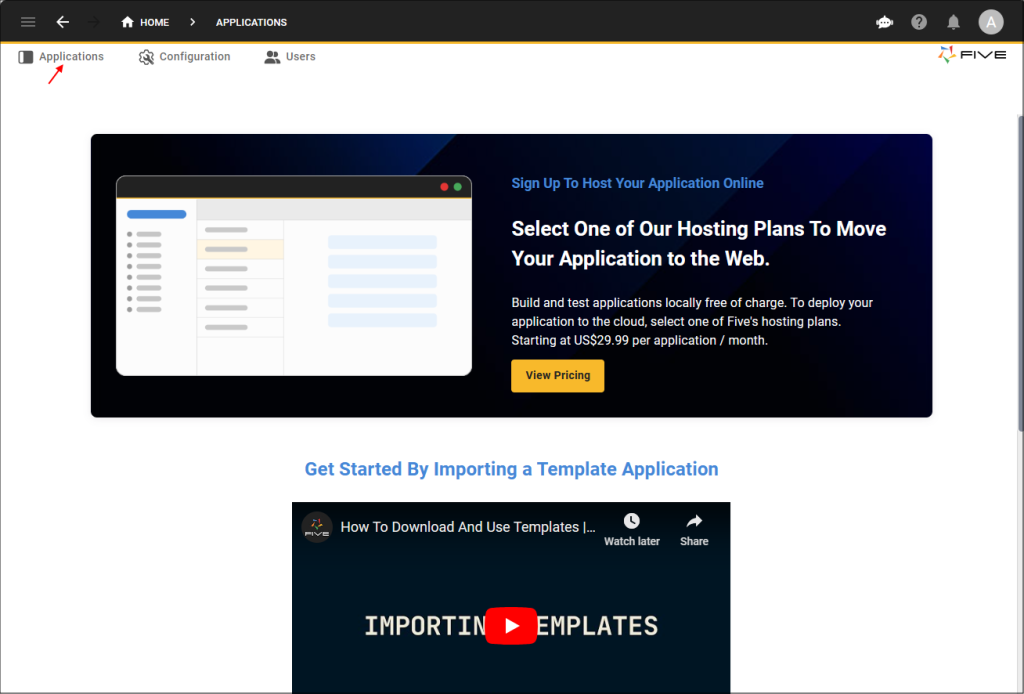
1.1. To create a new application in Five, navigate to the “Applications” section.
1.2. Click on the yellow Plus icon to start a new application.
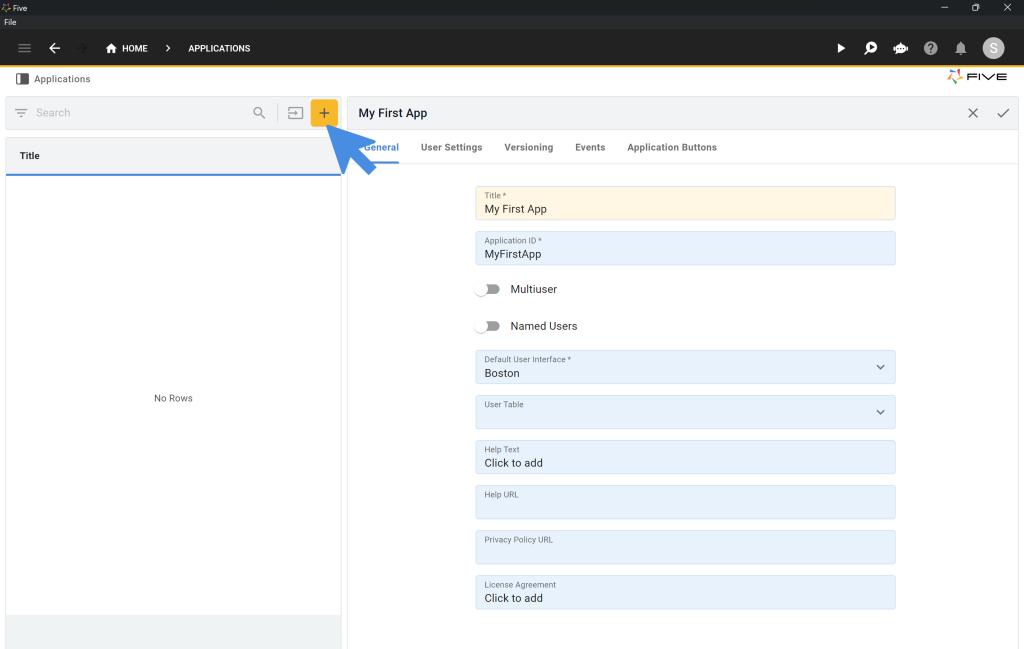
1.3. Enter “My First App” in the Title field.
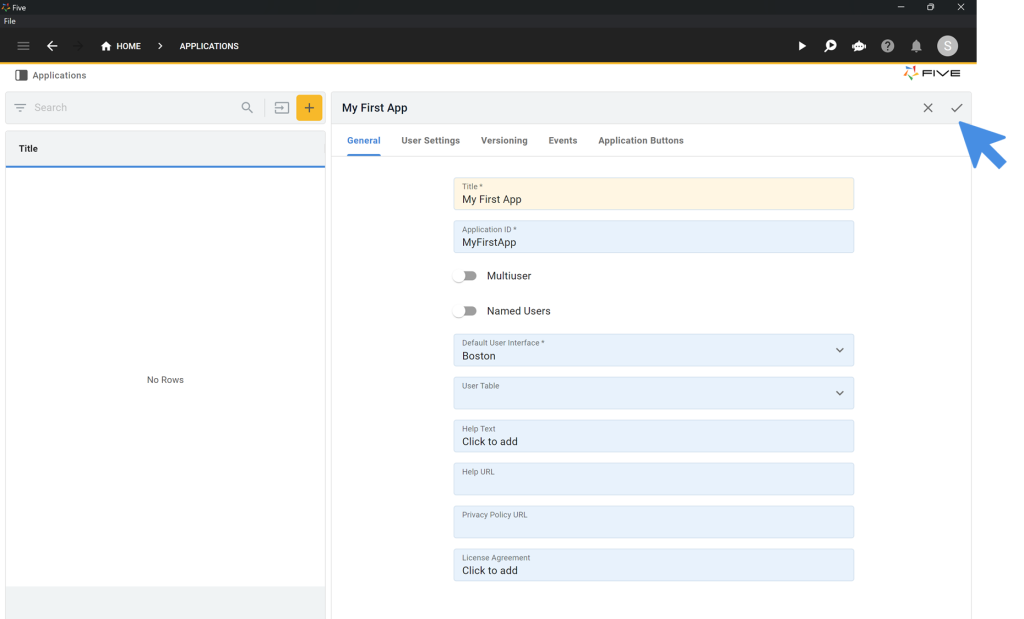
1.4. Save your application by clicking the Tick ✔️ icon.
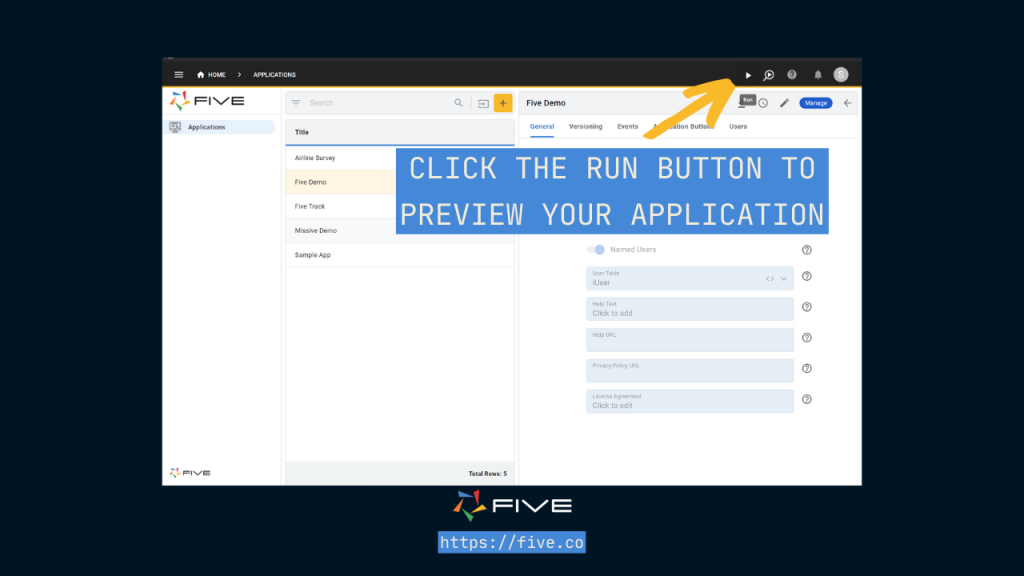
Step 2: Running Your Cloud-Based Application
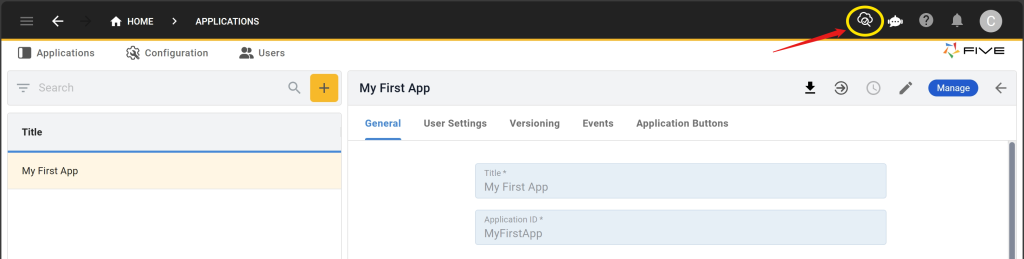
You can run and preview your cloud application at any time. Click on the “Deploy to Development” button in the top navigation bar. The initial deployment may take a while as Five sets up a cloud-hosted instance for your app.
After deployment, the “Deploy to Development” button will change to a “Run ▶️” button. Click “Run ▶️” to open a new window showing the current state of your application.
Step 3: Creating Database Tables with Table Wizard
Let’s start building our cloud application. Return to the development environment to continue.
3.1. Click on the blue “Manage” button.
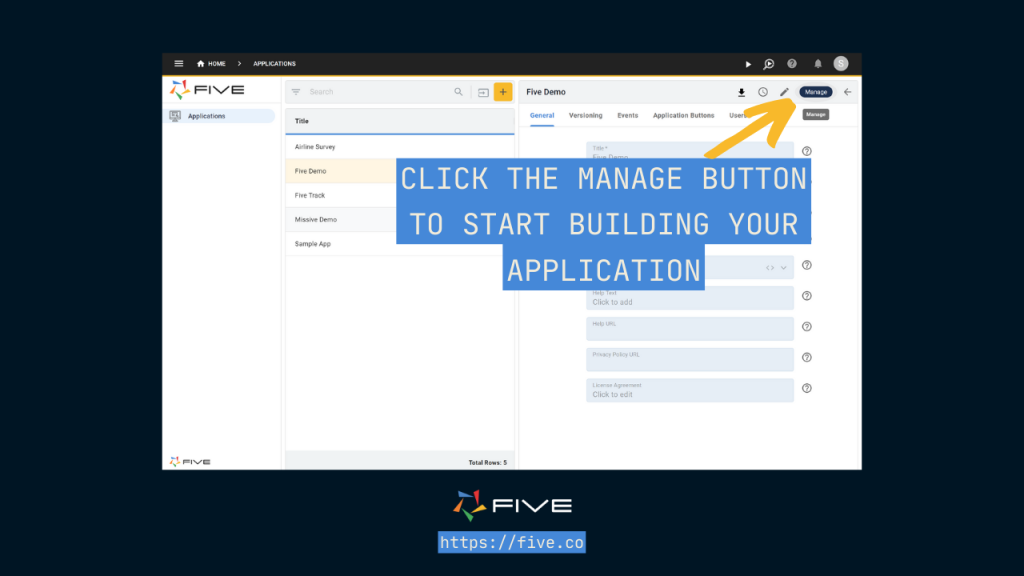
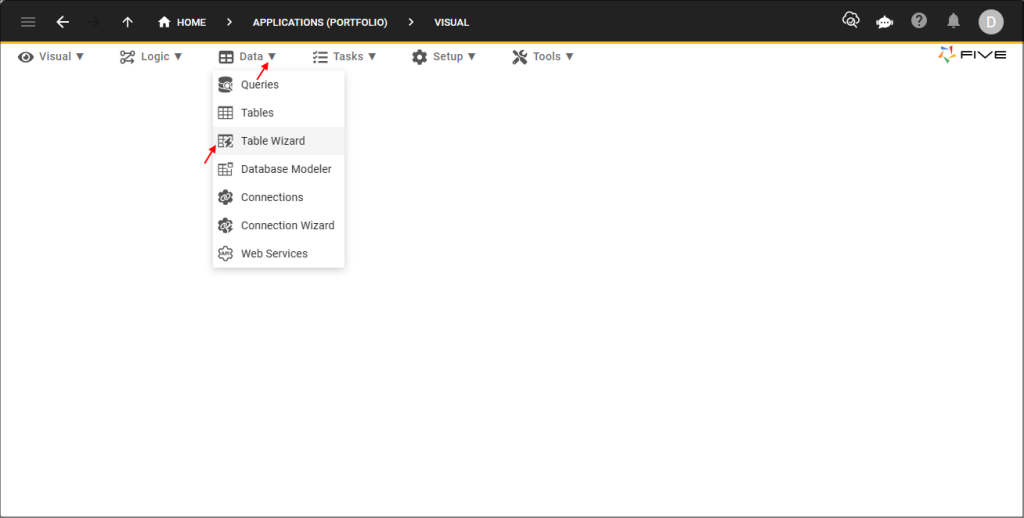
3.2. To add tables to Five’s integrated MySQL database, go to “Data” > “Table Wizard.”
We will create three tables: Products, Orders, and ProductOrders.
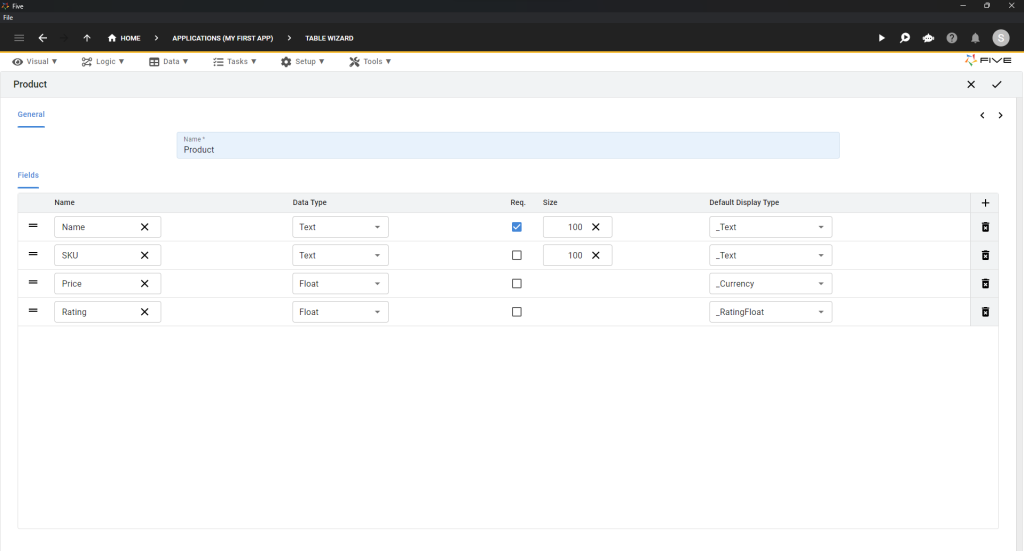
Creating the Product Table
3.3. Name your table “Product” in the Name field. Add fields by clicking the Plus ➕ icon.
3.4. Ensure your Product table fields match this structure:
| Name | Data Type | Required | Size | Default Display Type |
|---|---|---|---|---|
| Name | Text | ✔️ | 100 | _Text |
| SKU | Text | 100 | _Text | |
| Price | Float | _Currency | ||
| Rating | Float | _RatingFloat |
Save the table by clicking the Tick ✔️ icon and confirm in the Table Upgrade dialog.
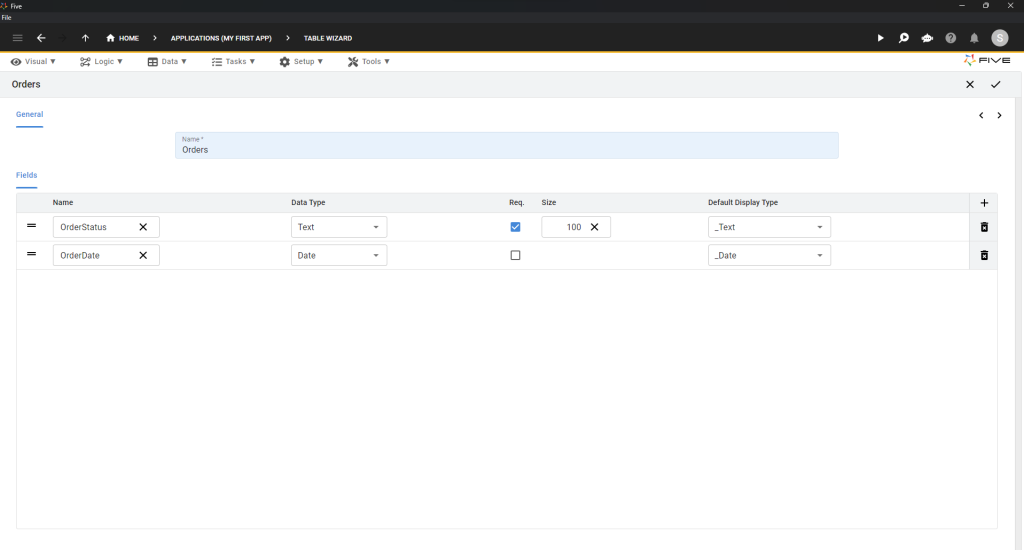
Creating the Orders Table
3.5. Repeat steps 3.3 and 3.4 for the Orders table. Ensure it looks like this:
| Name | Data Type | Required | Size | Default Display Type |
|---|---|---|---|---|
| OrderStatus | Text | ✔️ | 100 | _Text |
| OrderDate | Date | 100 | _Date |
Save by clicking the Tick ✔️ icon.
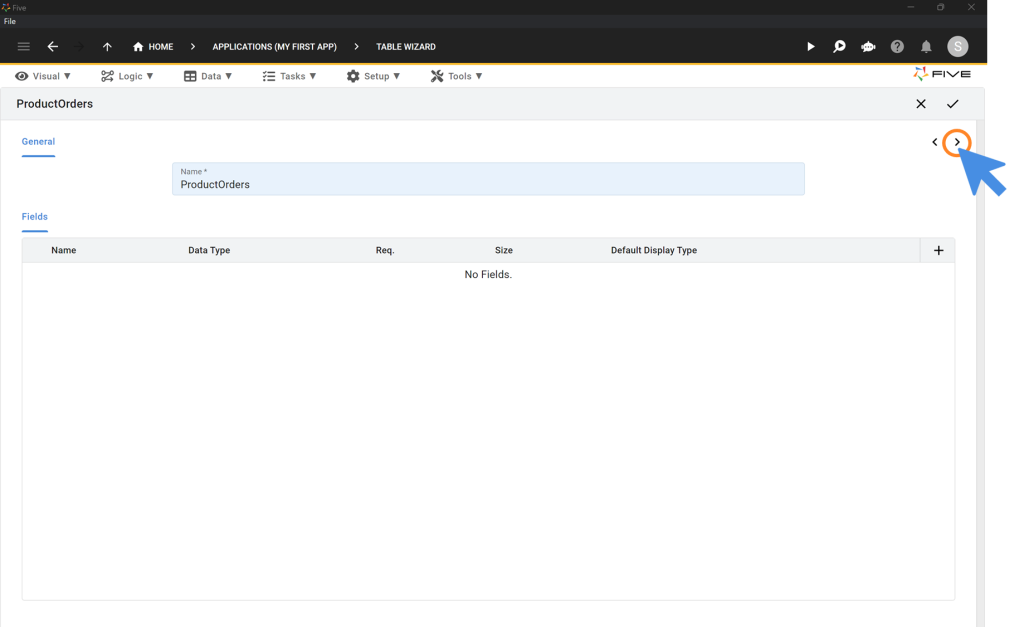
Creating the ProductOrders Table
The ProductOrders table links Products and Orders in a many-to-many relationship and contains only the Foreign Keys of these tables.
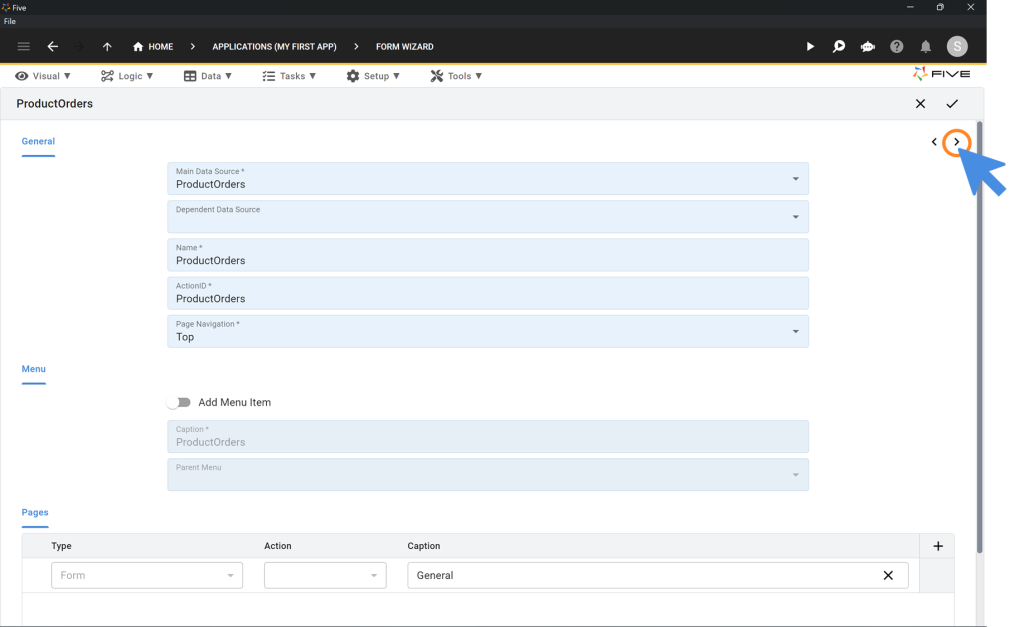
3.7. Open the Table Wizard and name the table “ProductOrders.”
3.8. Click the Right Arrow > to proceed.
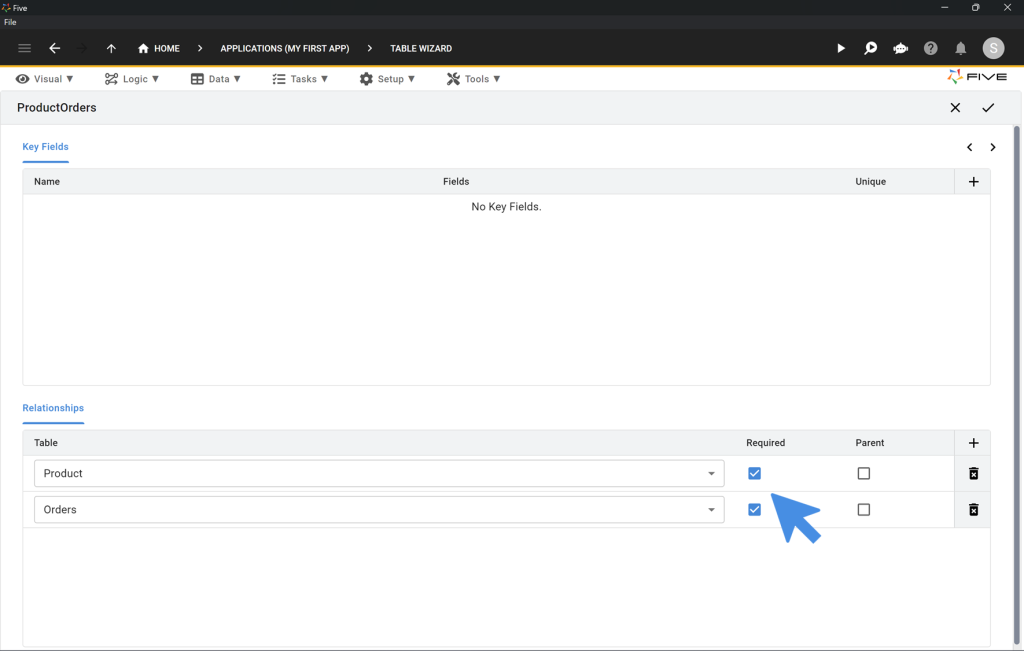
3.10. Add relationships by clicking the Plus ➕ icon in the Relationships area, linking to both Product and Orders tables. Tick the Required box for both.
3.12. Save the relationships and the table by clicking the Tick ✔️ icon.
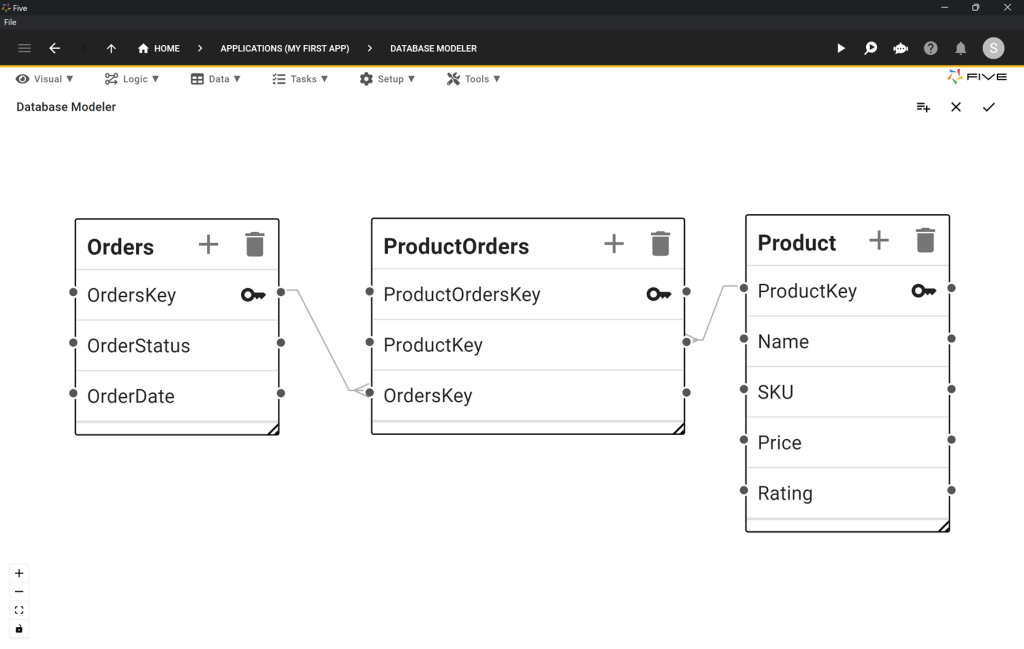
Step 4: Using the Database Modeler
4.1. Verify your database setup by navigating to “Data” > “Database Modeler.”
4.2. Arrange your tables to form a visual Entity-Relationship Diagram (ERD). Ensure relationships are correct, with “crows’ feet” pointing to the ProductOrders table.
Step 5: Importing Data from a CSV
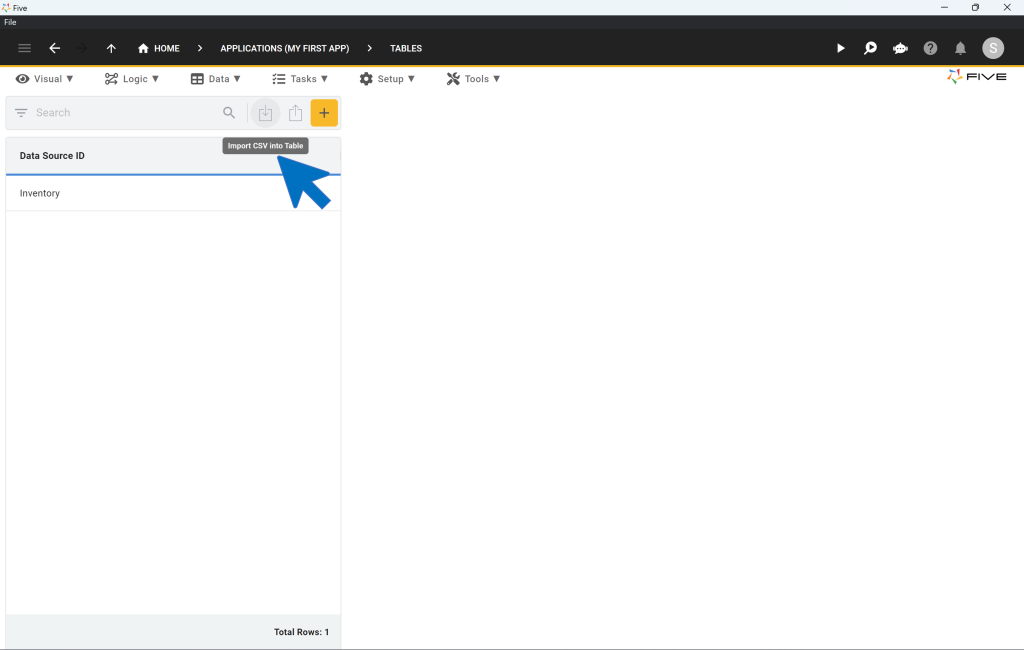
5.1. To import a CSV file into your database table, go to “Data” > “Tables.”
5.2. Click on the “Import CSV into Table 📥” button.
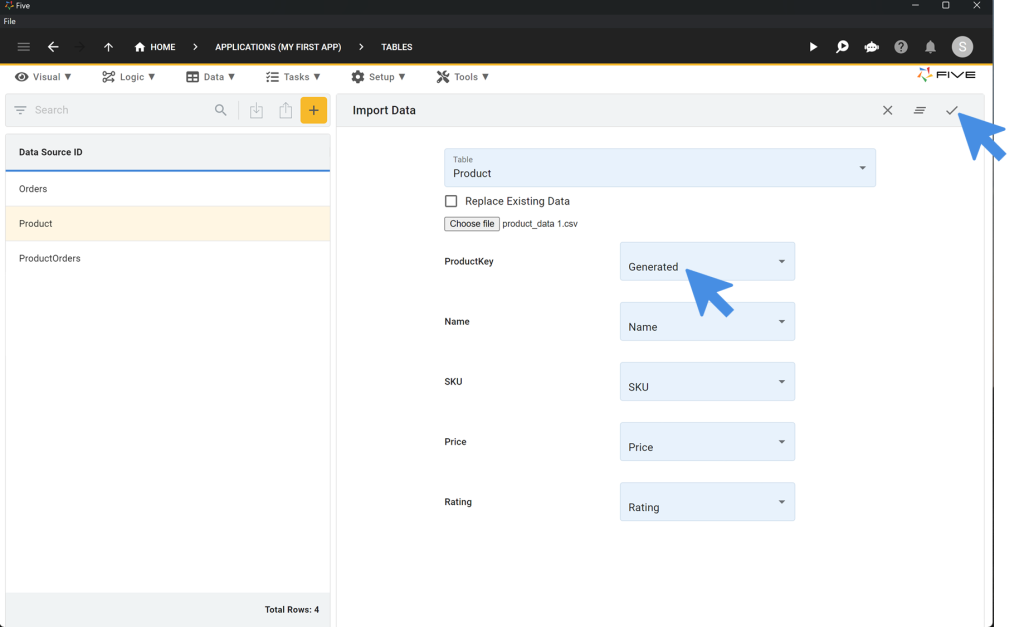
5.3. Select the Product table from the dropdown.
5.4. Choose the CSV file to import. Set ProductKey to “Generated.”
5.5. Five will map your database fields to the CSV columns. Confirm by clicking the Tick ✔️ icon.
Step 6: Creating Forms with Form Wizard
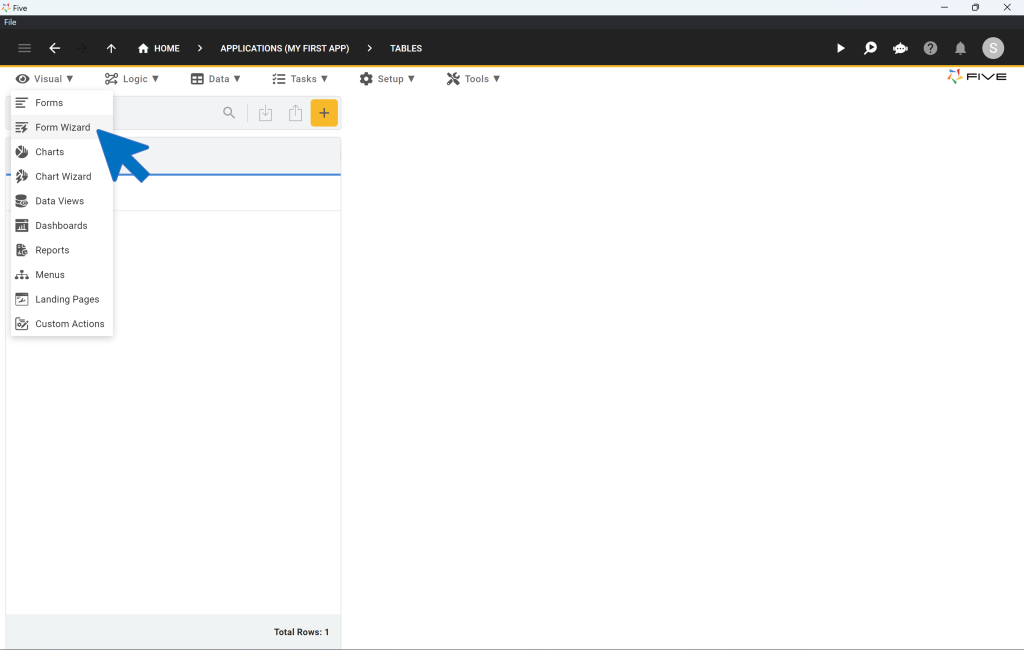
6.1. To create forms, go to “Visual” > “Form Wizard.”
Creating the Product and Orders Forms
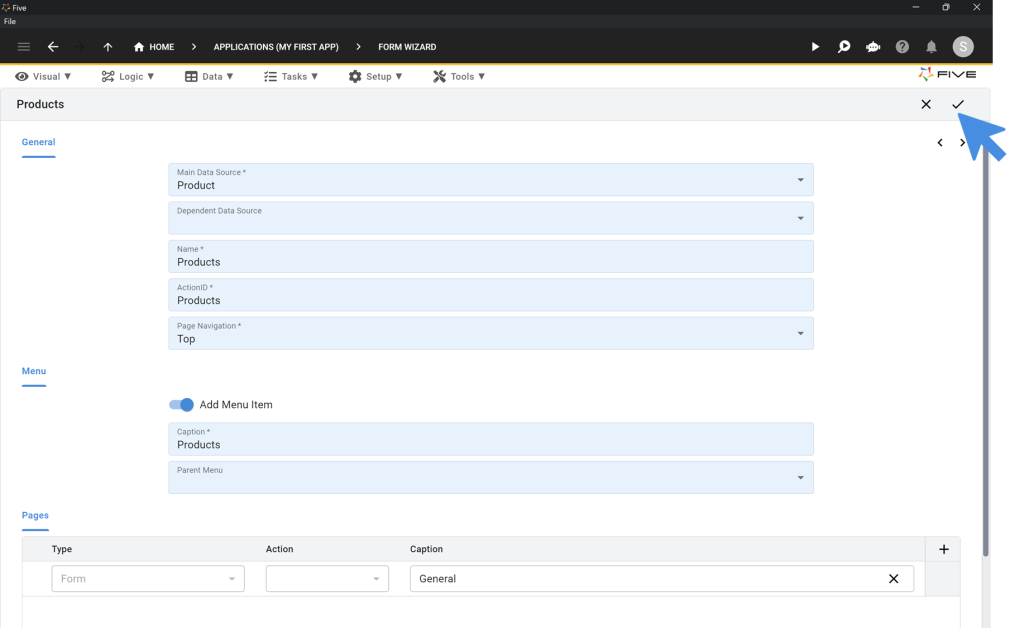
6.2. Select “Product” as the Main Data Source in the Form Wizard and save.
6.4. Repeat the process for the Orders table.
Creating the ProductOrders Form
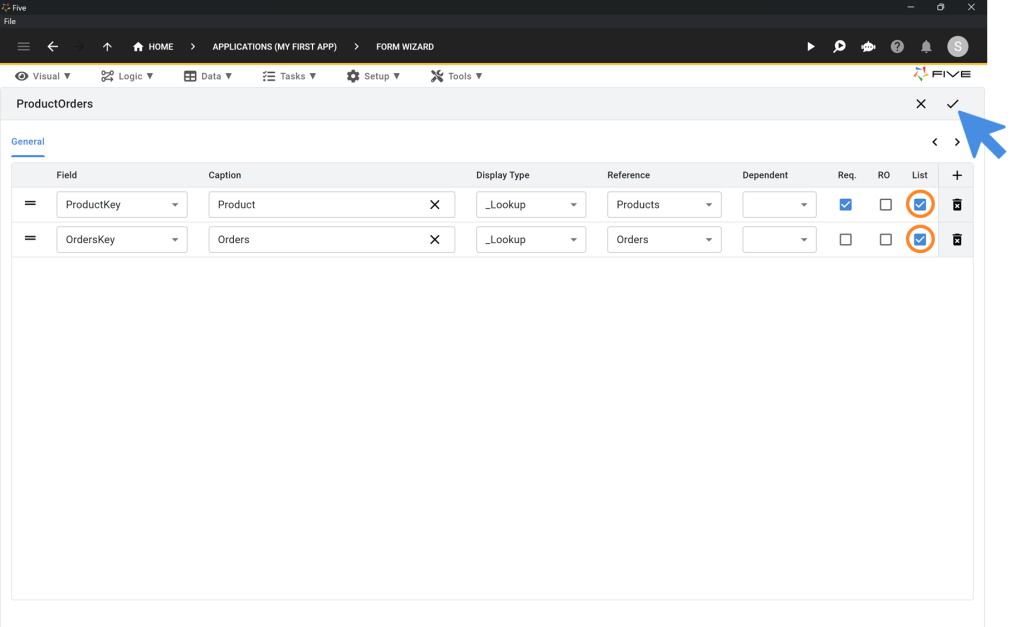
6.5. Select “ProductOrders” as the Main Data Source in the Form Wizard.
6.6. Toggle off “Add Menu Item.”
6.7. Click the Right Arrow > to proceed.
6.8. Tick the “List” box for both fields: ProductKey and OrdersKey, then save.
Step 7: Enhancing Forms by Adding Pages
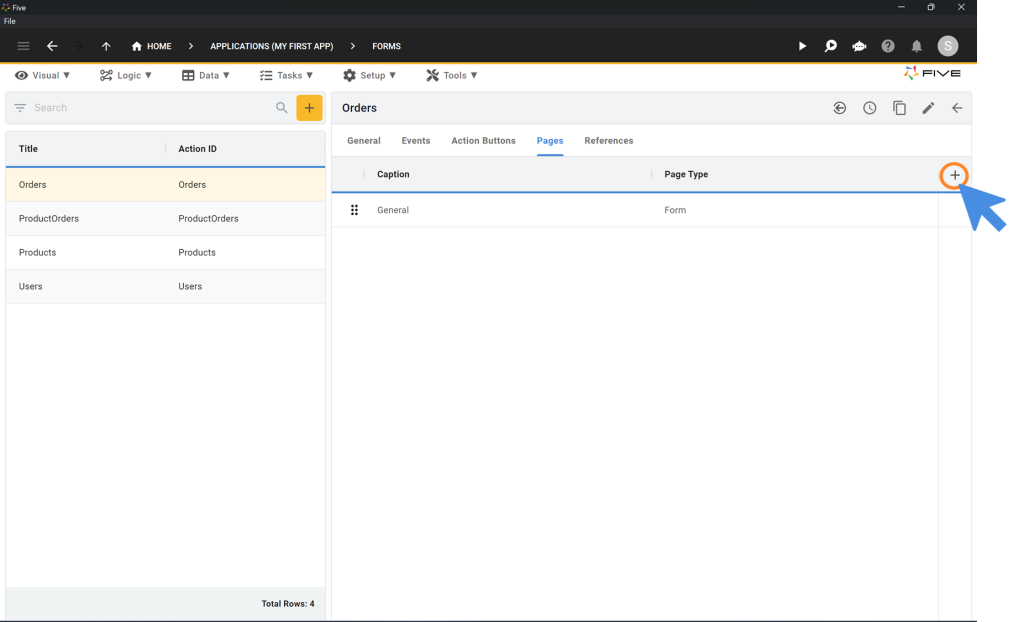
7.1. Go to “Visual” > “Forms.”
7.2. Select the Orders form.
7.3. Click on “Pages” and then the Plus ➕ icon.
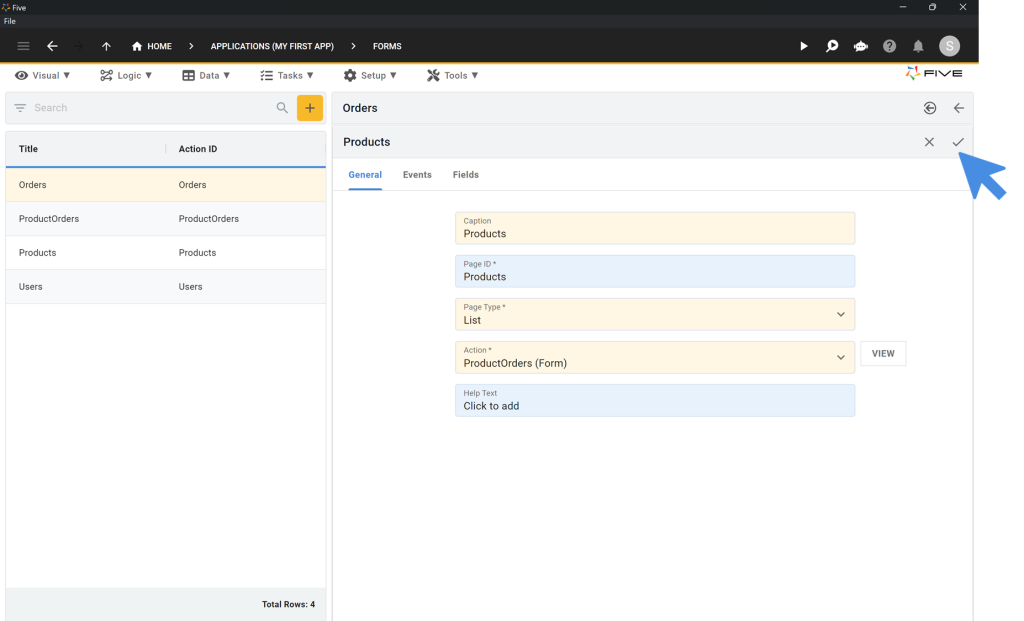
7.5. Set the Page Type to “List,” caption it as “Products,” and select “ProductOrders (Form)” as the Action.
7.7. Save the new page by clicking the Tick ✔️ icon.
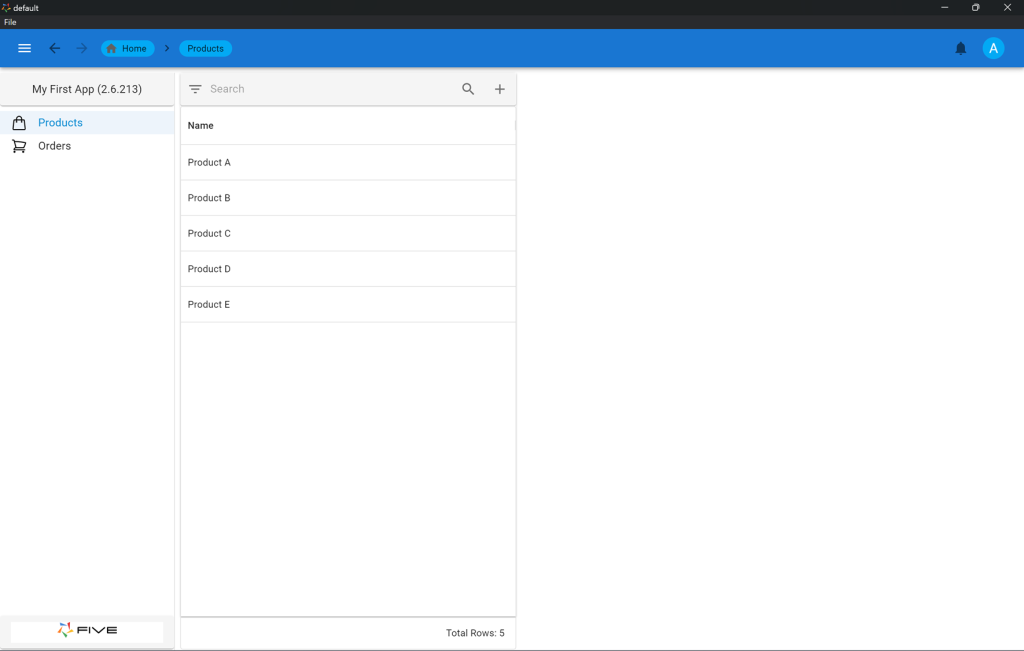
Second Checkpoint: Build Your Cloud Application
It’s time to run your application to see what we have developed so far. As shown in Step 2 above, you can always preview your application by clicking on the Run ▶️ icon in the top right corner.
Here’s what your app should look like:
Step 8: Validating Data on a Form
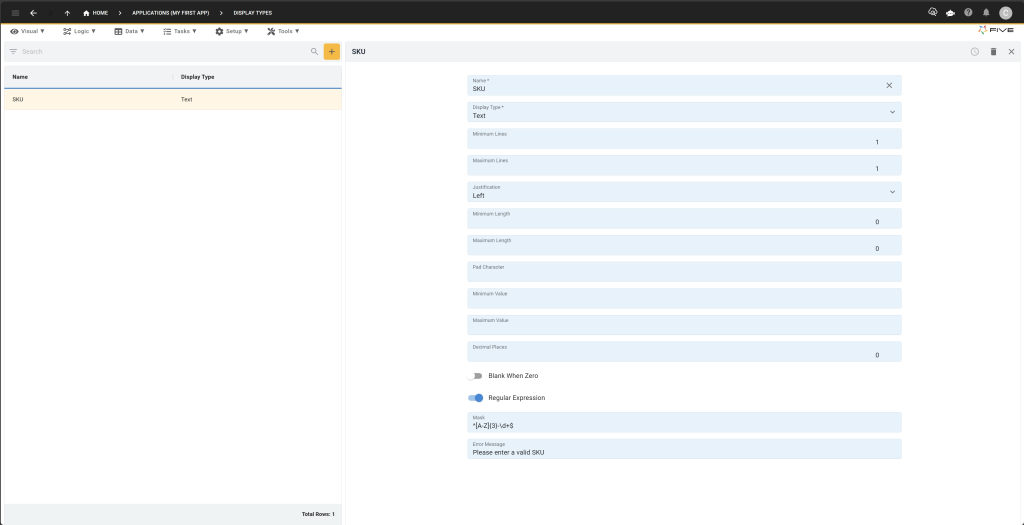
8.1. Go to Setup > Display Types.
8.2. Click on the yellow Plus ➕ button to create a new display type.
8.3. Fill in the following fields:
– For Name, type in SKU.
– For Display Type, select Text.
– Now go down to the bottom of the display type form, and toggle Regular Expression.
– For Mask, type or paste this regular expression: ^[A-Z]{3}-\d+$
– Last, for Error Message, type in the error message that users will see if they fill in an invalid SKU, such as “Please enter a valid SKU.”
8.4. Click on the Tick ✔️ icon to save your display type.
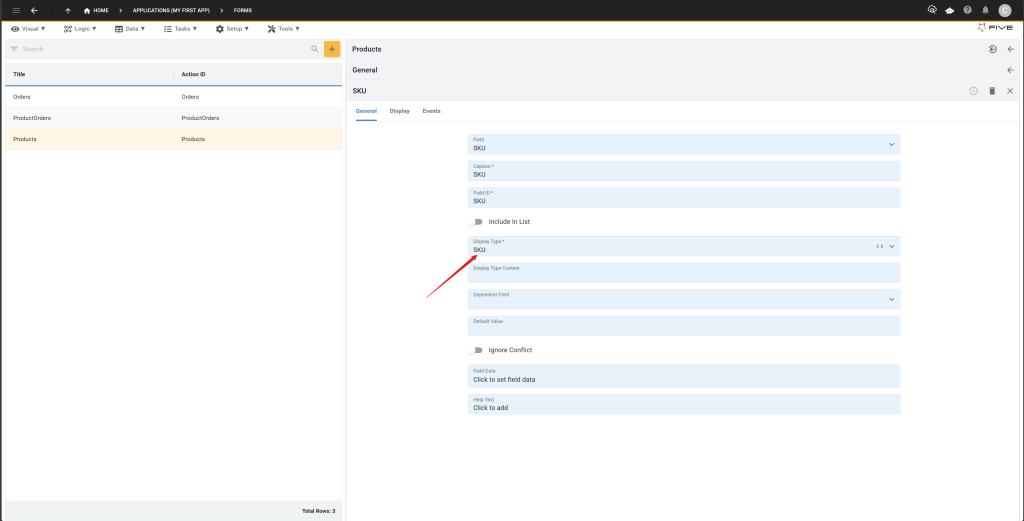
8.5. Apply this display type to the SKU field in the Products form under “Visual” > “Forms” > “Pages” > “General” > “Fields.”
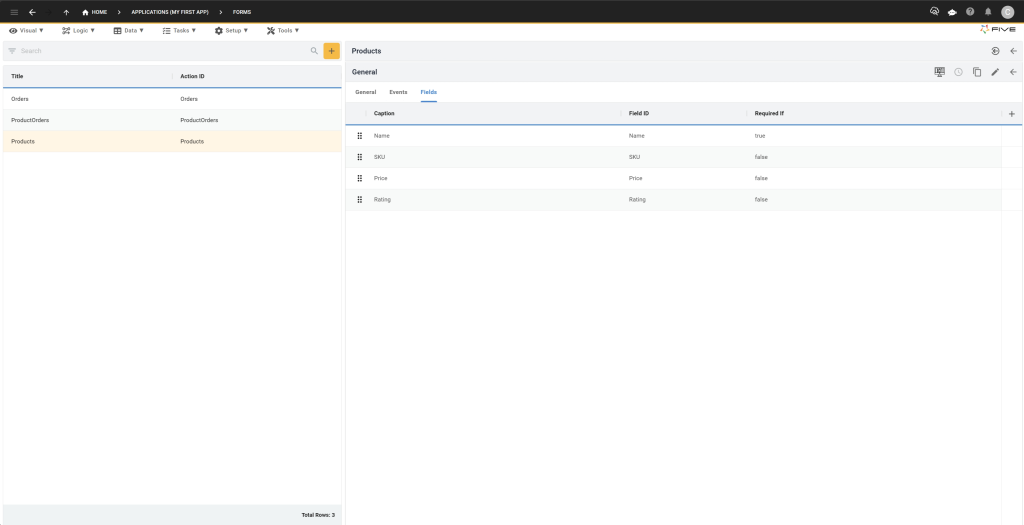
8.8. Change the Display Type of the SKU field to SKU and save.
Step 9: Using Five’s End-User GUI
9.1. In the end-user application, add some dummy data to the Orders table.
9.2. Add products to your orders via the Plus ➕ icon in the Products page.
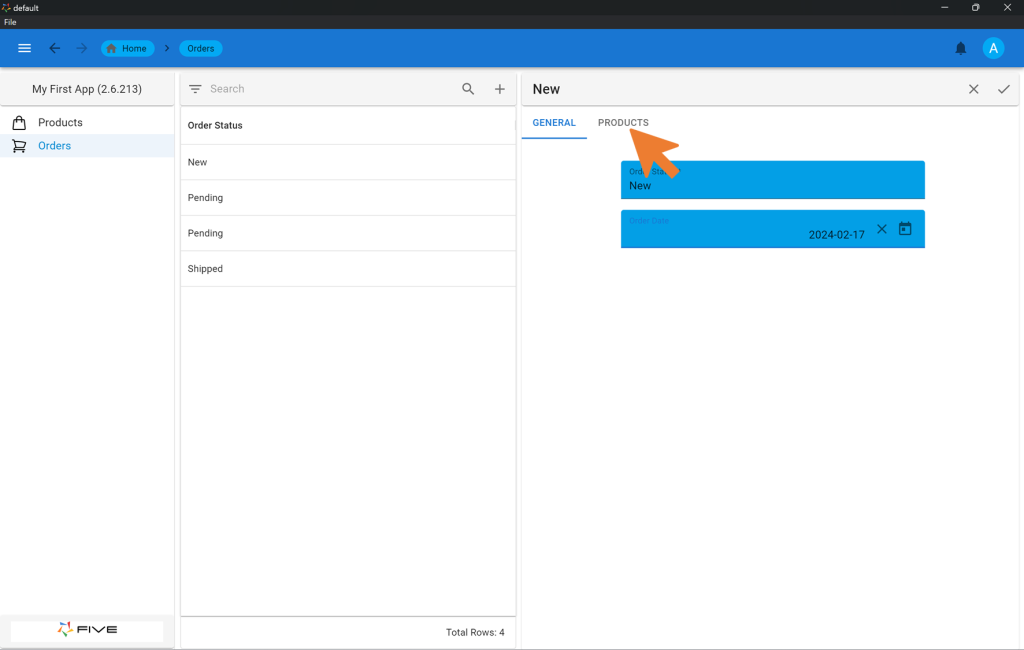
9.5 Repeat these steps until you have several orders stored in your database. As shown in Image 8.1, your orders will appear in a list. In Image 9.1, this list contains a New, Pending, Pending and Shipped order.
Step 10: Writing SQL Queries in Five
Now let’s create a SQL query in Five, so let’s go back into our development environment. We will write a query that returns some of the data you created previously.
10.1. Go to “Data” > “Queries.”
10.2. Add a new query by clicking the yellow plus and name it “ProductQuery.”
10.4. Click on “Click to add” to open the Query Editor.
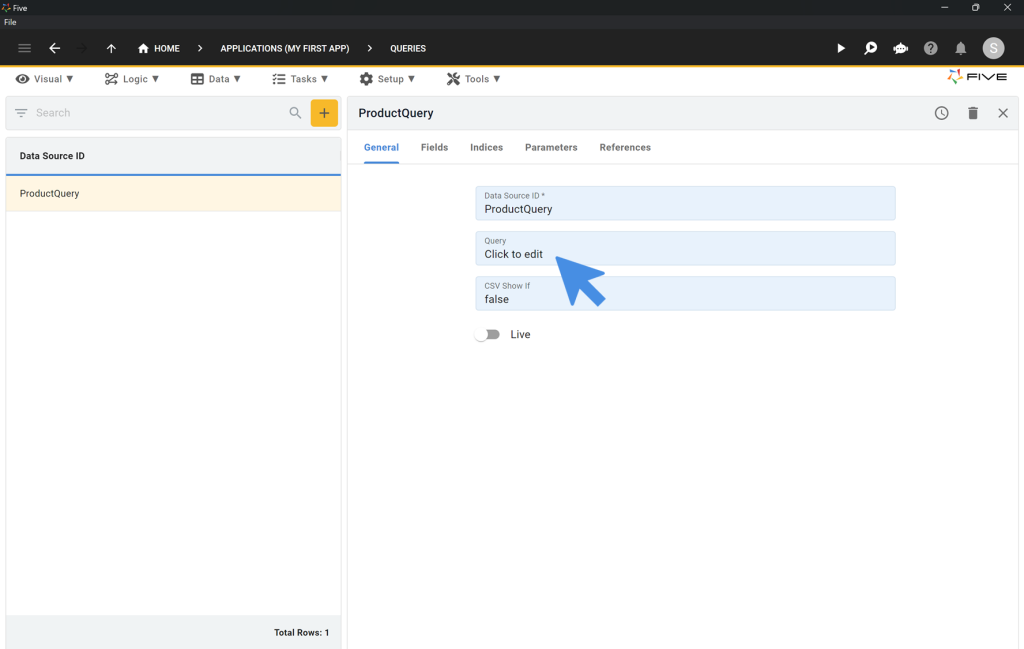
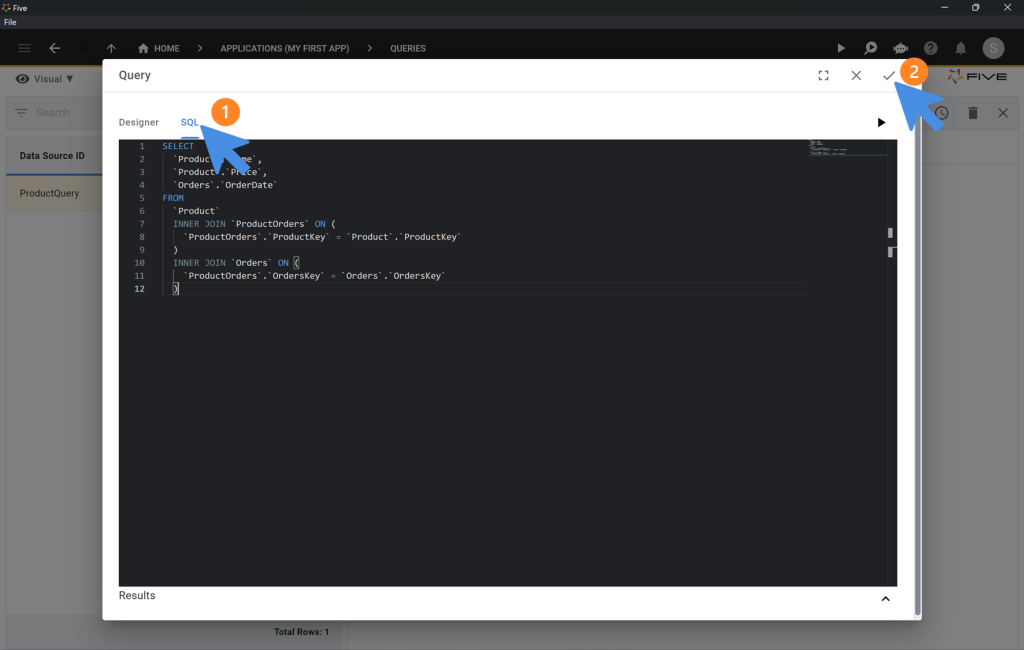
10.5. Click on SQL.
10.6. Paste the SQL into the SQL Editor. Make sure to have some orders in your Orders table. Otherwise, the query will not produce any results! To test your query, click on the Run ▶️ icon.
SELECT
  `Product`.`Name`,
  `Product`.`Price`,
  `Orders`.`OrderDate`
FROM
  `Product`
  INNER JOIN `ProductOrders` ON (
    `ProductOrders`.`ProductKey` = `Product`.`ProductKey`
  )
  INNER JOIN `Orders` ON (
    `ProductOrders`.`OrdersKey` = `Orders`.`OrdersKey`
  )
10.7. Save your query by clicking the Tick ✔️ icon.
Step 11: Creating Charts For Your Cloud Application
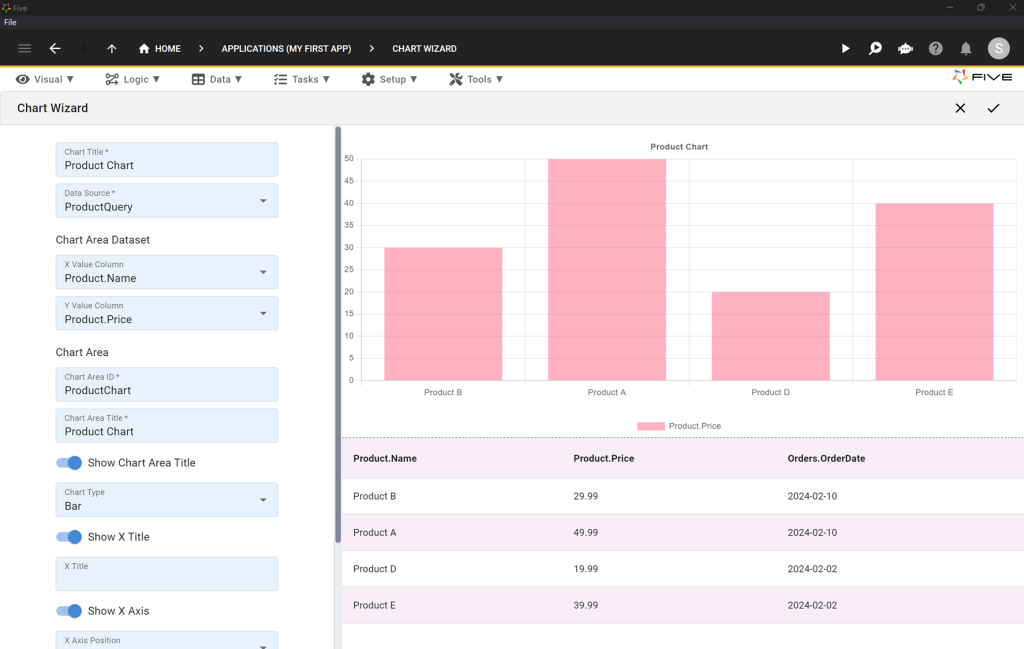
11.1. Navigate to “Visual” > “Chart Wizard.”
11.2. Fill in the required fields (marked with an asterisk *) and select your X Value Column and Y Value Column.
11.3. Save the chart settings by clicking tick in the top right
Step 12: Visual > Reports: Generating a PDF Report
12.1. Begin by navigating to Visual > Reports to create a PDF report from your database.
12.2. Click the yellow Plus icon to start a new report.
12.3. Enter “Product Report” into the Title field.
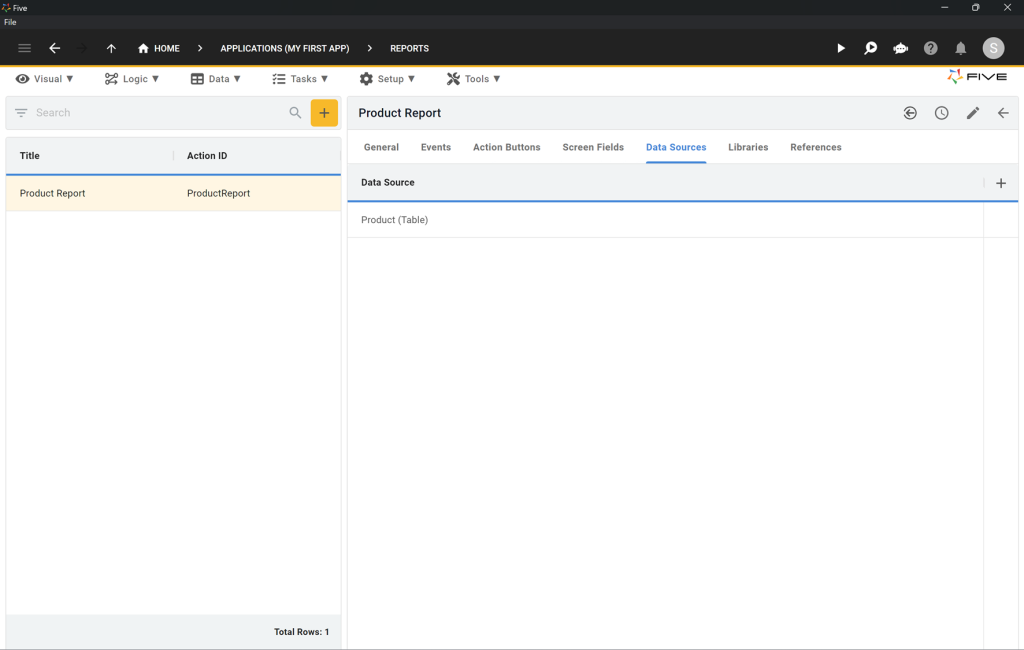
12.4. Select the Data Sources option.
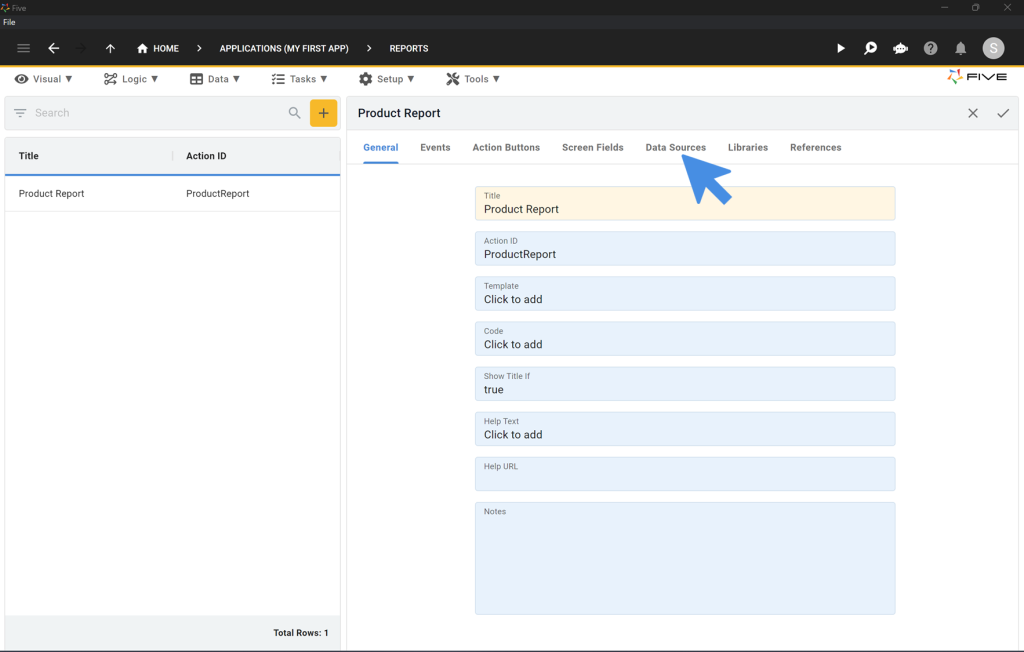
12.5. Click the Plus ➕ icon to add a new data source.
12.6. Choose “Product (Table)” as your Data Source.
12.7. Save by clicking the Tick ✔️ icon.
12.8. Return to the General tab.
12.9. In the Template field, click “Click to add” to open Five’s report template editor.
12.10. Click the </> icon to open the HTML editor.

12.11. Clear the existing code in the editor and replace it with the following HTML:
<style>
    .demo tr {
      background-color: lightgrey
    }

</style>

<div><img src="data:image/png;base64,iVBORw0KGgoAAAANSUhEUgAAAKMAAAAtCAYAAADC1tsoAAAABmJLR0QA/wD/AP+gvaeTAAAHlklEQVR42u2cbWxTVRjHLxvv8hJQM1HRgdB2dLyE3rYMQizQtRs4hA8V1iIqiQu+EBK/EAHZ5YOsiwtRfIkjSIIGWW9AhX2g3YAFPhiNiy8gbEMmuHUImYKArN0YOz6nux13d/d2ve29t3M7/+SfLO2559777JfnnOeck1LUABCiqLQWs7kgaKUrKCIiMeWX/vak2hAGLSZXk4W+0GyhEfgnEnUiUTm89d/keutrwZudu89PVqrf80bjyKCFXt9sMV3kIIz6NIk6kahySxvKAETEOZRbWs/aSy7aKYSGJdpnk9X8SrOZbhFAyNlUSaJOJA5jSf1GHox8N8B3W5a9ey5Dbp8AXak4iNjmgyTqRKLCWVACxqg7Hd66agDTZWNqhscFI01bpGAMWsyfkKgTiSqvpC6zHxj5boFh3AsAT++naBkG4F2RyIxeEnUiUTEMSgPIwjKAxL6Ps6Xd27A+Z3fzGNF5o4XeLQYjfL6NRJ1Iet7ora+TCSPfN+2lDeVOb8Ncfp8tNL1IYqh+k0ScKMa8saEyCRj5rnWU1BXZmPPj8PqiWEWNl3tIxIkktbTswtMAkUkpL9tVp4sUMmb6o77DtGkViTiRbKGt2RnJXB+0mpb0zYzzl5LIEskD8R1DDtqhW51UHy5XOlTP1/kw/mGdbyLRJZKREbOmoGJ9I2JmTEi2Lxiqy3tlR6t1psKPi3eK1oK3aODHBPd+ClzEs5RywKNS+C/FMVoS4/s08ErBu6hlGSAymaMBxO9RsU6Rbbsmq8nBh/F3qzVD4UDjF0QaWZjVCwTfi8kGDoFPgCekAMSR4APc870u0aZMwxjKgLFY/xkYIUa/QZEsa7MNBwhbe4DMyRmjcLDLBzCMc8C3eN+f5bKpVpoEPsW7/32wS6TdDwMORsTo3uJA7ERvz3hUqYgEzfR+DsYOFQLOh/EfcK2KzpIJ43jwcUGbP8G0BiBOA18Q3PsqeLZI21pemxvgRhUdF4h2APEeB+MpJaMC5xlXcDC2qgzjMY2HwHiGabyfv1fQ7l/w8yo+lxl8TXDPWFmZDyOT2oKFMWQChK0RELF3GDYp2X+tyTQCquobAGPjEIQxWkDgf3IXr20nVxQpLbyOe1fwXFX9zFcHBoyIMY4DAM89AFHfhbY9M1Xp+zRb6S9UOuX9f4AxqpfA7YJryrnsqYQ2c/NCfv/7wCP6yxcphxGfroEhme0BMTJEG75T415450XqlHeH3zhXIRjPcEWGWh6bJIxYeNH/puA6f5KVdjp4j6DPLhlg8WH8ADxdRUtVzoadvUDszoxqDB3UZZtttPBgLao2TQwFjIfCAWNXyG98dRBW01Iygq8Irv0FnMiI9BD4qKCvMLhQzkwqpdU0FCyrIkOyEMbter1ambhpAb0y+ndbddYCgLARjDh3tvuN7iECI8UtoAuXVFrA85Ps4y/wYrnT+pTBiLbPzALwbvUBkdGfVXVaAGuOiHWlA3RbAL4OHogPgAxkrxkiMEaz2jFBH3fAzyWYXS+BdYnUmCmBEQqWyQDdpT4gRmzYqSaMbYHsqeFA9mkRCPnGkBYkCONJlec7oxSGMTrf+1DQD66034hxzTKReee34ETXhrWaM2Y+ANFFpQN0x8VBxJlx5rwVB92TsJUGsb0qezXMD//uB8So28OBWfmDsJqWWwljMNIE7V7GNZ+gHQtOZmdL+2oaMuL7kiAW6y9H2+X5PHuch9YtVuSelaaxANfeOCHku7nt5NwnhhCMWPiUVJugz6+4Kj66VoniAHZgwwjHwV6MASL2e9G2ziPrpjh97tY8n5txwRwv4Wzon2UEqM7GCd89cG24yugN+7PsqMY2fIhlxqgWglsF/eLlti8Fn+HsuEGhe2oHI2KyFkBWDMeEkTEs5F/j9Hk2ApDIyRbW5B/xyPoJFISoYQBWEfhuDPju94Yvc/QQWPSOV3h+VRejCLgNzlfwfnwYr1Jq7u/DMs6OyLEwRt8mDqL+KmIEqR6Agsx4MgKkz30zr8LtiuetbtfoHgHIjkkAiJdyyturZrlunzA8rFAgByOMWPinZk6LgBgEz1P4XtpX05EChtFNh73nAsiEDD6zCDBeB38s9oTLK9boAMQQByRyVrg/L6gsGiv1RlCgLAXYgj3w+Y2tUD2zOEuGAnOmqQTEYIWR4qr3g7z+fwar8UNdB6iBcoQMbZoheQoZINzaA2M3kL8uZz29jiHh+V0okM0AdHcAvmq8jtgRmG3qk23VEV77c3FepDGMGRyQUashXLjg3ZSNVN/tSKU0nqvmvSp7V1JPaQPQnKz7Rz6QDp+7DT7b3D0fpdLwumCoavaziDWOpIiI1FQu654HEN7rlSG7fViNNUkiophy+grLRGDEw/aVXJ9nEYkQkXYzdShcAL5LokBC1sRrkqA0EikijbKjewm4SwJIhJeCcg+tfZxEikgrIPdLwcj52sqjG8aTSBGpLjvrmgjAtUjD6PGRKBFpWcy8IAFjp+NwoYFEiEjr4fprIYwOn+dTEhkizYULFbxnzV8Il3uggohIMTlY92s9lXSFp4REhChlwuuKcMTsTCRDsq7JJCJEKVUeu04f3acmIupP/wHYJhviTK/+pwAAAABJRU5ErkJggg==" style=""></div>
<div><br></div>
<h1>Report</h1>
<table style="letter-spacing: 0.00938em; width: 100%; font-size: 1rem;" class="demo">
    <tbody>
        <tr style="border-bottom: 2px solid black;" class="fiveReportHeaderRepeat-Level1">
            <td style="width: 28.1305%; background-color: rgb(153, 153, 153); color: rgb(255, 255, 255); text-align: left;">Name</td>

            <td style="width: 50.97%; background-color: rgb(153, 153, 153); color: rgb(255, 255, 255); text-align: left;">SKU</td>

            <td style="width: 18.254%; text-align: left; background-color: rgb(153, 153, 153); color: rgb(255, 255, 255);">Price</td>
        </tr>

        <tr class="fiveReportHelper" contenteditable="false">
            <td class="fiveReportHelper">{{#each @root.[Product].[Records] as | Product |}}</td>
            <td><br></td>
            <td><br></td>
        </tr>
        <tr class="" contenteditable="false">

            <td style="text-align: left;">{{Product.[Name]}}</td>

            <td style="text-align: left;">{{Product.[SKU]}}</td>

            <td style="text-align: left;">{{Product.[Price]}}</td>
        </tr>
        <tr class="fiveReportHelper" contenteditable="false">
            <td class="fiveReportHelper">{{/each}}</td>
            <td><br></td>
            <td><br></td>
        </tr>

    </tbody>
</table>
<div><br></div>

<div style="text-align: center;  display: flex; justify-content: center; align-items: center;">
    <div style="width: 150mm; height: 125mm; border: 1px dashed black; display: flex; justify-content: center; align-items: center;">   {{{_Chart 'ProductChart'}}}</div>
</div>
<div><br></div>
<div><br></div>
<div><br></div>
<div><br></div>

<table class="fiveReportFooter-everyPage" style="width: 100%; height: 10mm;">
    <tbody>
        <tr>
            <td style="text-align: right;"><span style="font-size: 12px;"><em>Page <five.pageNumber.current.arabic> of <five.pageNumber.total.arabic></em></span></td>

        </tr>
    </tbody>


</table>
12.12. Click on the Tick ✔️ icon to save your HTML.
12.13. Click on the Tick ✔️ icon to save your report.
Step 13: Visual > Menus: Adding Menu Items to Your App
13.1. Navigate to Visual > Menus.
13.2. Click the yellow Plus icon to add a new menu.
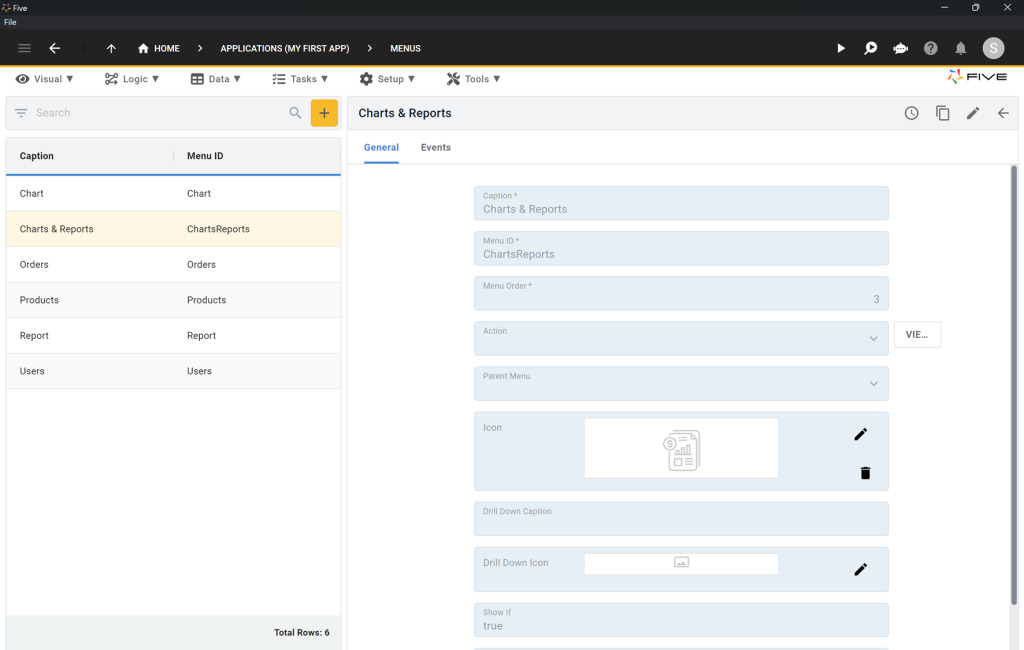
13.3. Create a parent menu called “Charts & Reports.”
13.4. Enter “Charts & Reports” into the Caption field.
13.5. Set the Menu Order to 3.
13.6. Save by clicking the Tick ✔️ icon.
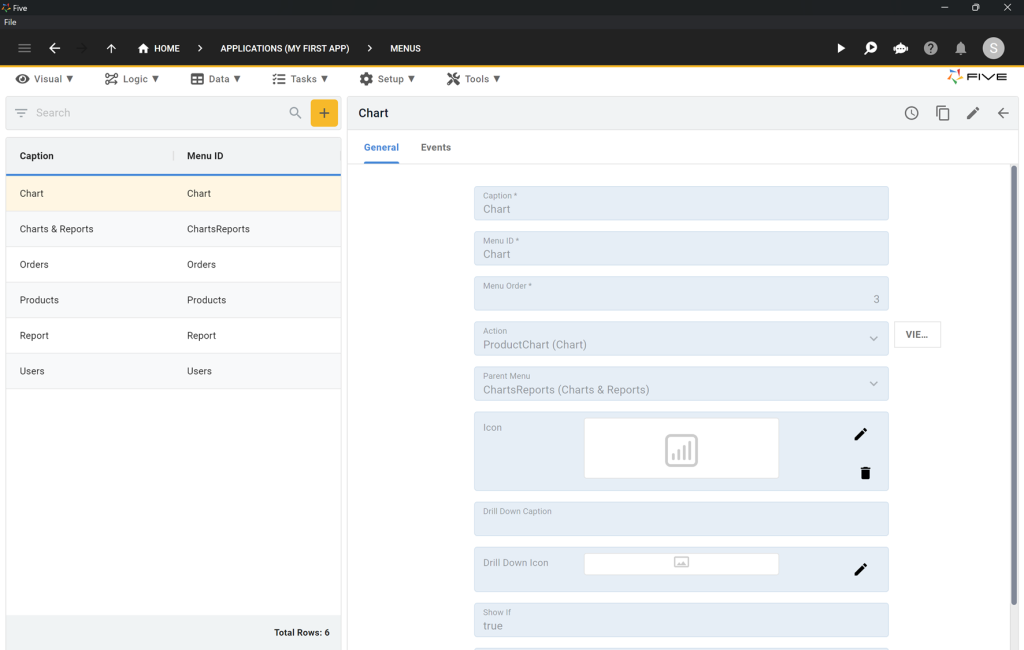
Next, we need to create new menu items for the chart and report.
13.7. Click the yellow Plus icon.
13.8. For the Chart menu, fill in Caption, Action, and Parent Menu as shown in Image 11.2.
13.9. Save by clicking the Tick ✔️ icon.
13.10. For the Report menu, fill in Caption, Action, and Parent Menu as shown in Image 11.3.
13.11. Save by clicking the Tick ✔️ icon.

Third Checkpoint: Ensuring Your App Functions Correctly
Run your application to verify that the forms, charts, and reports are functioning as expected. When you select the Chart from the menu, the corresponding chart should appear. Additionally, test the report to confirm that a PDF document is generated within your application.

Step 14: Logic > Code Editor: Creating a JavaScript Function
To integrate your application with Slack using a webhook, follow these steps to create a function that sends a message to a Slack channel whenever a new order is submitted.
14.1. Navigate to Logic > Code Editor.
14.2. Click the Plus ➕ icon to add a new function.
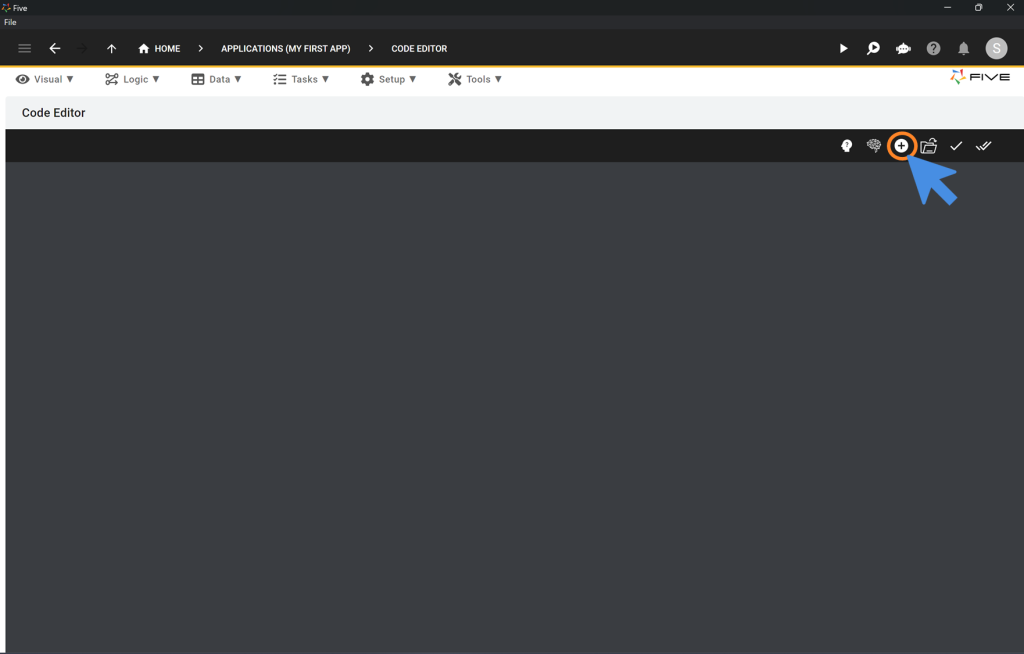
14.3. Enter “Slack” into the Function ID field.
14.4. Keep JavaScript selected as the language.
14.5. Click Okay.
14.6. Delete the existing code and replace it with the following JavaScript function:
function Slack(five, context, result) {
  const client = five.httpClient();
  const form = context.Transactions[0].Values;
  five.log(JSON.stringify(form));
  client.setContentType("application/json");
  client.setContent(`{
        "text": "A Customer has made an order, \n Date: ${form.OrderDate} \n Status ${form.OrderStatus}"
    }`);

  try {
    // Slack Webhook⬇️
    const httpResult = client.post(
      "https://hooks.slack.com/services/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"
    );
    five.log(JSON.stringify(httpResult))
    if (httpResult.isOk() === false) {
      return five.createError(httpResult);
    }
  } catch (err) {
    five.log(err);
  }
  return five.success(result);
}
14.7. Click on the Tick ✔️ icon to save your function.
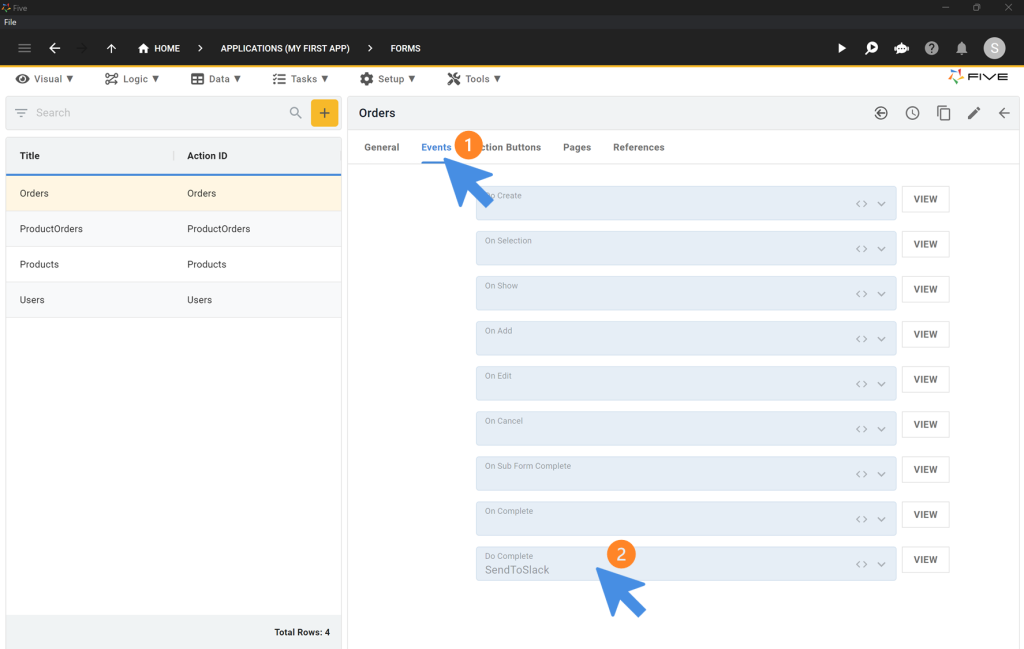
Step 15: Visual > Forms: Associating a Function with an Event
15.1. Navigate to Visual > Forms.
15.2. Select your Orders form.
15.3. Go to the Events section.
15.4. Assign the Slack function to the DoComplete event.
15.5. Save by clicking the Tick ✔️ icon.
Now, whenever a new order is submitted, your Slack channel will receive a notification. Ensure you replace the webhook URL in the JavaScript function with your own Slack webhook URL for testing
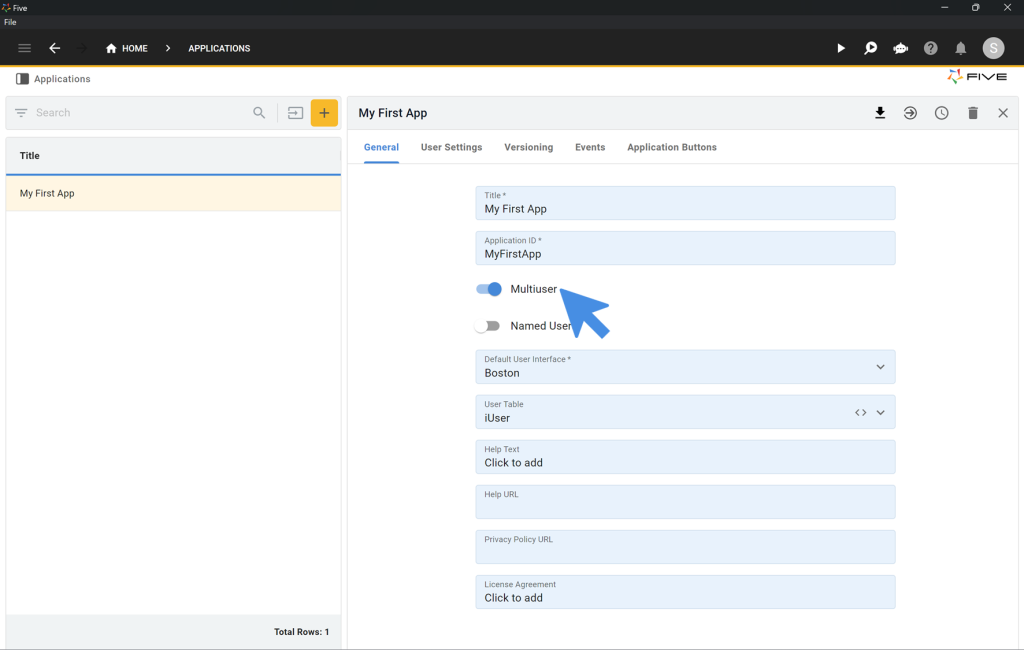
Step 16: Applications: Enabling Multiuser Functionality
To add user management and login features to your app, follow these steps:
16.1. Click on Applications (My First App) in the top navigation bar.
16.2. Toggle the Multiuser switch to on to enable login and user management features.
16.3. Save by clicking the Tick ✔️ icon.
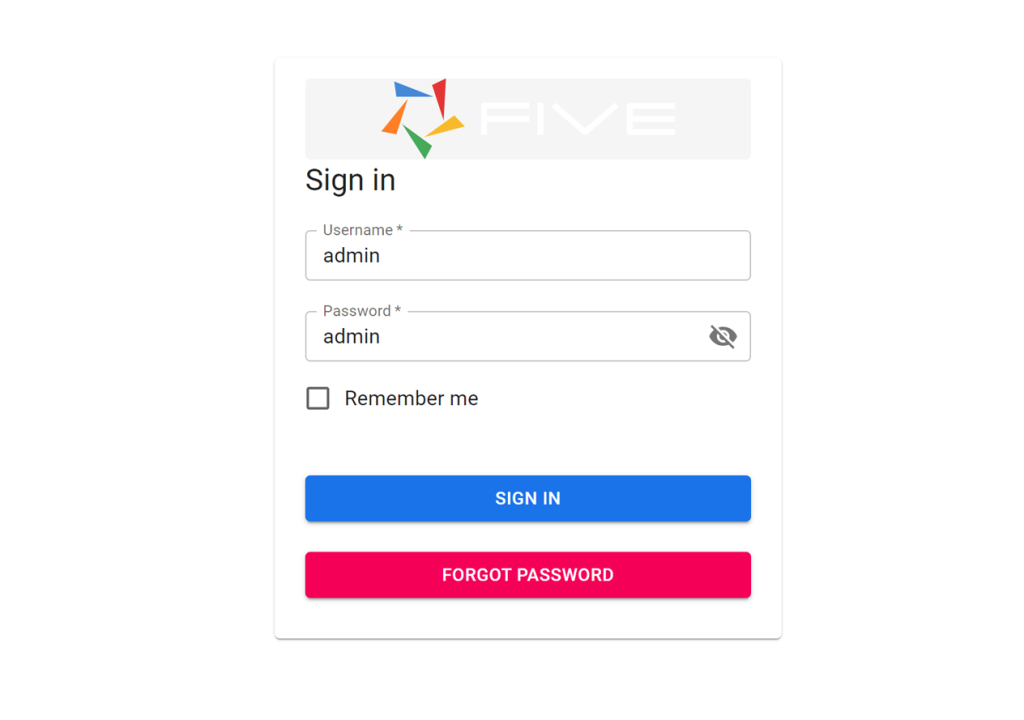
Fourth Checkpoint: First Login
Run your application again, and you should now see a login screen. Use the default admin credentials (username: admin, password: admin) to log in.
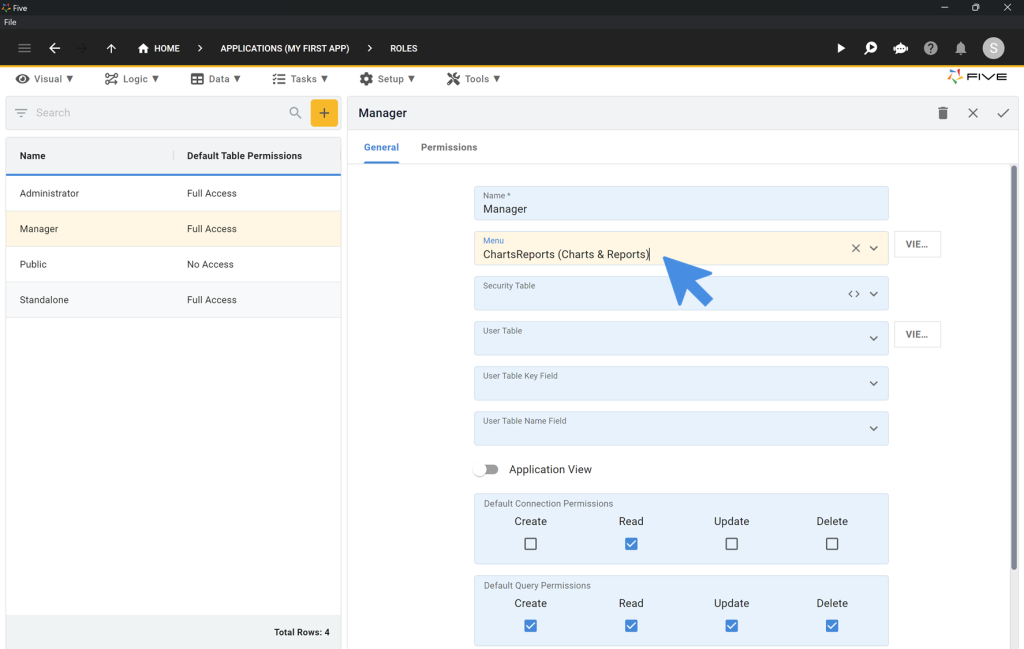
Step 17: Setup > User Roles: Configuring Roles and Permissions
17.1. Navigate to Setup > Roles to create user roles and permissions.
17.2. Click the yellow Plus icon to add a new role.
17.3. Enter “Manager” into the Name field, select ChartsReports (Charts & Reports) as the Menu, and grant full Create, Read, Update, and Delete permissions for the Default Query Permissions.
17.4. Save by clicking the Tick ✔️ icon.
Step 18: Setup > Themes: Customizing the Appearance of Your App
18.1. Navigate to Setup > Themes to create a new theme.
18.2. Click the yellow Plus icon.
18.3. Enter “MyTheme” into the Name field.
18.4. Click “Click to edit theme” to open the theme editor.
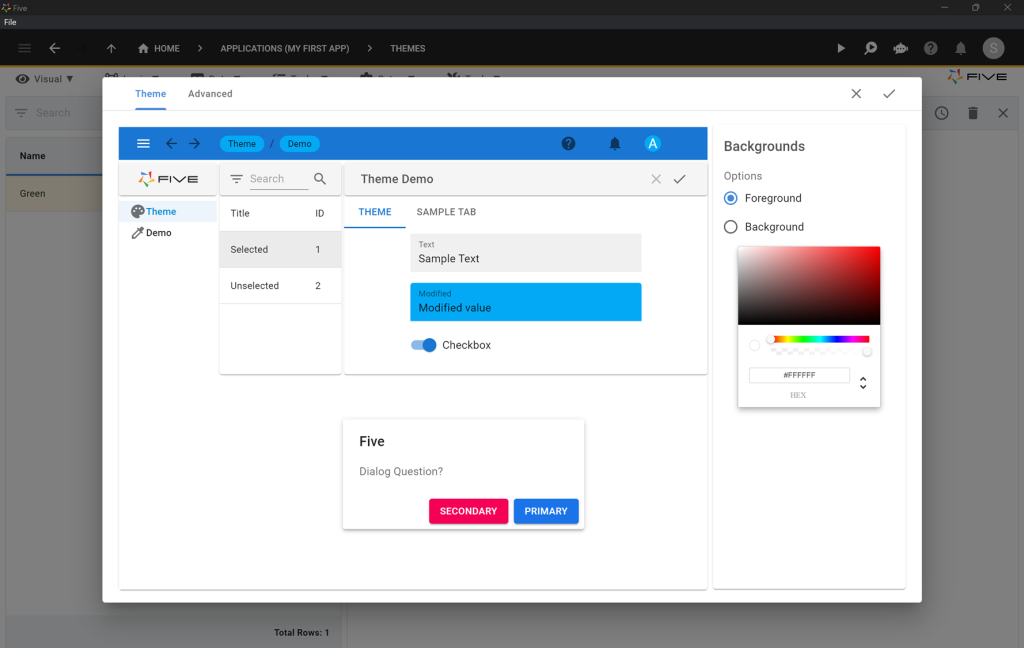
18.5. Select Advanced at the top of the theme editor.
18.6. Visit Five’s Themes, download your preferred theme, and replace the existing code in the Advanced theme editor with the new theme code.
18.7. Save the theme by clicking the Tick ✔️ icon.
18.8. Confirm the changes by clicking the Tick ✔️ icon again.
Step 19: Setup > Instances: Applying a Theme and Customizing the UI
19.1. Navigate to Setup > Instances to apply a theme to your application.
19.2. Select the default instance.
19.3. Choose MyTheme from the Theme dropdown. If using Five’s cloud version (free trial version), stop the deployment first by clicking the Stop ⏹️ button in the top right corner.
19.4. Click the ✏️ icon on Logo and select an image or SVG as your logo.
19.5. Select between the Boston or New York user interfaces under User Interface.

Congratulations: You’ve Built Your Cloud Web Application
You’ve successfully built your first cloud-based application! Recap: you created a database, wrote a query, added forms, charts, and a PDF report, integrated with Slack, added logins and authentication, and customized the front end.
Exploring User Roles
Try out the Manager role you created. Run your app, log in as a manager, and observe the restricted access. Managers can view charts and reports but not forms, demonstrating the granular permissions Five offers for multi-user apps.
Finding Help in Five
If you encounter any issues, here are some resources to assist you:
- Five’s User Community: Visit Five.org for questions or inspiration from other users.
- Five’s Documentation: Access documentation at help.five.org.
- Five’s In-App Help: Utilize the in-app help available in the top right corner or on most fields.
Deploying Your App
Well done you’ve completed How to Build a Cloud Application. Deploy your application with unlimited end-users for just US$29.99 per month. This plan includes a custom URL for online access.