Build a Web App with JavaScript In 3 Steps
How to Build a Web App with JavaScript
In this tutorial, we’ll walk through the process of creating a basic to-do list web application using HTML, CSS, and vanilla JavaScript. This project is perfect for beginners looking to understand the fundamentals of web development without the complexity of frameworks or libraries.
Project Overview
Our to-do list app will allow users to:
- Add new tasks
- View existing tasks
- Delete tasks
- Persist tasks between sessions using local storage
Step 1: Setting Up the HTML Structure
We’ll start by creating the HTML file that forms the backbone of our application. This file defines the structure of our web page.
<!DOCTYPE html>
<html lang="en">
<head>
    <meta charset="UTF-8">
    <meta name="viewport" content="width=device-width, initial-scale=1.0">
    <title>To-Do List App</title>
    <link rel="stylesheet" href="styles.css">
</head>
<body>
    <div class="container">
        <h1>To-Do List</h1>
        <form id="todo-form">
            <input type="text" id="todo-input" placeholder="Add a new task" required>
            <button type="submit">Add</button>
        </form>
        <ul id="todo-list"></ul>
    </div>
    <script src="script.js"></script>
</body>
</html>
This HTML creates a container with a heading, a form for adding new tasks, and an unordered list that will display our tasks.
Step 2: Styling with CSS
Next, we’ll add some CSS to make our app visually appealing and responsive.
body {
    font-family: Arial, sans-serif;
    line-height: 1.6;
    margin: 0;
    padding: 0;
    background-color: #f4f4f4;
}

.container {
    max-width: 500px;
    margin: 30px auto;
    padding: 20px;
    background-color: #fff;
    border-radius: 5px;
    box-shadow: 0 0 10px rgba(0, 0, 0, 0.1);
}

h1 {
    text-align: center;
    color: #333;
}

#todo-form {
    display: flex;
    margin-bottom: 20px;
}

#todo-input {
    flex-grow: 1;
    padding: 10px;
    font-size: 16px;
    border: 1px solid #ddd;
    border-radius: 4px 0 0 4px;
}

button {
    padding: 10px 20px;
    background-color: #4CAF50;
    color: white;
    border: none;
    border-radius: 0 4px 4px 0;
    cursor: pointer;
    font-size: 16px;
}

button:hover {
    background-color: #45a049;
}

#todo-list {
    list-style-type: none;
    padding: 0;
}

#todo-list li {
    background-color: #f9f9f9;
    padding: 10px;
    margin-bottom: 10px;
    border-radius: 4px;
    display: flex;
    justify-content: space-between;
    align-items: center;
}

.delete-btn {
    background-color: #f44336;
    color: white;
    border: none;
    padding: 5px 10px;
    border-radius: 3px;
    cursor: pointer;
}

.delete-btn:hover {
    background-color: #d32f2f;
}
Our CSS file styles the container, form elements, and list items. It uses flexbox for layout and adds hover effects to buttons for better user interaction.
Today, building web apps is easier than ever, thanks to modern application builder platforms.
However, many of these platforms lack flexibility, restricting your ability to add custom code like JavaScript or make unique modifications.
That’s where Five stands out.
Five is a rapid web application builder that allows you to go from prototype to deployment faster than ever before.
While using Five isn’t completely effortless, it significantly reduces the complexity compared to spending over 60 hours learning various coding frameworks and languages. With Five, you can create sophisticated web applications without the usual constraints of application builders.
With Five, you can
1. Set up your database in minutes, and
2. Create a login-protected, user-friendly interface that works well on the web and on any device, such as desktop, tablet, or mobile.
3. Five also offers the flexibility to create custom logic with code (including JavaScript), generate PDF documents, and visualize your data through custom charts and dashboards.
Get free access to Five here and start building your web application.
Now let’s add JavaScript to our existing todo list. Although keep in mind this process would be alot easier in Five.
Step 3: Adding Functionality with JavaScript
The JavaScript file is where we add interactivity to our app. Here’s a breakdown of its main functions:
- Event Listeners: We set up listeners for the form submission and the DOMContentLoaded event.
- Task Management: Functions to add, display, and delete tasks.
- Local Storage: Methods to save and load tasks using the browser’s local storage.
document.addEventListener('DOMContentLoaded', () => {
    const form = document.getElementById('todo-form');
    const input = document.getElementById('todo-input');
    const todoList = document.getElementById('todo-list');

    // Load todos from localStorage
    let todos = JSON.parse(localStorage.getItem('todos')) || [];

    const saveTodos = () => {
        localStorage.setItem('todos', JSON.stringify(todos));
    };

    const renderTodos = () => {
        todoList.innerHTML = '';
        todos.forEach((todo, index) => {
            const li = document.createElement('li');
            li.textContent = todo;

            const deleteBtn = document.createElement('button');
            deleteBtn.textContent = 'Delete';
            deleteBtn.classList.add('delete-btn');
            deleteBtn.addEventListener('click', () => {
                todos.splice(index, 1);
                saveTodos();
                renderTodos();
            });

            li.appendChild(deleteBtn);
            todoList.appendChild(li);
        });
    };

    form.addEventListener('submit', (e) => {
        e.preventDefault();
        const todo = input.value.trim();
        if (todo) {
            todos.push(todo);
            saveTodos();
            renderTodos();
            input.value = '';
        }
    });

    renderTodos();
});
Key Concepts
- DOM Manipulation: We use methods like
getElementById()andcreateElement()to interact with the HTML elements. - Event Handling: The app responds to user actions like form submissions and button clicks.
- Local Storage: We use
localStorageto persist data in the browser, allowing tasks to be saved between sessions. - Array Methods: We use array methods like
push()andsplice()to manage our list of tasks.
Building this to-do list app provides a solid foundation in web development basics. It demonstrates how HTML, CSS, and JavaScript work together to create interactive web applications. From here, you can expand the app with features like task editing, due dates, or even connecting it to a backend server for multi-device synchronization.
How to Develop a Web App in Minutes
Now let’s explain how to build a web app in minutes. As explained there’s a simpler way. With Five, an intuitive application builder, you can replace traditional, coder-heavy database administration tools with a user-friendly interface.
Five allows users to create databases from scratch and offers a range of application development features, including form creation, chart generation, and report building. Essentially, Five serves as a comprehensive web-based development environment.
If you’re new to Five, it might seem a bit overwhelming at first. Let’s break down the core concepts to make your first experience successful and enjoyable!
1: Access Five
First, sign up for free access to Five and start building web apps directly in your browser.

2: Start Developing
With Five up and running, you’re ready to dive into your first app development project! The best place to start is by following our YouTube tutorial on developing a membership application. This seven-step guide will walk you through building an app with Five, from database modeling to previewing your finished application locally.
Step 1 of the tutorial explains how to create a database table in Five. If your main goal is developing a web app, this four-and-a-half-minute video is highly recommended.
The video also demonstrates how to assign different SQL data types to your table fields and visually inspect your database schema using Five’s database modeler. Additionally, it covers how Five automatically adds primary keys to all your tables.
3: Where to Find Help
Every new tool has a learning curve, and Five is no different. For those familiar with SQL, Five is intuitive, relying heavily on standard SQL concepts like relationships, primary and foreign keys, data views, and queries.
For newcomers to relational databases or those creating their first database, the learning curve might be steeper. Where can you find help if you get stuck?
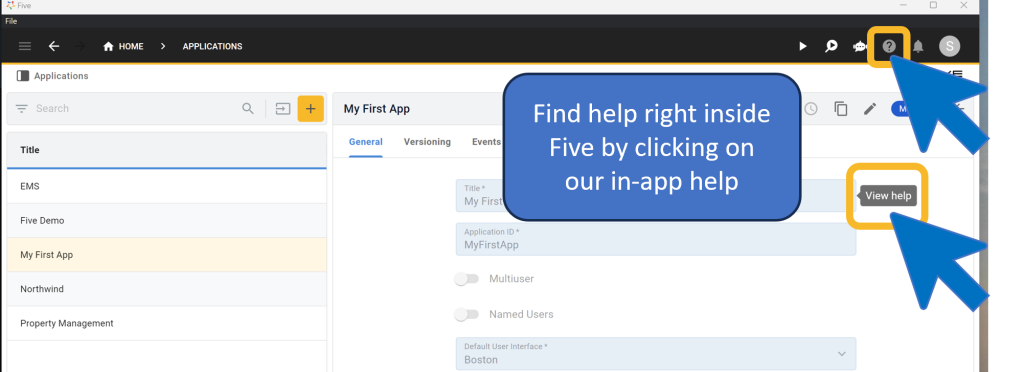
In addition to our user community and YouTube channel, Five offers extensive in-product help. To access help and documentation, click the Help icon in the top right corner. While it might not answer every question, the help is comprehensive and covers many commonly asked questions.
Moreover, many of Five’s fields have help text accessible by hovering over the field and clicking “View help.” Check out the image below to see where the Help buttons are located in Five.

30-Minute Code Along Tutorial: Develop a Full-Stack Web App
Follow our free step-by-step web app development guide and develop a full-stack web app in just 30 minutes with a fully responsive web UI and MySQL database.


