How to Import Excel to MySQL [4-Step Tutorial]
Importing Excel Data into MySQL: A Beginner’s Guide
Are you looking to convert your Excel spreadsheet into a MySQL database? If so, you’re in the right place! In this beginner-friendly tutorial, we’ll walk you through the process of importing your Excel data into a MySQL database.
Don’t worry if you don’t have a background in coding – this guide is designed to be accessible to everyone, regardless of technical expertise.
To make things even easier, we’ll be using Five’s free trial to build our prototype application. Before we dive in, make sure you’ve signed up and installed Five, which you can do for free.
Ready to get started? Let’s find out how to import Excel to MySQL!
To follow this tutorial you’ll need to sign up for free access to Five.
Step by Step: Import Excel to MySQL
Here’s a quick overview of what we’ll be doing:
Step 1: Prepare Your Excel Data
The first step is to ensure your Excel spreadsheet is properly formatted and ready for import. Here are a few tips:
- Make sure each column has a clear header that describes the data it contains
- Remove any empty rows or columns
- Ensure data is consistently formatted (e.g., dates are in the same format)
- Save your Excel file in CSV format
Step 2: Create a MySQL Database
Next, you’ll need to create a new MySQL database to house your imported Excel data. Using Five, you can easily create a MySQL database from within the platform.
Step 3: Import CSV Data into MySQL
With your database created, you’re ready to import your Excel CSV file. Five provides a simple interface for uploading your CSV and mapping the columns to your MySQL table.
Step 4: Verify Successful Import
Once the import process is complete, it’s a good idea to verify that your data was successfully transferred. You can do this by running a few simple SQL queries to check that your tables are populated with the expected data.
And that’s it! By following these steps, you’ll have successfully imported your Excel spreadsheet data into a MySQL database, putting you well on your way to converting your Excel-based solution into a full-fledged web application.
Step 1: Prepare Your Excel Data
Before you start importing your Excel data into MySQL, it’s crucial to ensure that your spreadsheet is properly formatted and cleaned up. Here are some tips:
- Make sure your header row (row 1) only contains descriptive names for the data stored in each column.
- Avoid repeating the same information in multiple columns. Instead, use separate columns for distinct data points.
- Ensure that each cell contains only one piece of data. Don’t mix multiple data points in a single cell.
- If you have multiple values for the same item, split them across multiple columns instead of putting them in the same cell.
For example, let’s say your spreadsheet contains information on Products, Prices, and Quantities.
Here’s what your Excel spreadsheet should look like:
| Product | Price | Quantity |
| Product 1 | 4.99 | 100 |
| Product 2 | 5.99 | 4 |
| Product 3 | 100.99 | 58 |
To clean up your data, consider using these helpful Excel functions:
TRIM: Removes leading, trailing, and extra spaces between words.CLEAN: Removes all nonprintable characters from text.PROPER: Converts the first character to uppercase and all other characters to lowercase.
Once you’ve cleaned up your data, export your excel spreadsheet into a csv file.
Step 2: Setting Up Your MySQL Database and Importing Data
Create a New Application in Five
- Sign up for free access to Five in your web browser. You’ll be welcomed by a screen that looks like this:
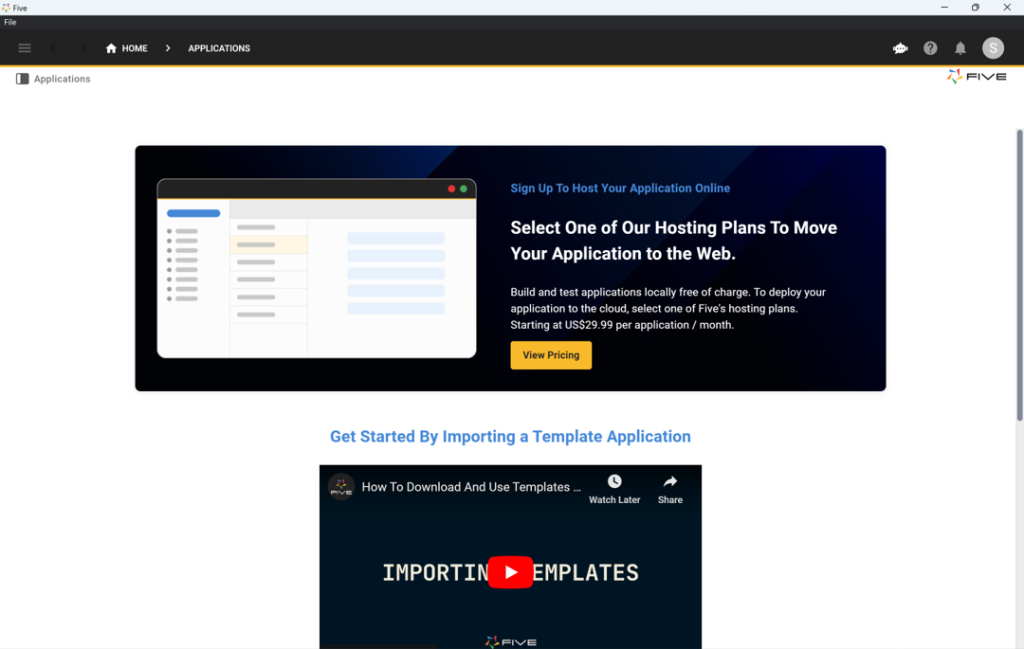
- Navigate to Applications: Once logged in, click on “Applications” near the top left corner of the screen, just below the hamburger menu icon.
- Create New Application: Click on the yellow Plus icon. A new window titled “New Applications Record” will appear.
- Title Your Application: Give your application a title, such as “Excel to Web App,” and save it by clicking the Tick Mark in the top right corner. Your screen should now display your new application.
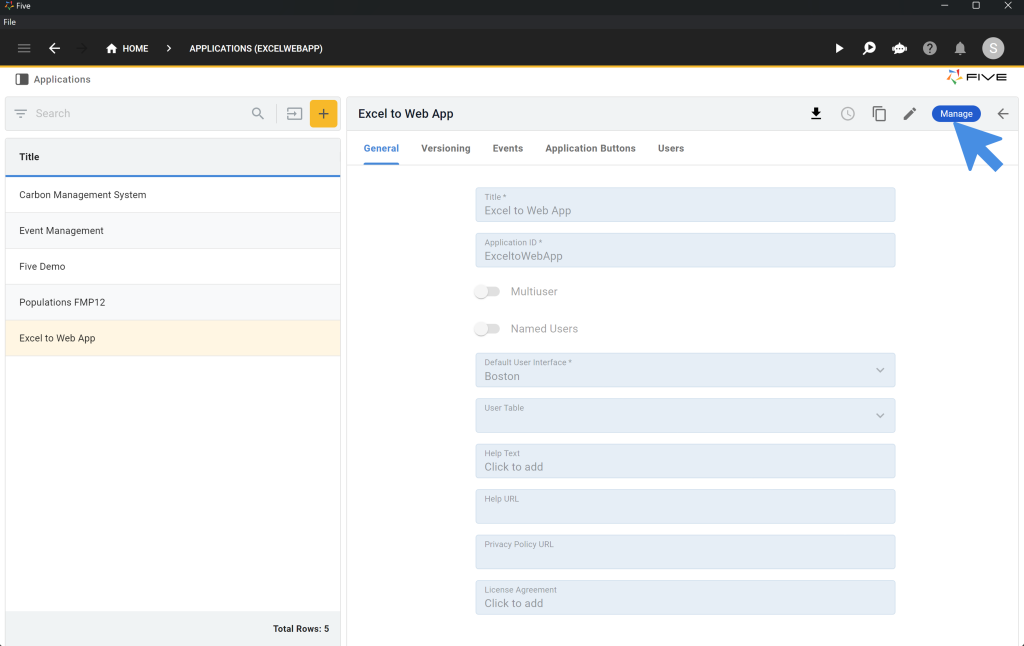
Create Your Database and Import Data
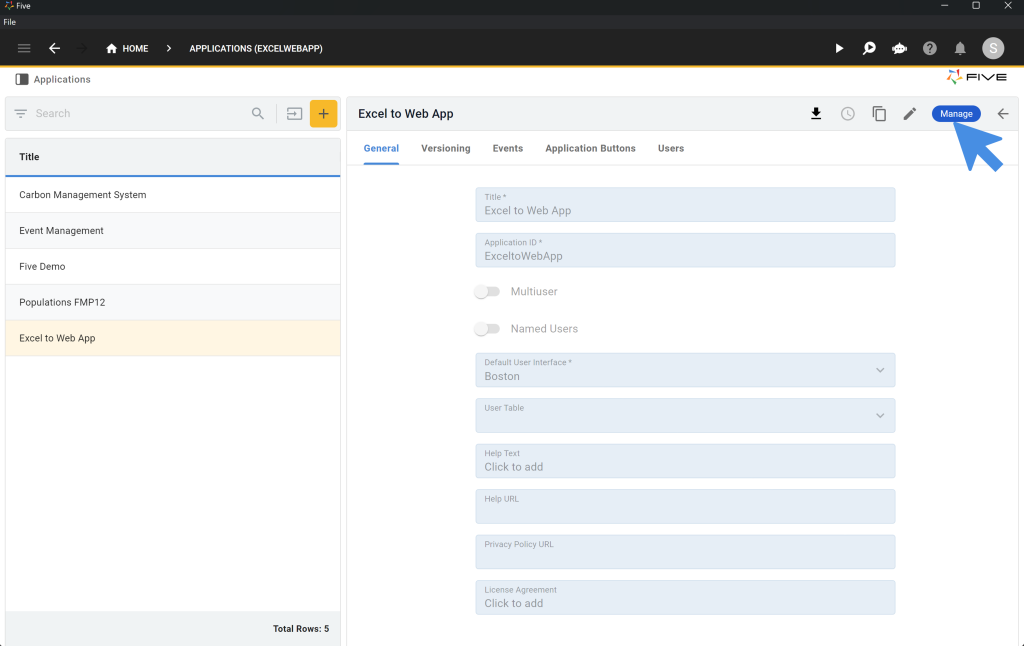
Access Database Management: Click the blue “Manage” button on the top right of the screen near the Five logo.
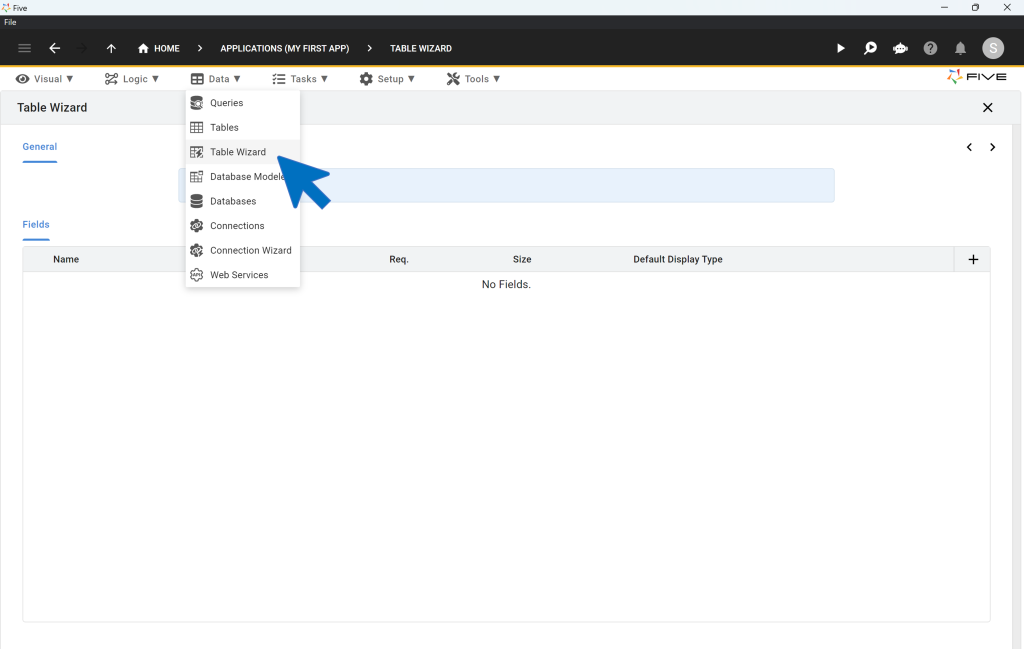
Open Table Wizard: Navigate to “Data” and then select “Table Wizard.”
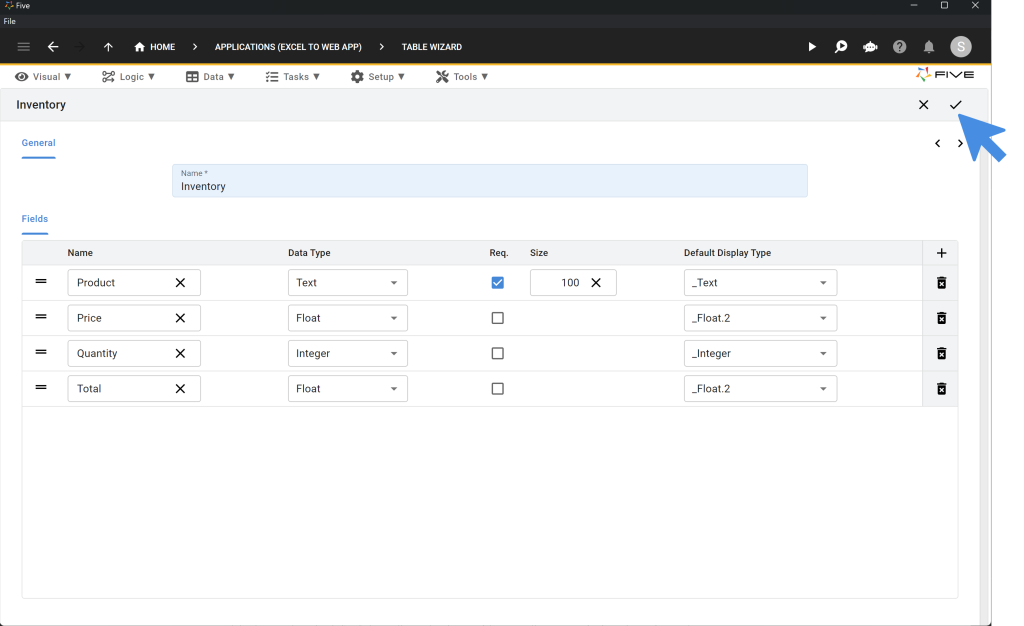
Creating Your Database Table
- Name Your Table: Name your table “Inventory.”
- Add Database Fields: Click the Plus icon four times to create four database fields:
- Field 1: Name it “Product,” select “text” as its data type, and set its size to 100.
- Field 2: Name it “Price,” select “float” as its data type, and set its display type to “float.2.”
- Field 3: Name it “Quantity,” with “integer” for both data and display type.
- Field 4: Name it “Total,” which will be used for calculations in later steps.
- Save the Table: Ensure your table setup matches the specifications and click the Tick mark to save.
Importing Data from Excel to MySQL
- Prepare Your CSV File: Ensure your Excel data is saved as a CSV file. If you’d like to use the data provided above, download our CSV file here.
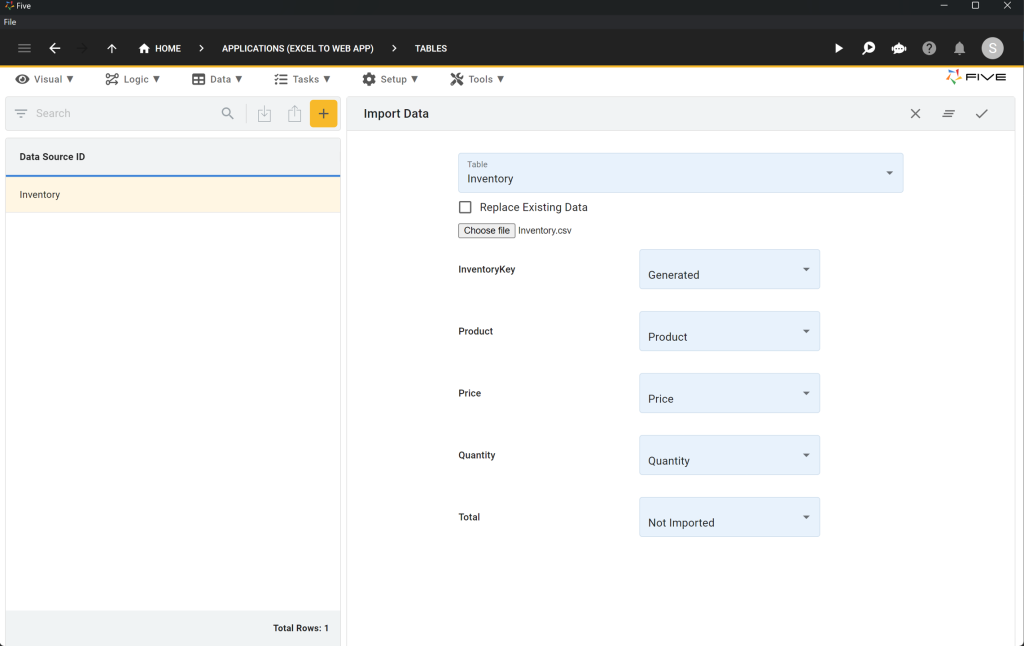
- Import Data: Go to “Data” > “Tables,” then click on the “Import CSV into Table” icon.

- Select Table for Import: Choose the “Inventory” table from the dropdown menu.
- Upload CSV File: Click “Choose File” and select your CSV file, then upload it.
- Map Fields: Five will automatically map the fields if they match the column names in your CSV file.
- Set InventoryKey: Select “Generated” for InventoryKey to auto-generate unique keys.
- Exclude Total: For the “Total” field, select “Not Imported.”
- Finalize Import: Click the Tick mark to complete the data upload.
Congratulations! You have successfully created a MySQL database table and imported data from your Excel file. In the next step, we will add a form to your application and preview the final product.
Step 3: Adding a Form and Previewing Your Application
After setting up your MySQL database and importing data, the next step is to add a form and preview your web application. This step will show you how to import Excel data to MySQL, and create an interactive interface for your users.
Adding a Form
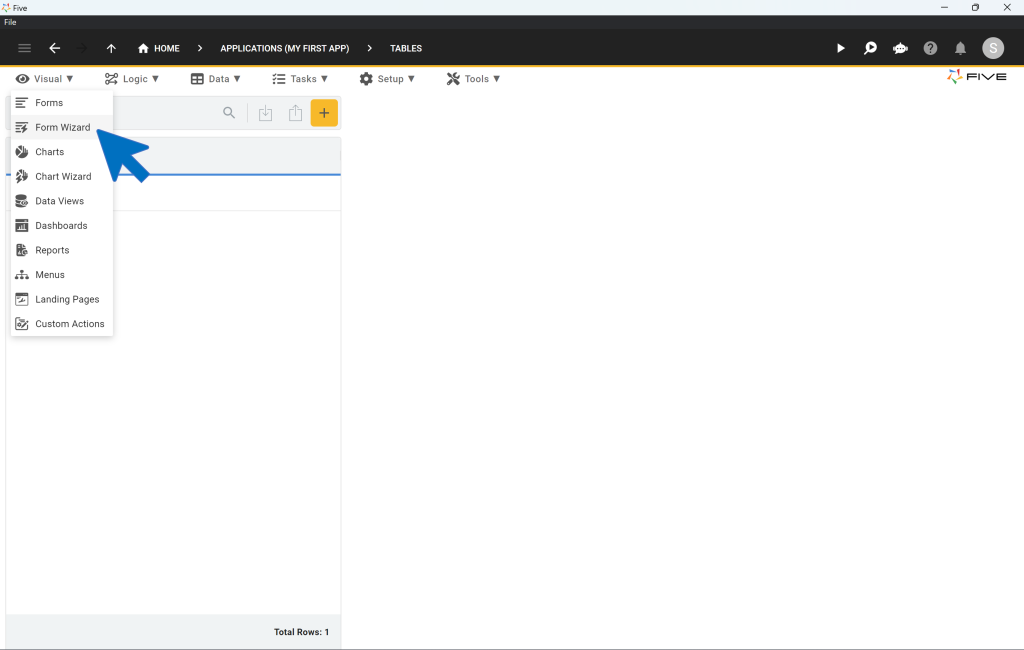
Access Form Wizard: Five makes it simple to create a form for end-users. Start by clicking on “Visual” and then selecting “Form Wizard.”
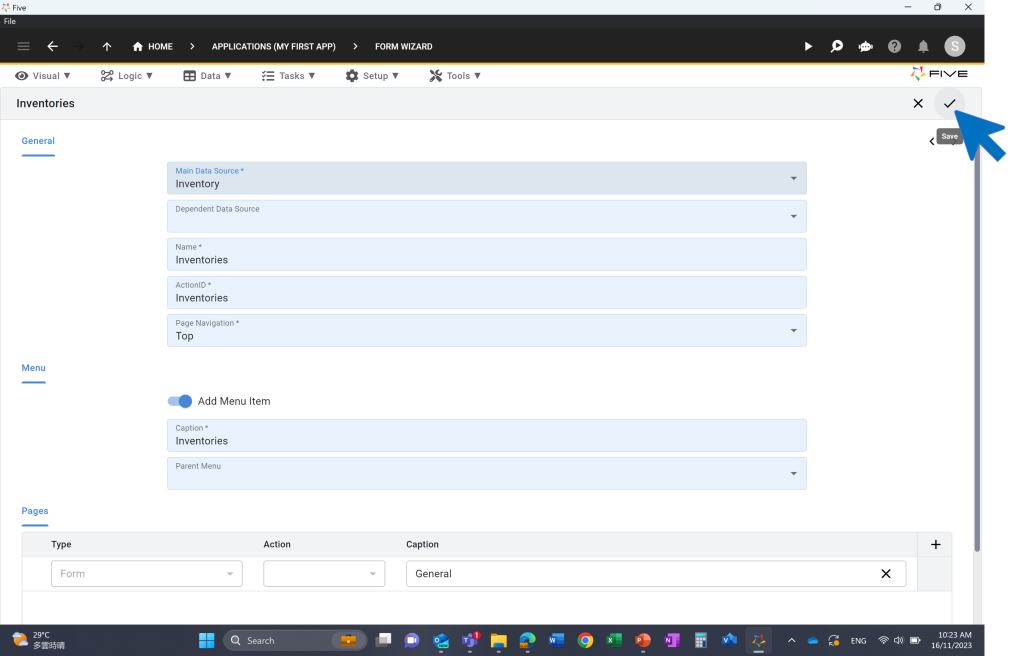
Select Main Table: In the Form Wizard, choose “Inventory” as your Main Table.
Save the Form: Click the Tick mark to save your form setup.
Previewing Your Application
Run Your Application: Click the “Run” button at the top right corner. If the Run button is not visible, you need to deploy to development (it might take a couple of minutes for your web app to be live):
Here’s what your application looks like:
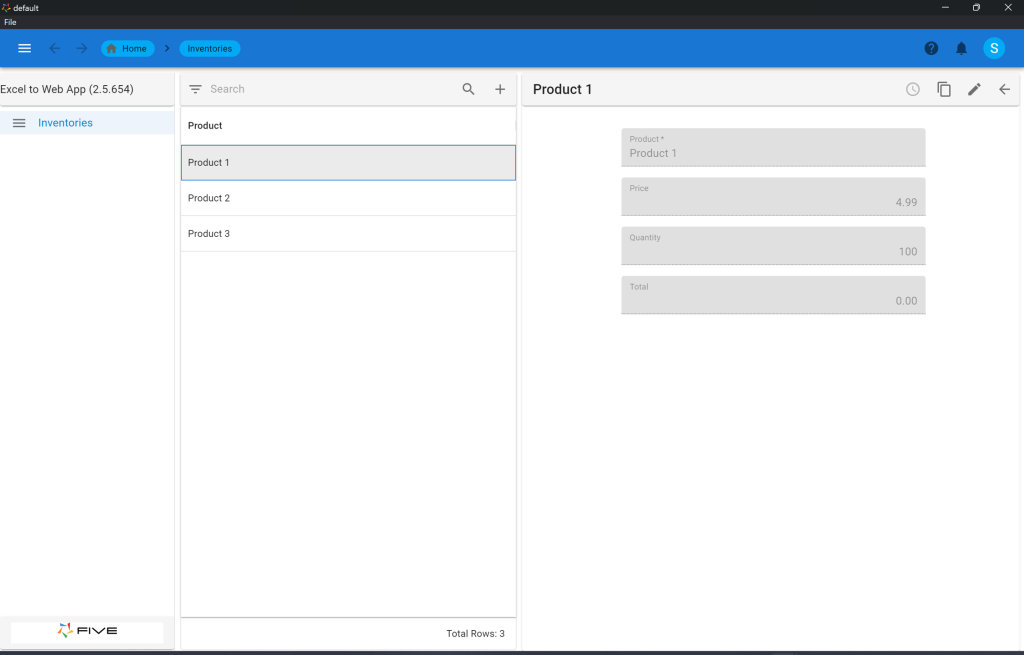
Your Application Interface
Five provides a fully auto-generated front-end for your MySQL database, including the form you created. The interface features:
- Menu: A menu on the left side for navigation.
- Search Bar: A search bar at the top to quickly find records.
- Filter Options: A filter next to the search bar to refine your data view.
- CRUD Operations: The ability to add, edit, or delete records through the graphical user interface.
By following these steps, you have successfully imported Excel data to MySQL, and created an interactive web application interface. Continue with the next steps of this tutorial to further develop your application.
Import Excel to MySQL: Next Steps
Congratulations! You have successfully connected Excel to MySQL, imported Excel data to MySQL, and created a web interface using Five. Now, let’s explore the next steps to enhance your web app.
This blog post is part 1 of a 5-part series on converting Excel to MySQL. To view the other parts, follow the links here:
- Part 2: Import Excel to MySQL – Calculating a Field
- Part 3: Import Excel to MySQL – Adding a Theme
- Part 4: Import Excel to MySQL – Adding Logins to Your App
- Part 5: Import Excel to MySQL – Creating Charts and Dashboards
There’s a lot more you can develop in Five. For inspiration, check out this screenshot of a finished web interface based off Excel data transferred to a MySQL database. Visit the Five Use Cases page or continue following our tutorial series to discover additional features and capabilities.

By now, you should have a solid understanding of how to import data from Excel to MySQL.
In case you get stuck during the development process, we’re here to help! Continue developing your application by accessing these resources:
- Five’s User Community: Visit https://five.org to ask questions or get inspiration from other users.
- Five’s Documentation: Visit help.five.org to access Five’s comprehensive documentation.


