Using Webservices To Connect To REST APIs
Five Labs: Using WebServices In Five To Connect To REST APIs
Welcome to Five Labs, a step-by-step guide to building applications using Five.
This lab will guide you through the process of connecting to a REST API and using it as a data source in Five through the Connection Wizard.
Lab Objectives
By the end of this lab, you will understand how to use the Connection Wizard in Five to integrate an API as a data source and subsequently design forms based on that data.
To get started, here’s what we need:
- Have Five installed in your system or run Five on the cloud (with a paid subscription).
To get started, here’s what we need:
- Have Five installed in your system or run Five on the cloud (with a paid subscription).
Step 1: Creating An App In Five
First, let’s launch Five and click the yellow + button to create a new application. Assign it a name and press save. Then, select Manage to begin developing your application.

Step 2: Using The Connection Wizard
Let’s dive straight into connecting our API. For this tutorial, we’ll utilize the Dummy JSON API, which offers sample data for various products
We can start by clicking on Data and then navigating to Connection Wizard

After clicking on the Wizard, you’ll be presented with an interface that has some similarities to Postman. Start by selecting ‘New’ from the WebService lookup, then assign it a WebService ID and Name. For our purposes, we’ll use the name “DummyProducts.”
Next, apart from general, you’ll notice several other tabs at the top:
- Read List Mapping: This expects an endpoint that returns all records from the API using a GET method.
- Read Single Mapping: Requires an endpoint that provides a single record.
- Create Single: Here, you’ll need an endpoint where you can send a POST request to add a new record.
- Update Single: This is for an endpoint where you can use a PUT or PATCH method to update an existing record.
- Delete Single: This tab expects an endpoint that, through a DELETE request, allows you to remove a record from the API.
Setting up the Endpoints:
For the “Read List Mapping“, we’ll input the endpoint that fetches all records. Since we are Utilizing the Dummy JSON API, the relevant URL is: https://dummyjson.com/products (as mentioned on their official website)
Once you’ve entered the endpoint, click “Send” to view the returned results.

If your API mandates authorization or specific headers, you can set these up in the adjacent ‘Authorization’ and ‘Headers’ tabs.
For “Read Single Mapping“, “Update Single“, and “Delete Single“, we’ll utilize an endpoint that fetches a specific record. According to the Dummy JSON website, the relevant URL structure is https://dummyjson.com/products/{productID}, where {productID} represents the product’s ID.
Let’s use this in the connection wizard now our URL should look something like this: https://dummyjson.com/products/:id where ‘id’ is the variable where we will pass the product’s ID

For the “Create Single Mapping“, we’ll use the endpoint https://dummyjson.com/products/add. This endpoint enables us to add new records to the API via a POST request.
Finally, we can click on save to store the connection
Step 3: Using API As a Data Source
Now that we’ve established a connection in Five, it can be utilized as a data source. For the purpose of this tutorial, we’ll construct a basic form using this connection.
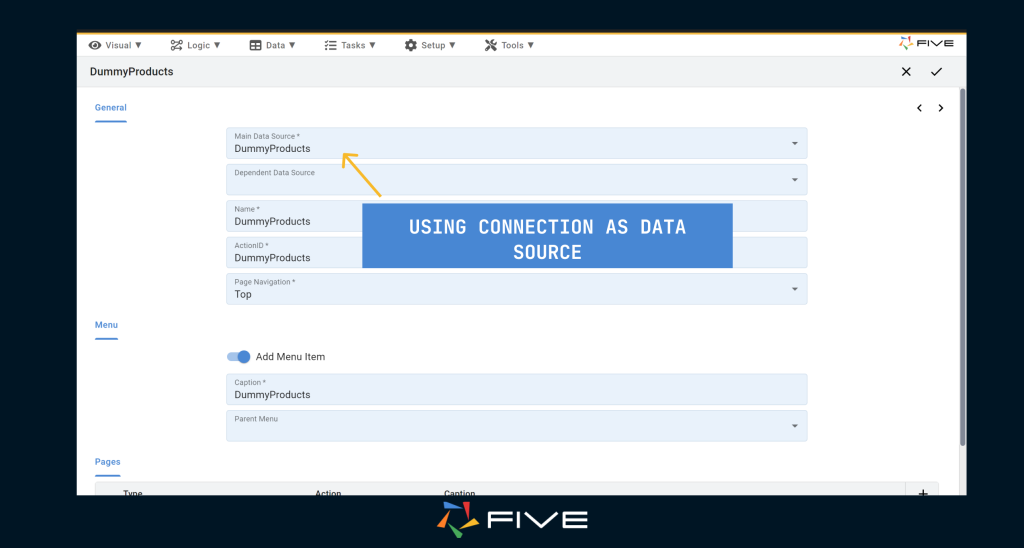
First, click on “Visual” followed by “Form Wizard”. In the primary data source lookup, choose “DummyProducts” (or any other name you might have given your connection).
Five will take care of populating most of the details for you. At this stage, you’re welcome to modify any settings as you see fit.
Click ‘Save’ to store the form, and then we can finally run our application

Conclusion
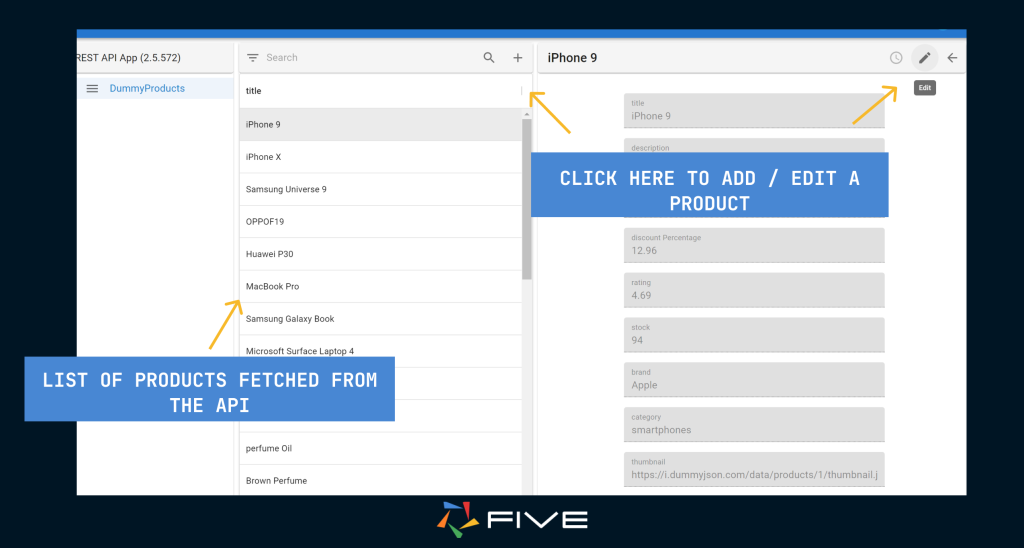
In your end-user application, you now have a form that contains all of the products from the API. You can click on each record to view their details, even make changes, add new records, and delete them as well.
In this tutorial, we’ve walked through the steps of using Five to connect to a REST API, specifically the Dummy JSON API. Through the Connection Wizard, we’ve successfully set up endpoints to read, update, and manage product data.
With our connection saved and the form set up, our end-user application now showcases products from the API.
Congratulations! You’ve successfully built an application on Five that uses an API as a data source in just three simple steps.