How To Build a SQL App
Can SQL create web apps? The answer is yes, it can. With the right tools, it is possible to create an entire web application with little more than a few lines of SQL. The only knowledge required is SQL and an understanding of relational databases, such as MySQL.
In this step-by-step tutorial, we are building a SQL app, using only Five, a rapid application development environment, and SQL.
Goals and Objectives
In this step-by-step tutorial, we are developing:
- A responsive SQL app that uses a MySQL database,
- A chart on top of an SQL query, and
- A PDF report that shows data from our SQL database to our application.
- Last, we put all of this into a login-protected, responsive web app.
Sounds like a lot? You’ll be surprised how quickly we can do this in Five!
Before we continue, make sure to sign up for free access to the Five development environment.
Table of Contents
- Goals and Objectives
- Resources and Downloads
- Step 1: Creating a New Application
- Step 2: Running Your Application ▶️
- Step 3: Data > Table Wizard: Creating Database Tables
- Step 4: Data > The Database Modeler
- First Checkpoint: Is Your Database Setup Correctly?
- Step 5: Data > Tables: Importing a CSV
- Step 6: Visual > Form Wizard: Creating Forms
- Step 7: Visual > Forms: Adding a Page to a Form
- Second Checkpoint: Run Your Application
- Step 8.A.: Using Five’s End-User GUI
- Step 8.B.: Data > Queries: Write SQL In Five
- Step 9: Visual > Chart Wizard: Create Charts For Your Application
- Step 10: Visual > Reports: Creating a PDF Report
- Report
- Step 11: Visual > Menus: Adding Menu Items to Your App
- Third Checkpoint: Here’s What Your App Should Now Look Like
- Step 12: Applications: Turning Your App Into a Multiuser App
- Fourth Checkpoint: Logging Into Your Application For The First Time
- Step 13: Setup > User Roles: Creating Roles And Permissions
- Step 14: Setup > Themes: Give Your Application a Unique Look
- Step 15: Setup > Instances: Applying a Theme, Logos and Customizing the UI
- Congratulations: Creating a SQL App
- Finding Help in Five
- Host Your SQL App Online For Just US$29.99 Per Month
Get Your App Online For US$29.99 Per Month
Host Your App Online
Select one of our hosting packages.
Starting from US$29.99 per app and month
To deploy your application, sign up for one of our paid plans, starting from US$29.99 per month and application.
Resources and Downloads
CSV File
Download the CSV file here.
SQL Query
Download the SQL query here.
Theme
Download the CSS theme here.
Report Template
Download the PDF report template from here.
Step 1: Creating a New Application
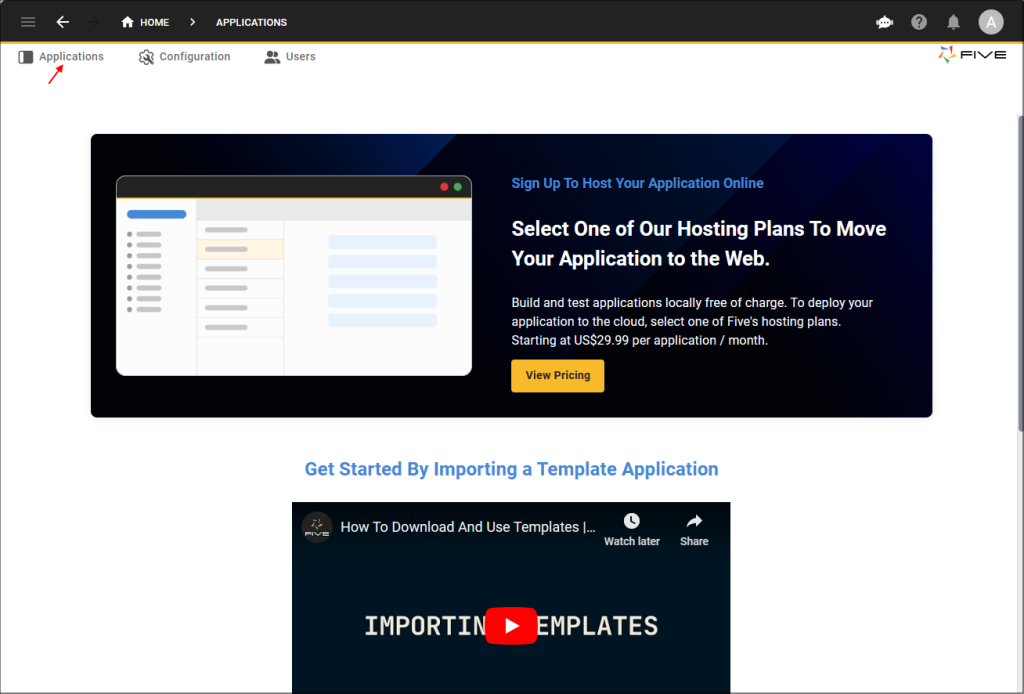
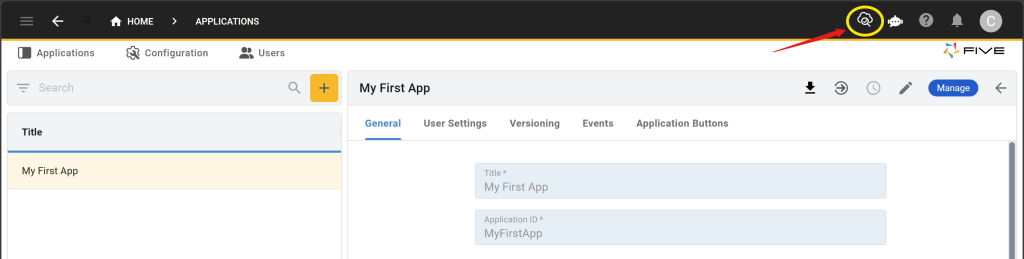
1.1. To create a new application in Five, click on Applications.
1.2. Next, click on the yellow Plus icon.
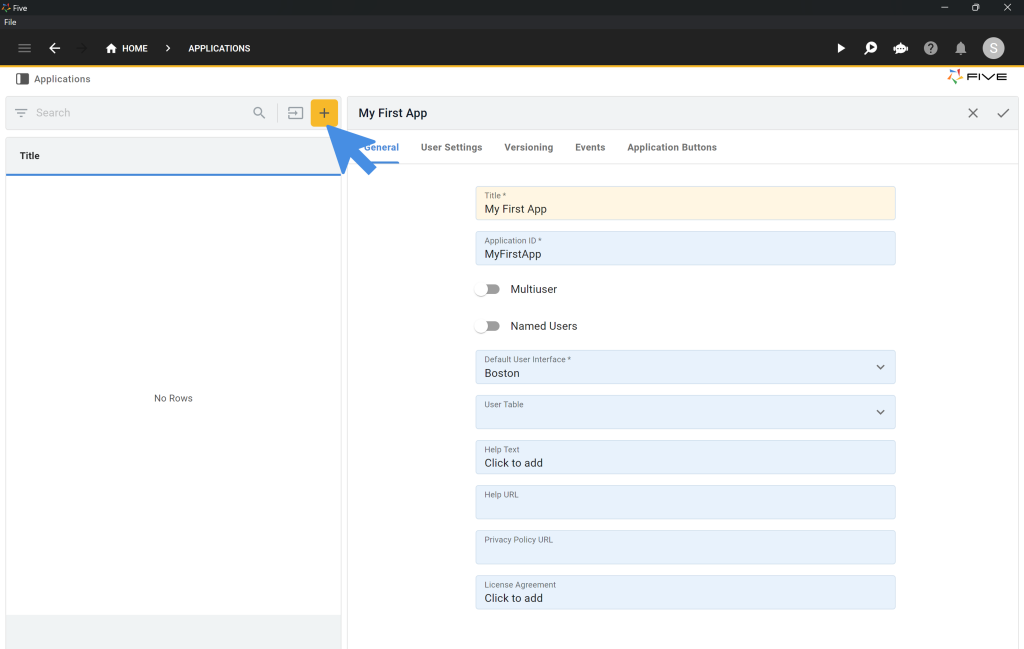
1.3. Type My First App in the Title field.
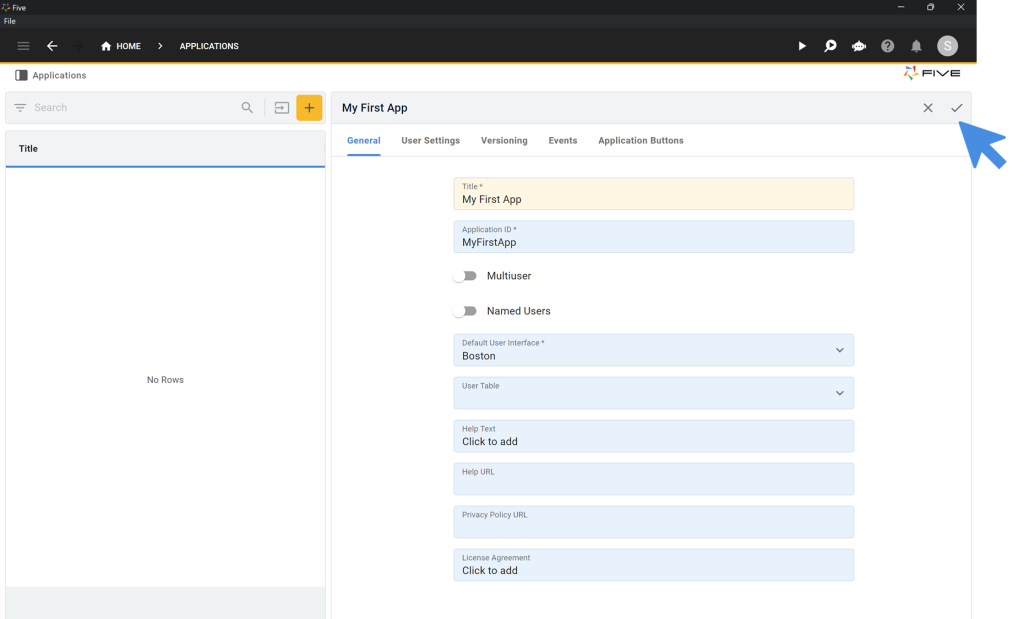
1.4. Click on the Tick ✔️ icon to save.
Step 2: Running Your Application ▶️
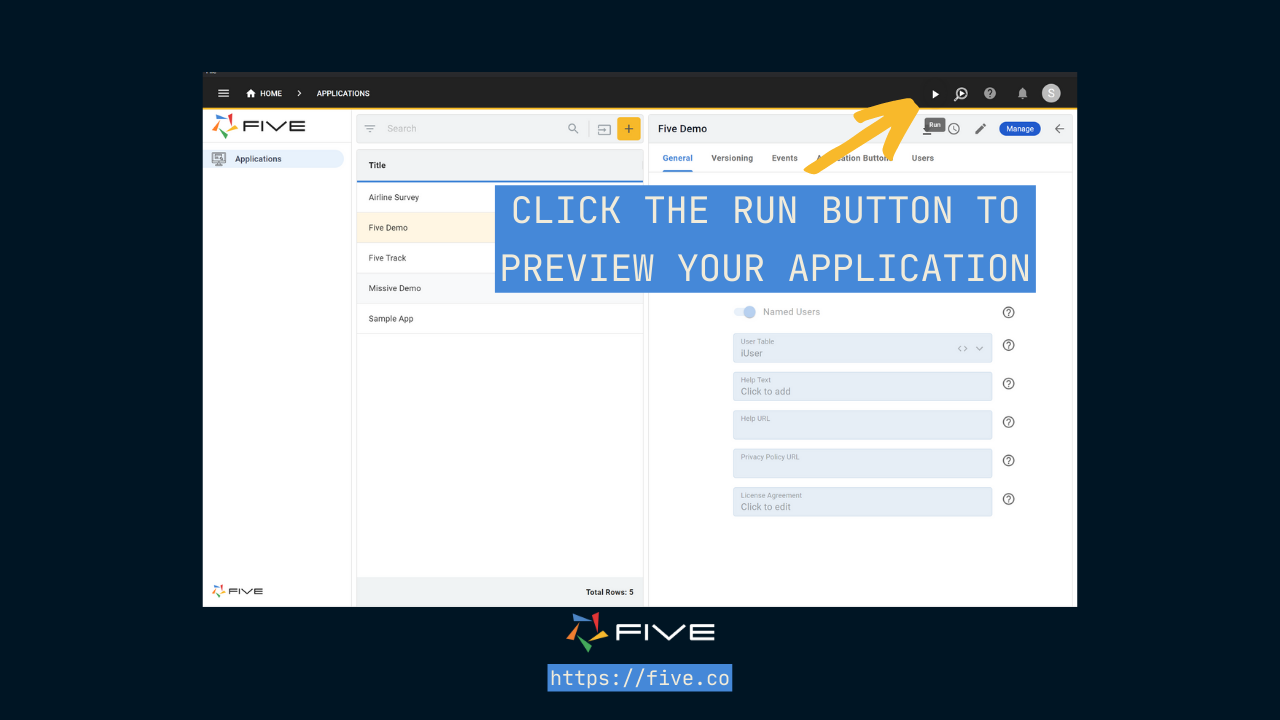
You can run and preview your application at any time. To do so, click on the Deploy to Development button in the top navigation bar. The first deployment of your app can take some time, as Five is creating a cloud-hosted instance, including a database server and unique URL, for your app.
Once your application is deployed, the Deploy to Development button turns into a Run ▶️ button in the top right corner.
Every time you click on Run ▶️, a new window opens up, showing the current state of your application.
Step 3: Data > Table Wizard: Creating Database Tables
Let’s start developing our application. The first step towards a SQL app is of course the creation of a SQL database.
Let’s go back into our development environment.
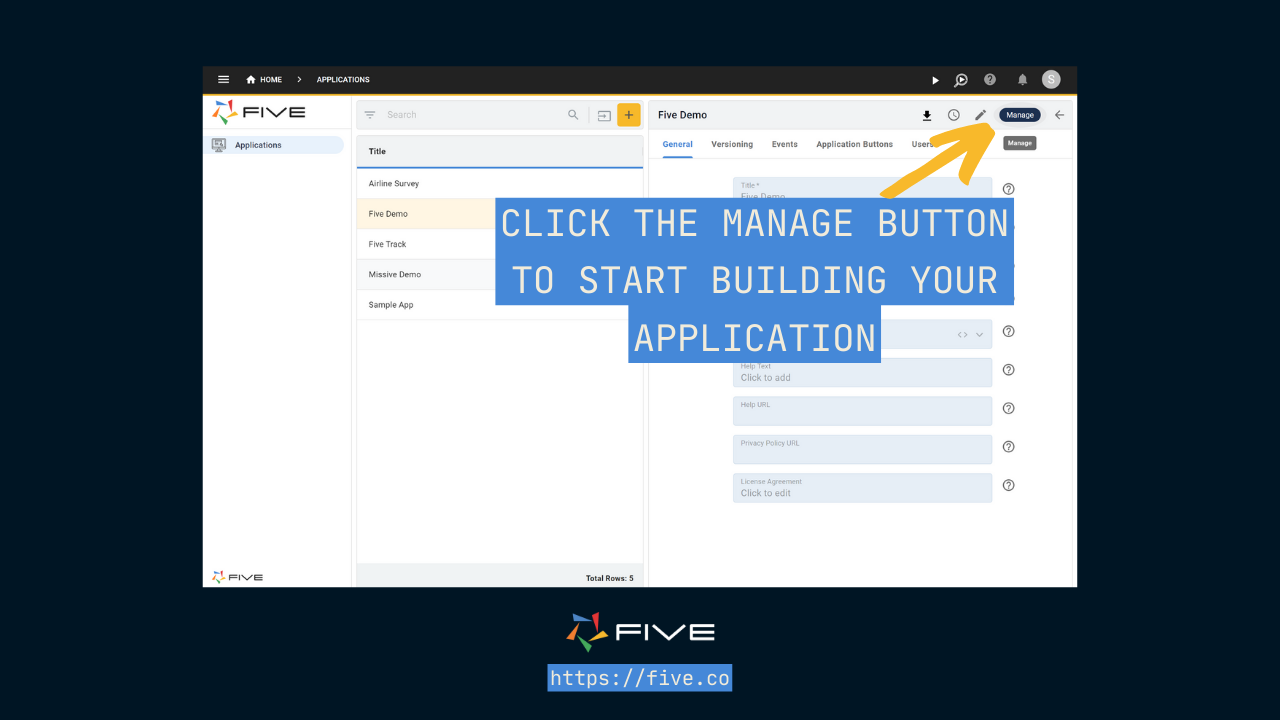
3.1. Click on the blue Manage button.
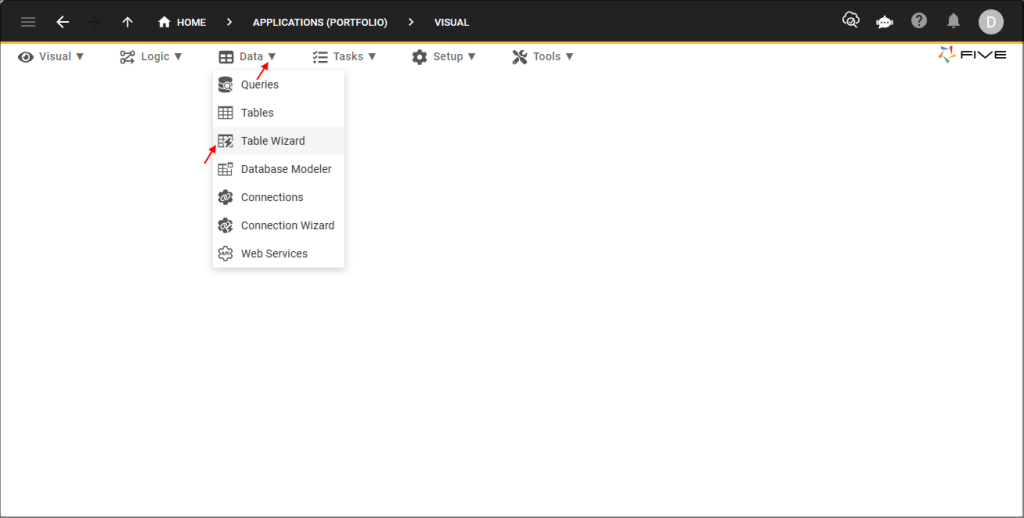
3.2. To add tables to Five’s integrated MySQL database, click on Data > Table Wizard.
We are creating three separate tables: Products, Orders, and ProductOrders.
The Product Table
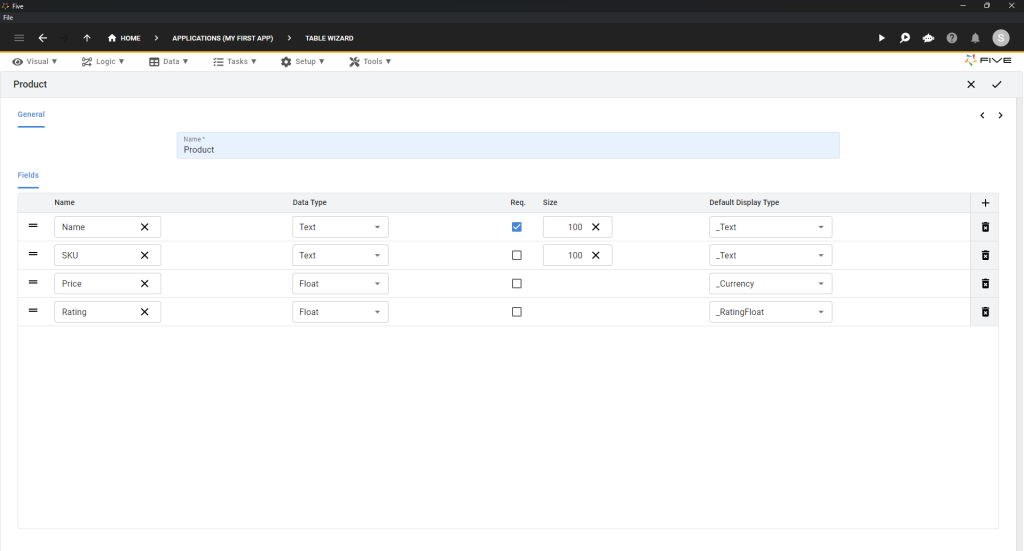
3.3. Give your table a name inside the Name field: call it Product. To add fields to your table, click the Plus ➕ icon on the right side of the screen.
3.4. Here is what your Product table should look like. Make sure to get the Data Type and Display Type for your fields right.
| Name | Data Type | Req. | Size | Default Display Type |
| Name | Text | ✔️ | 100 | _Text |
| SKU | Text | 100 | _Text | |
| Price | Float | _Currency | ||
| Rating | Float | _RatingFloat |
Once your table looks exactly like what’s shown in the image below, click on the Tick ✔️ icon to save.
For the Table Upgrade dialog, click on Save again.
The Orders Table
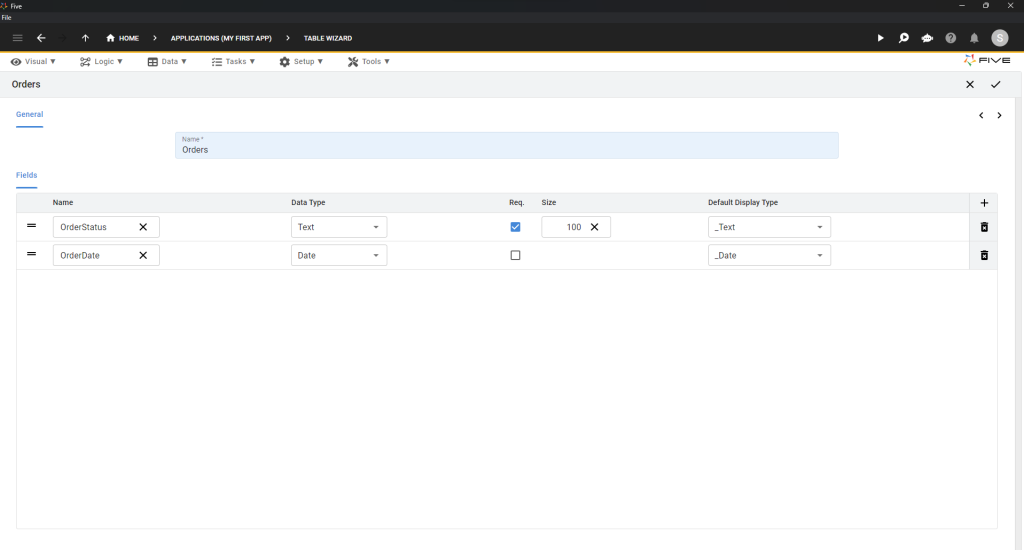
3.5. Repeat steps 3.3 and 3.4 for your Orders table. Shown below is what your Orders table should look like.
| Name | Data Type | Req. | Size | Default Display Type |
| OrderStatus | Text | ✔️ | 100 | _Text |
| OrderDate | Date | 100 | _Date |
3.6. Click on the Tick ✔️ icon to save.
The ProductOrders Table
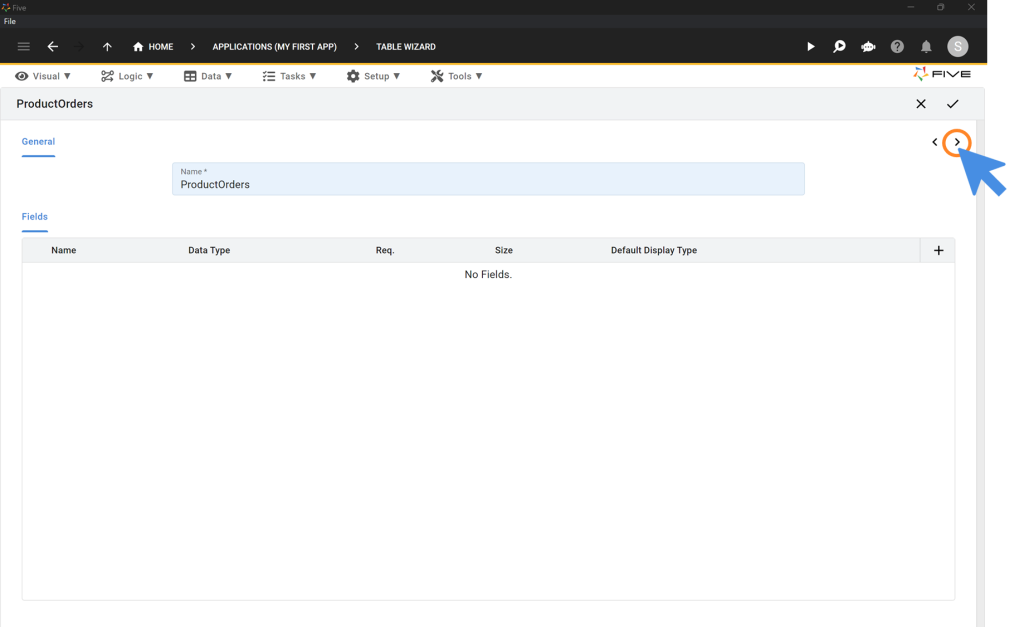
The ProductOrders table is a junction table between our Product and Orders table. It is used to establish a many-to-many relationship between Products and Orders and it does not contain any fields. It only contains the Foreign Keys of the Product and Orders table.
3.7. To create this table, open up the Table Wizard.
3.8. Type ProductOrders into the Name field.
3.9. Click on the Right Arrow > as shown in this image:
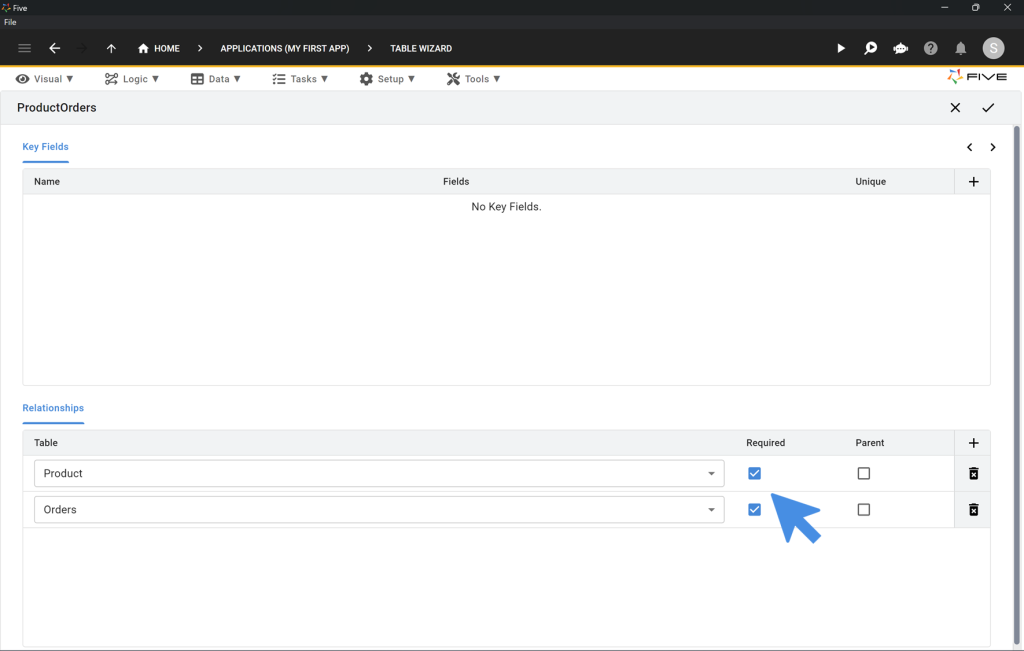
3.10. Click the Plus ➕ icon in the Relationships area at the lower part of the screen.
3.11. Add a relationship to the Product and Orders table and tick the Required box for both. Here is what this should look like.
3.12. Once the relationships are defined, click on the Tick ✔️ icon to save.
Step 4: Data > The Database Modeler
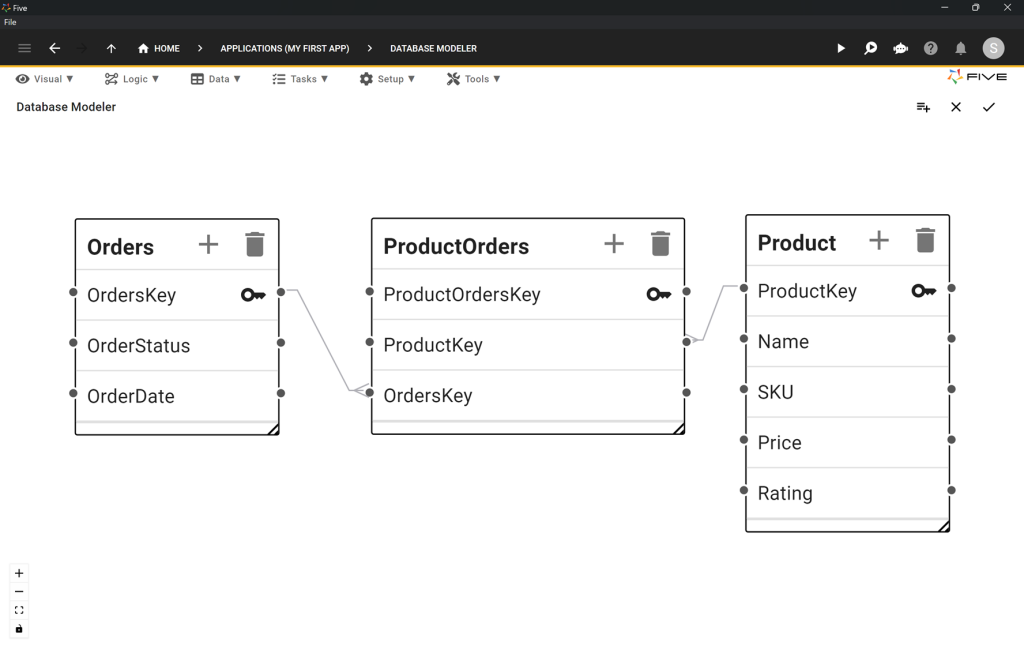
4.1. To check whether your database is set up correctly, click on Data > Database Modeler
4.2. Here is what your database should look like. You have to drag and drop your tables around to get a visual Entity-Relationship-Diagram that looks exactly like Image 4.1.
Make sure the relationships are correct: the “crows’ feet” on the lines are both pointing towards the ProductOrders table, indicating the many-to-many relationship that exists between products and orders.
First Checkpoint: Is Your Database Setup Correctly?
Make sure your database looks exactly like the one shown in the database modeler. Your database is your SQL app’s foundation: without a proper definition of a database, it’s difficult to build a robust application.
In the following steps, our SQL query and PDF report refer to the field names shown above. They will only work if your field names are the same as what is shown.
Step 5: Data > Tables: Importing a CSV
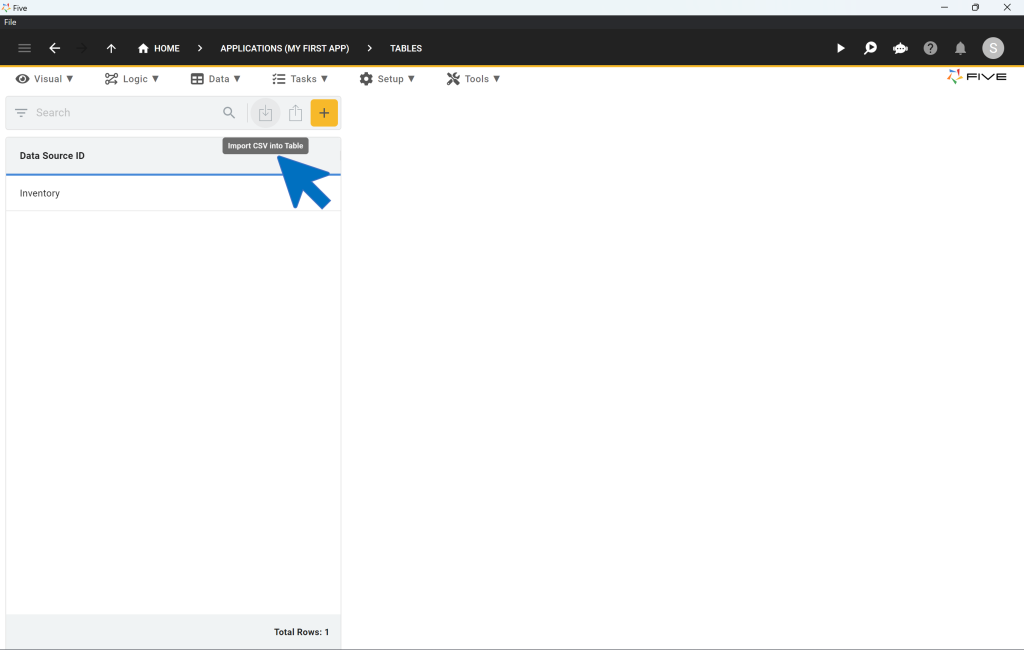
5.1. To import a CSV file into your database table, click on Data > Tables.
5.2. Now click on the Import CSV into Table 📥 button.
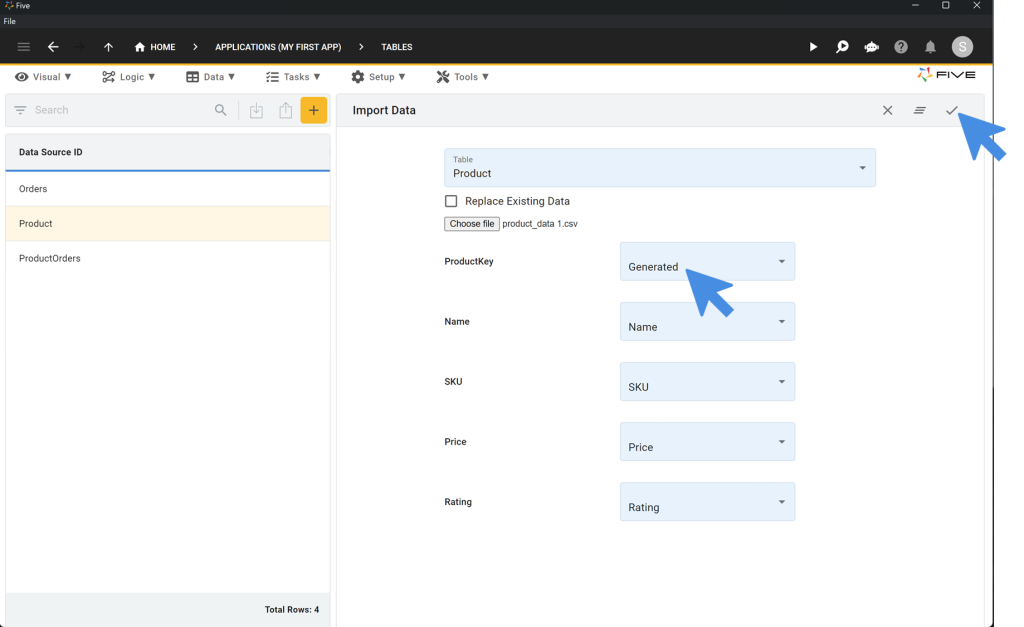
5.3. From the dropdown, select the Product table. This is the table we are importing data into.
5.4. Click on Choose File and select the CSV file available for download at the top of this article.
5.5. For ProductKey select Generated. For all other fields, Five automatically maps the fields of your database to the columns of your CSV file.
5.6. Click on the Tick ✔️ icon to confirm the data import. A pop-up message saying “Import of CSV completed successfully” appears. We have now successfully populated our SQL database with data and generated primary keys for each record!
Step 6: Visual > Form Wizard: Creating Forms
Now, let’s build some forms for our front end. These forms refer back to our database tables and will give our application users an intuitive interface to create, read, update, or delete data stored in our database.
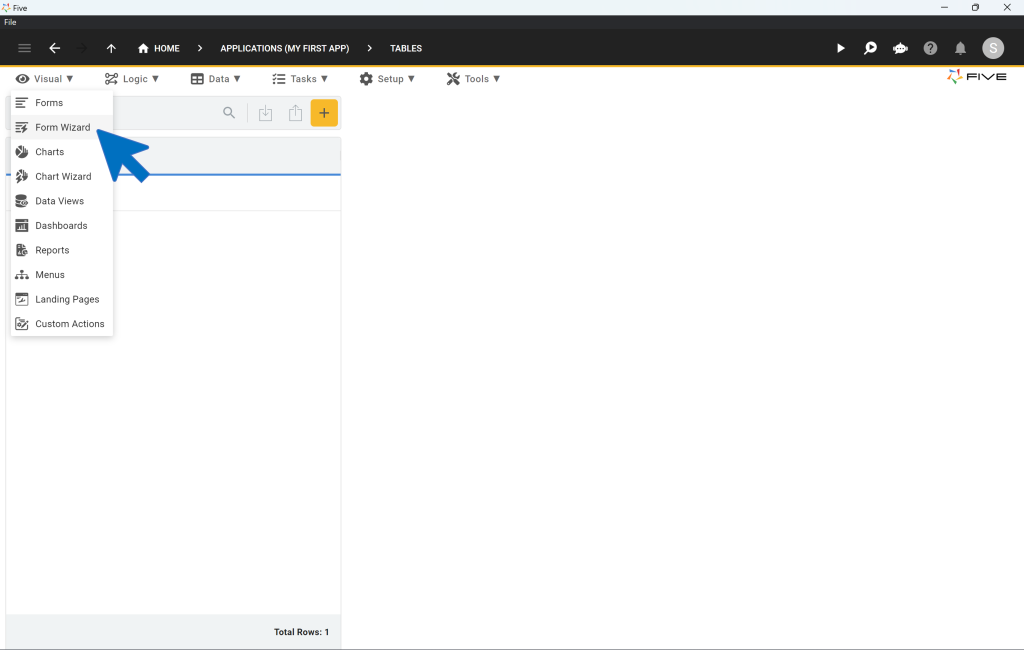
6.1. To create forms, click on Visual > Form Wizard.
Create the Product and Orders Form
6.2. In the Main Data Source field of the Form Wizard, select Product.
6.3. Click on the Tick ✔️ icon to save.
6.4. After saving your Product form, repeat the same steps for Orders, i.e. select Orders in the Main Data Source field, and save again.
Create the ProductOrders Form
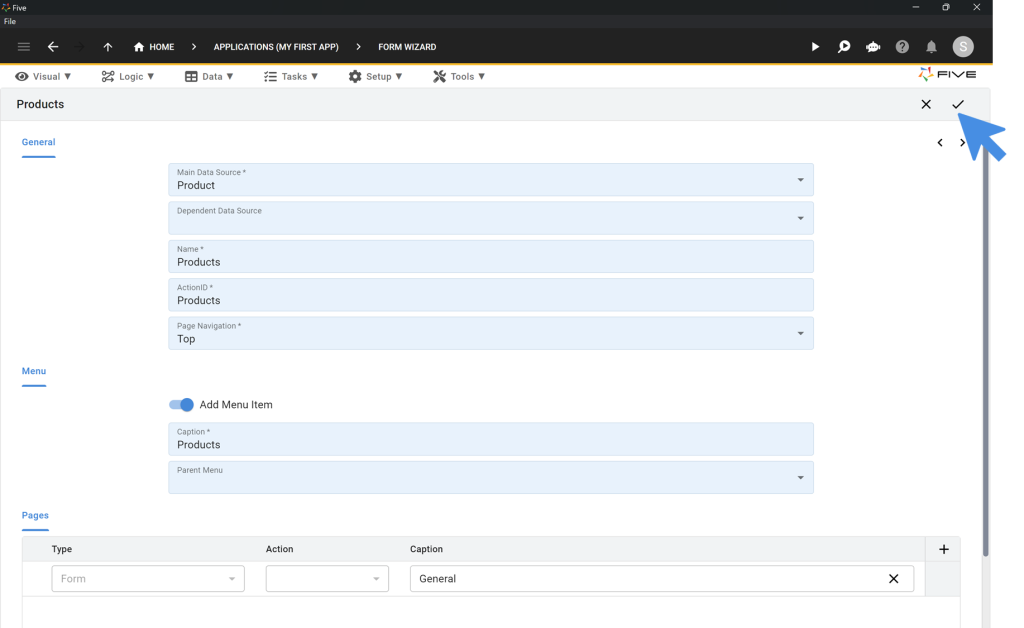
6.5. In the Main Data Source field of the Form Wizard, select ProductOrders.
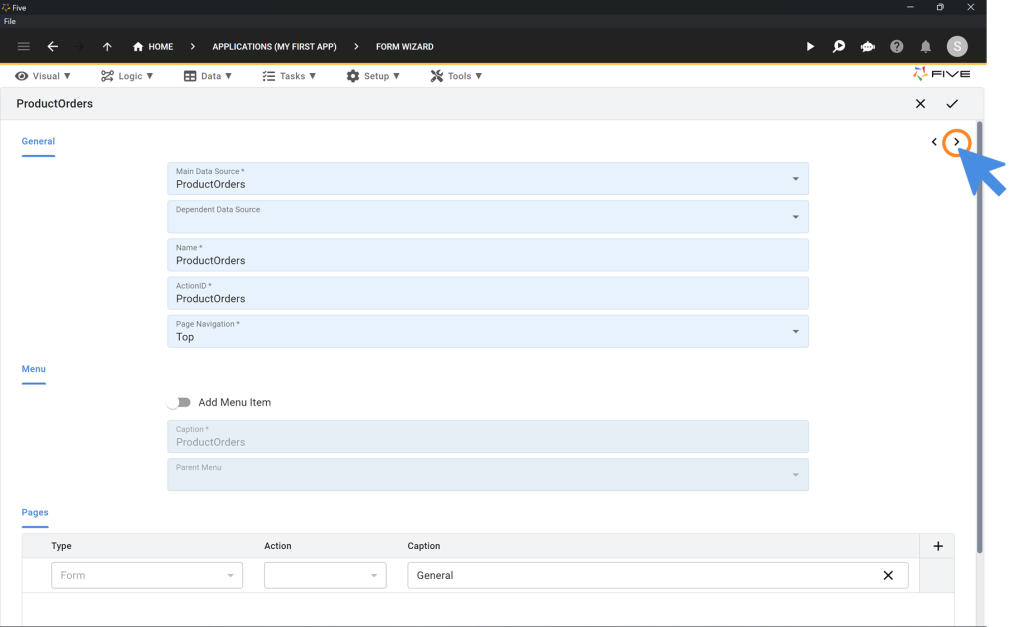
6.6. Toggle the Add Menu Item to off.
6.7. Click on the Right Arrow > as shown here:
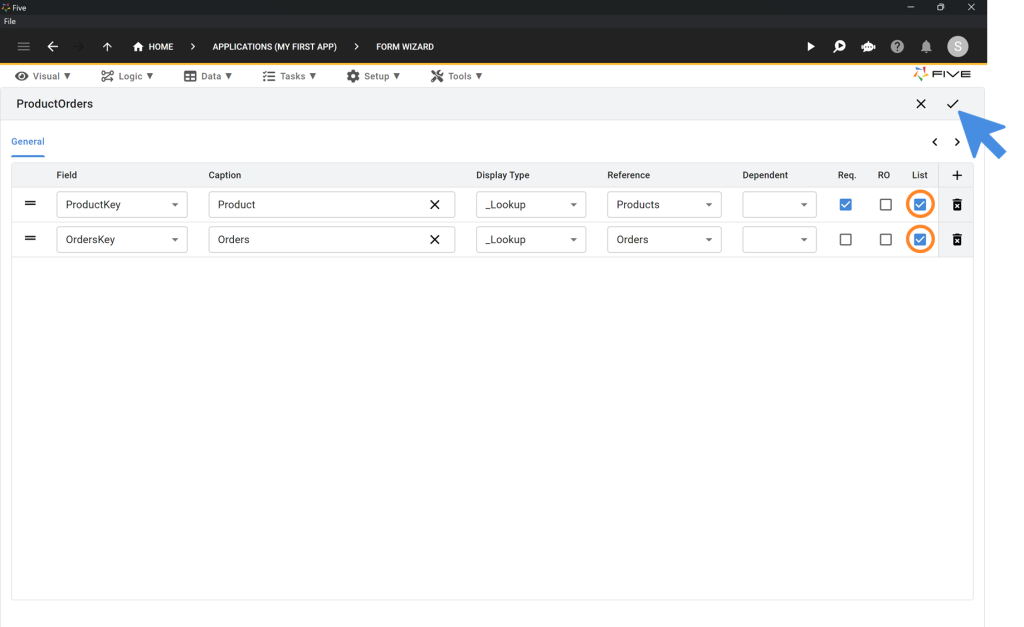
6.8. Tick the Boxes ☑️ for List for both fields: ProductKey and OrdersKey.
6.9. Click on the Tick ✔️ icon to save.
Step 7: Visual > Forms: Adding a Page to a Form
Next up, let’s make our forms more advanced by adding a page to a form. If by now you are wondering what exactly we’re building, bear with us. We’re just a few steps away from previewing our application.
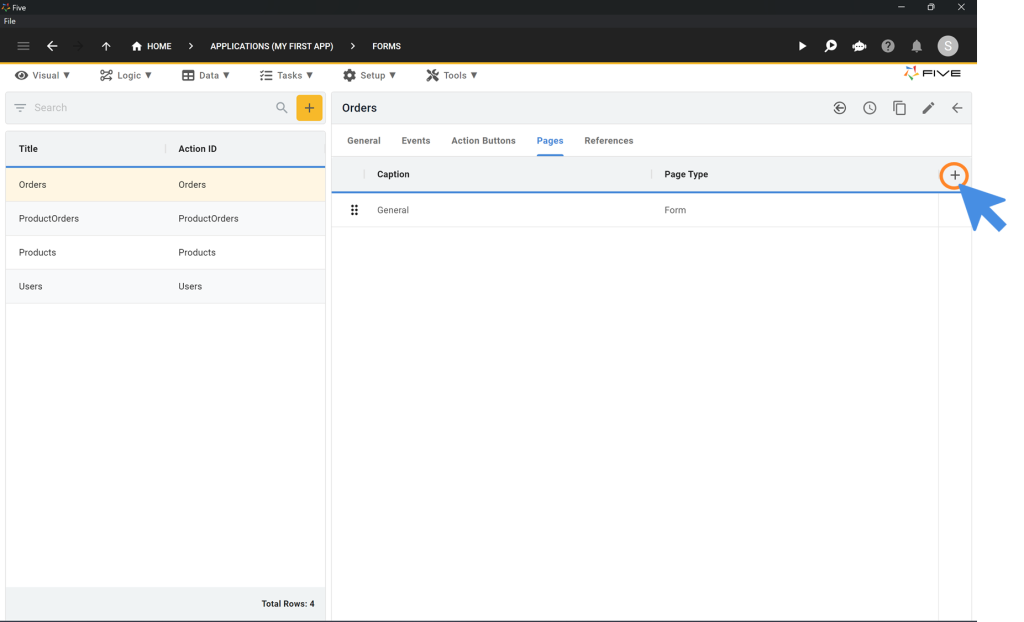
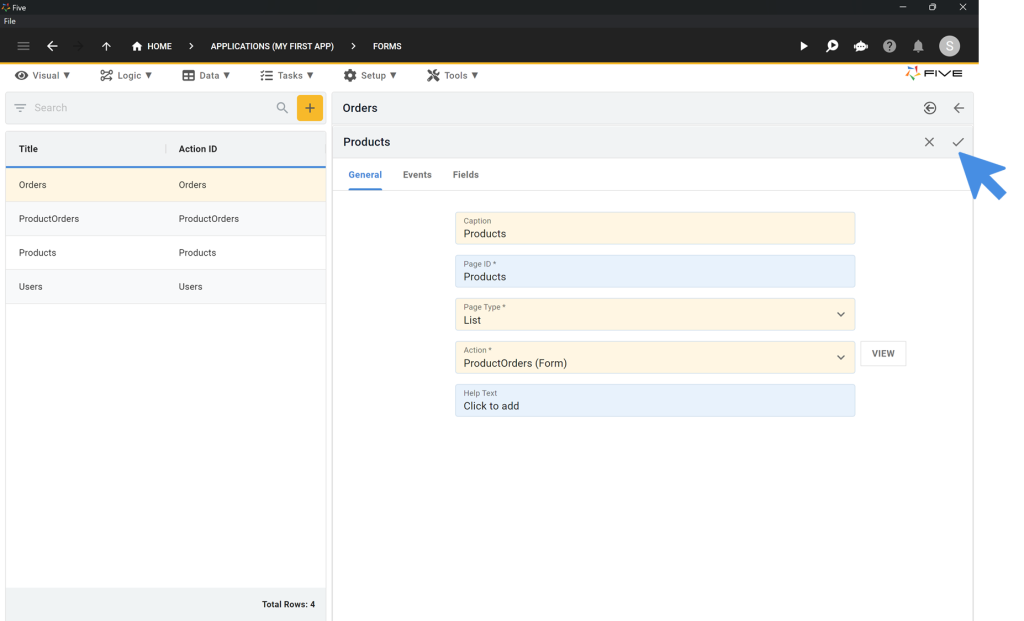
7.1. Click on Visual > Forms
7.2. Select the Orders form from the list on the left.
7.3. Click on Pages.
7.4. Click on the Plus ➕ icon.
7.5. Change the Page Type to List.
7.6. Type Products in the Caption field.
7.7. Click on the Tick ✔️ icon to save. Here is what your screen should look like before saving. Save again to confirm the new page as part of your Orders form.
Second Checkpoint: Run Your Application
It’s time to run your SQL application to preview what we have developed so far. As shown in Step 2 above, you can always preview your application by clicking on the Run ▶️ icon in the top right corner.
Here’s what your app should look like:
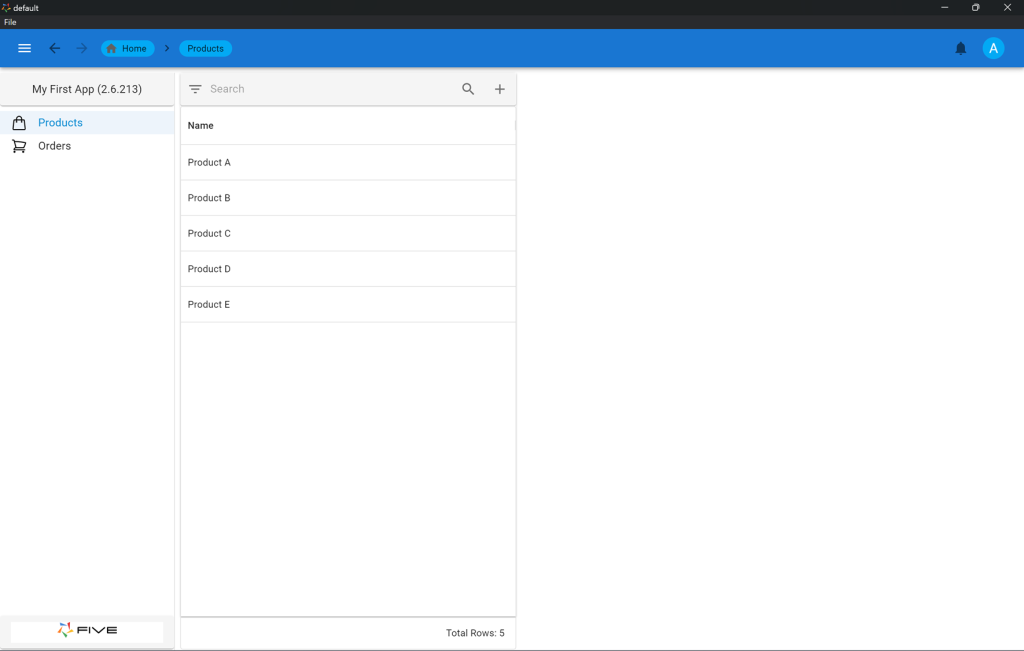
Go ahead and get familiar with Five’s auto-generated user interface (GUI) that translates your data structure into a web app.
Check out the filter and search bar above your products or select a product, for example. The products that you can see inside your application are the data that was stored in our CSV and they are now part of a searchable online database.
Also, note how Five is converting the rating of each product into stars. This is because we defined “Rating” to be a “_RatingFloat” display type. Price, on the other hand, which is also a float, is shown as a currency, because we selected “_Currency” as its display type. Nice, isn’t it?
Step 8.A.: Using Five’s End-User GUI
For Step 8A, we will keep working inside our end-user application, i.e. on the screen shown in the image above. We will add a few orders to our database to better understand Five’s end-user GUI.
8A.1. Click on Orders in the menu on the left.
8A.2. Now click on the Plus ➕ icon. and add some dummy data to your database.
8A.3. Fill in some dummy data for your Order Status and Order Date.
8A.4. Click on Products. This is the page that we added to our Orders form earlier.
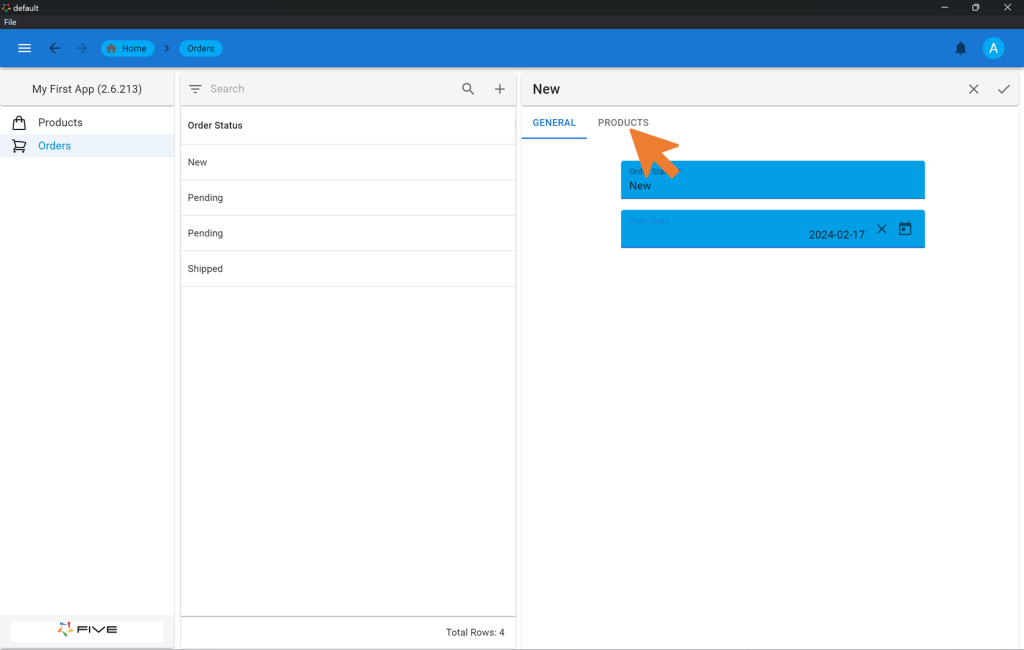
8A.5. Add a few products to your order. This is just dummy data, so feel free to associate any products with your order.
8A.6. Repeat these steps until you have several orders stored in your database. As shown in Image 8.1, your orders will appear in a list. In Image 8.1, this list contains a New, Pending, Pending and Shipped order.
Step 8.B.: Data > Queries: Write SQL In Five
Now let’s create a SQL query in Five.
Queries are an essential part of a SQL app: they determine which data is shared with end-users. They also allow for calculations and data manipulation. We are keeping our SQL statement simple, but you can make queries as complex as you need them to be. Five’s native support for standard SQL puts the power of SQL right into the app development process.
Today, we will write a query that returns some of the data you have just created in Step 8.A.
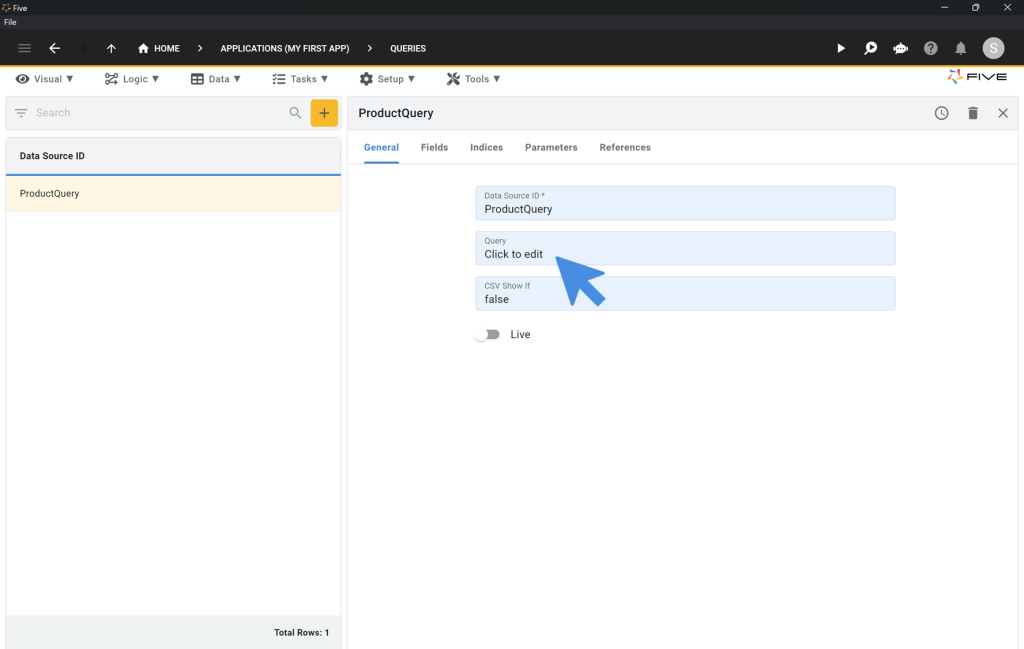
8.1. To add a query, click on Data > Queries.
8.2. Click on the yellow Plus icon.
8.3. Type ProductQuery into the Data Source ID field.
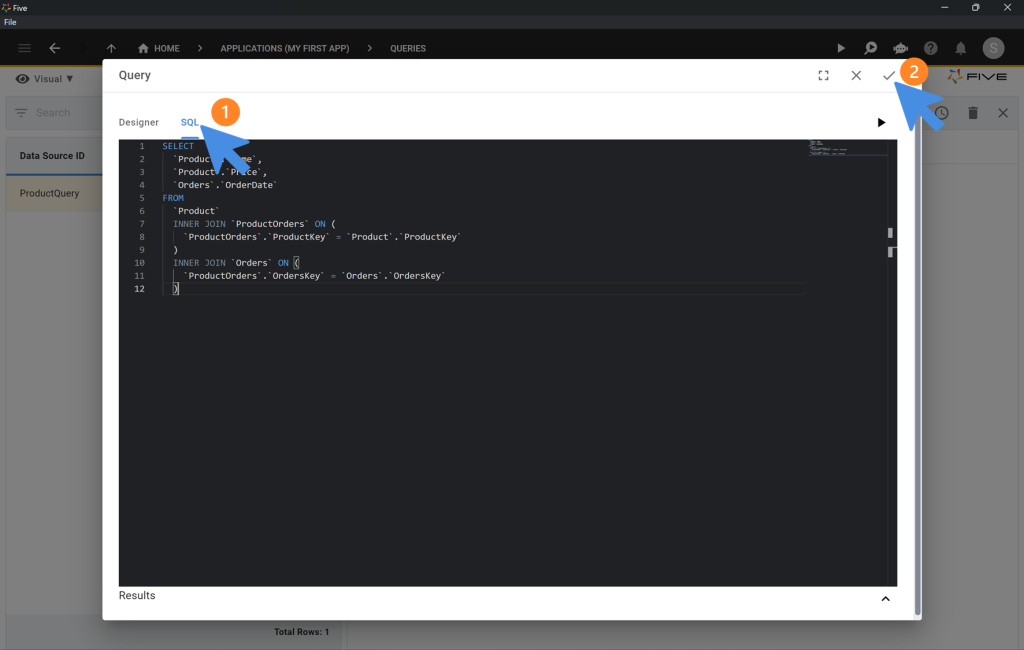
8.4. Click on Click to add in the Query field, as shown here:
8.5. Click on SQL.
8.6. Paste the SQL shown below into the SQL Editor. Make sure to have some orders in your Orders table. Otherwise the query will not produce any results. To test your query, click on Run ▶️. Five will show you the results the query produces.
SELECT
  `Product`.`Name`,
  `Product`.`Price`,
  `Orders`.`OrderDate`
FROM
  `Product`
  INNER JOIN `ProductOrders` ON (
    `ProductOrders`.`ProductKey` = `Product`.`ProductKey`
  )
  INNER JOIN `Orders` ON (
    `ProductOrders`.`OrdersKey` = `Orders`.`OrdersKey`
  )
8.7. Click on the Tick ✔️ icon to save your query.
8.8. Click on the Tick ✔️ icon to save your query as a data source.
Step 9: Visual > Chart Wizard: Create Charts For Your Application
SQL apps typically deal with data. Data can be shown to our application users in many different ways: as forms, charts, reports, or dashboards.
As part of our SQL app, we are developing a simple chart that visualizes our data in a bar chart.
9.1. To create a chart, click on Visual > Chart Wizard.
9.2. Fill in all fields on the left of the screen that are marked with an asterisk *, and choose your X Value Column and Y Value Column, as shown in the image below.

Step 10: Visual > Reports: Creating a PDF Report
Another common way to show data to users is PDF reports. Let’s quickly create a PDF report for our SQL app.
10.1. To create a report, click on Visual > Reports
10.2. Click on the yellow Plus icon.
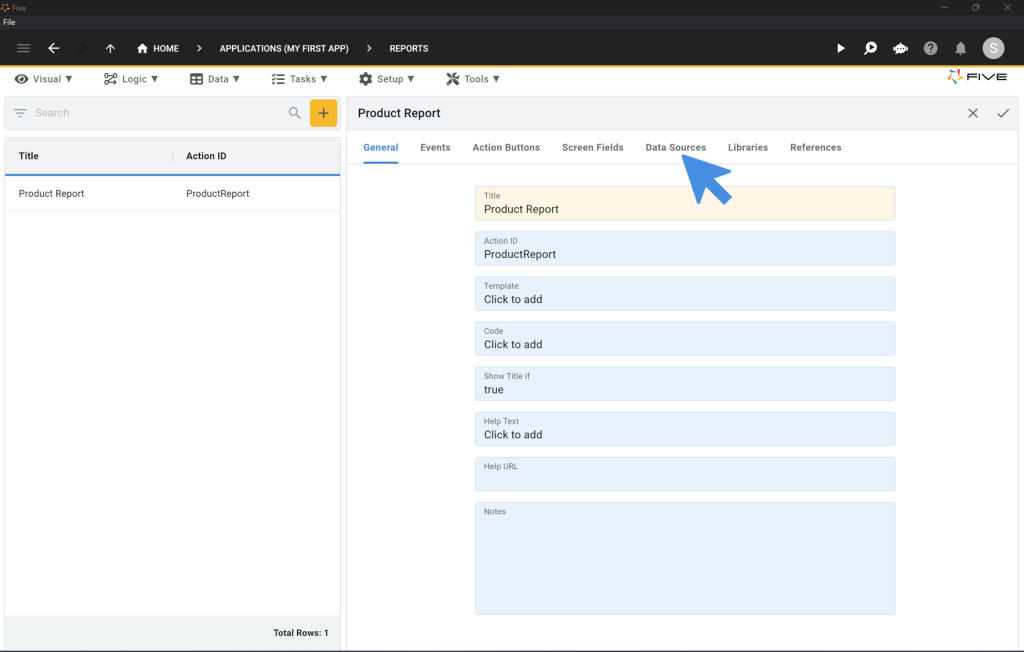
10.3. Type Product Report into the Title field.
10.4. Click on Data Sources.
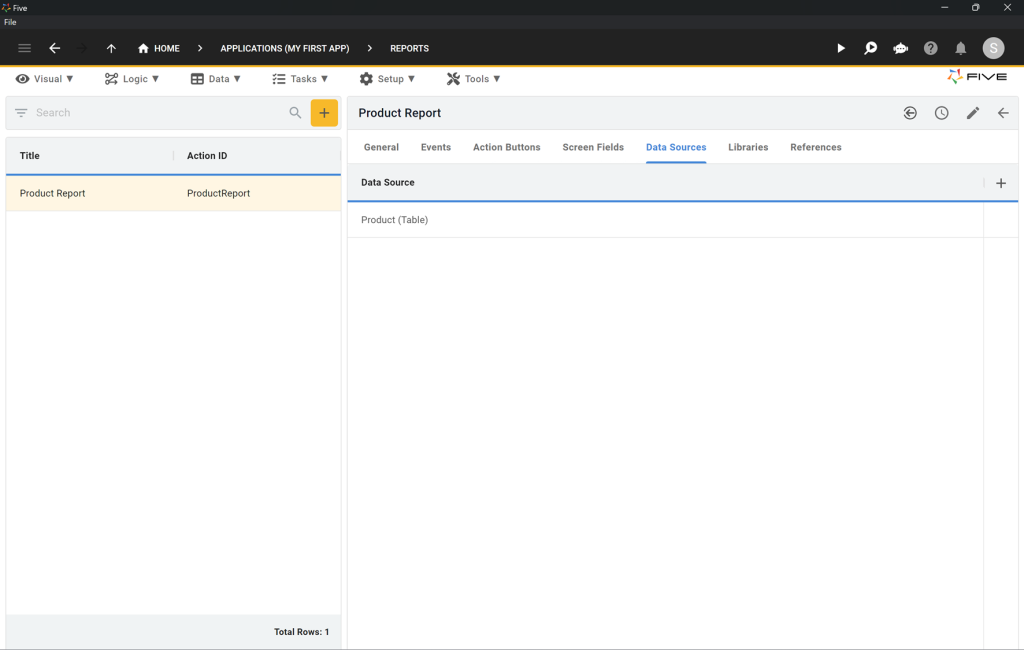
10.5. Click on the Plus ➕ icon to add a data source.
10.6. Select Product (Table) as a Data Source. This data source will now be available for our PDF report.
10.7. Click on the Tick ✔️ icon to save.
10.8. Go back to General.
10.9. Click on the Template field that says Click to edit. This opens up Five’s report template editor. Here you can create a report using a text editor similar to Microsoft Word.
10.10. Click on the </> icon.
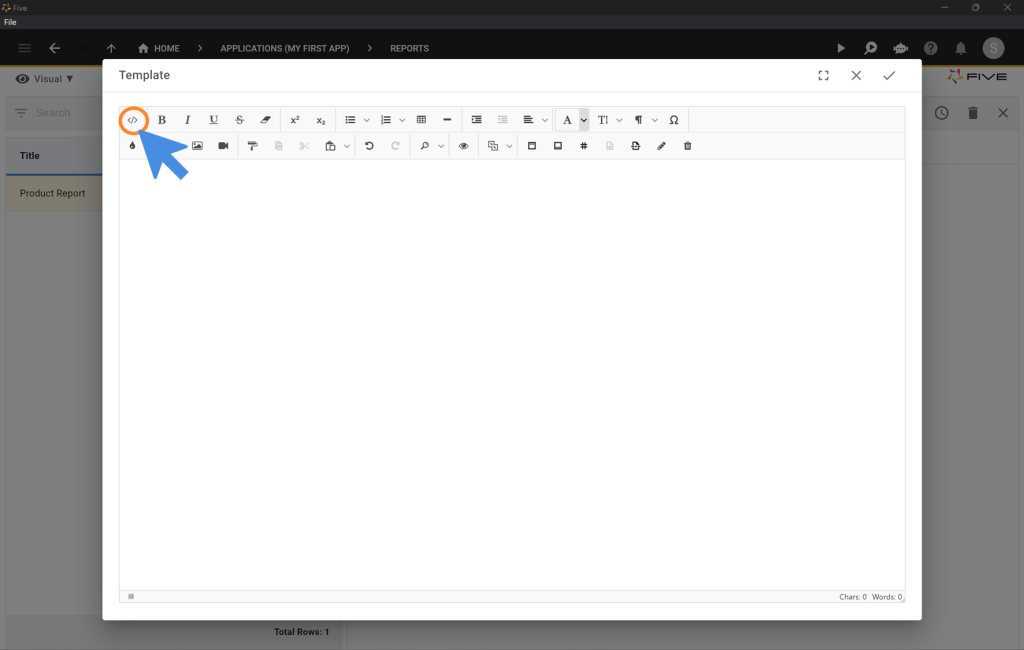
10.11. Delete all code in the code editor and replace it by pasting the HTML below into the code editor.
<style>
    .demo tr {
      background-color: lightgrey
    }

</style>

<div><img src="data:image/png;base64,iVBORw0KGgoAAAANSUhEUgAAAKMAAAAtCAYAAADC1tsoAAAABmJLR0QA/wD/AP+gvaeTAAAHlklEQVR42u2cbWxTVRjHLxvv8hJQM1HRgdB2dLyE3rYMQizQtRs4hA8V1iIqiQu+EBK/EAHZ5YOsiwtRfIkjSIIGWW9AhX2g3YAFPhiNiy8gbEMmuHUImYKArN0YOz6nux13d/d2ve29t3M7/+SfLO2559777JfnnOeck1LUABCiqLQWs7kgaKUrKCIiMeWX/vak2hAGLSZXk4W+0GyhEfgnEnUiUTm89d/keutrwZudu89PVqrf80bjyKCFXt9sMV3kIIz6NIk6kahySxvKAETEOZRbWs/aSy7aKYSGJdpnk9X8SrOZbhFAyNlUSaJOJA5jSf1GHox8N8B3W5a9ey5Dbp8AXak4iNjmgyTqRKLCWVACxqg7Hd66agDTZWNqhscFI01bpGAMWsyfkKgTiSqvpC6zHxj5boFh3AsAT++naBkG4F2RyIxeEnUiUTEMSgPIwjKAxL6Ps6Xd27A+Z3fzGNF5o4XeLQYjfL6NRJ1Iet7ora+TCSPfN+2lDeVOb8Ncfp8tNL1IYqh+k0ScKMa8saEyCRj5rnWU1BXZmPPj8PqiWEWNl3tIxIkktbTswtMAkUkpL9tVp4sUMmb6o77DtGkViTiRbKGt2RnJXB+0mpb0zYzzl5LIEskD8R1DDtqhW51UHy5XOlTP1/kw/mGdbyLRJZKREbOmoGJ9I2JmTEi2Lxiqy3tlR6t1psKPi3eK1oK3aODHBPd+ClzEs5RywKNS+C/FMVoS4/s08ErBu6hlGSAymaMBxO9RsU6Rbbsmq8nBh/F3qzVD4UDjF0QaWZjVCwTfi8kGDoFPgCekAMSR4APc870u0aZMwxjKgLFY/xkYIUa/QZEsa7MNBwhbe4DMyRmjcLDLBzCMc8C3eN+f5bKpVpoEPsW7/32wS6TdDwMORsTo3uJA7ERvz3hUqYgEzfR+DsYOFQLOh/EfcK2KzpIJ43jwcUGbP8G0BiBOA18Q3PsqeLZI21pemxvgRhUdF4h2APEeB+MpJaMC5xlXcDC2qgzjMY2HwHiGabyfv1fQ7l/w8yo+lxl8TXDPWFmZDyOT2oKFMWQChK0RELF3GDYp2X+tyTQCquobAGPjEIQxWkDgf3IXr20nVxQpLbyOe1fwXFX9zFcHBoyIMY4DAM89AFHfhbY9M1Xp+zRb6S9UOuX9f4AxqpfA7YJryrnsqYQ2c/NCfv/7wCP6yxcphxGfroEhme0BMTJEG75T415450XqlHeH3zhXIRjPcEWGWh6bJIxYeNH/puA6f5KVdjp4j6DPLhlg8WH8ADxdRUtVzoadvUDszoxqDB3UZZtttPBgLao2TQwFjIfCAWNXyG98dRBW01Iygq8Irv0FnMiI9BD4qKCvMLhQzkwqpdU0FCyrIkOyEMbter1ambhpAb0y+ndbddYCgLARjDh3tvuN7iECI8UtoAuXVFrA85Ps4y/wYrnT+pTBiLbPzALwbvUBkdGfVXVaAGuOiHWlA3RbAL4OHogPgAxkrxkiMEaz2jFBH3fAzyWYXS+BdYnUmCmBEQqWyQDdpT4gRmzYqSaMbYHsqeFA9mkRCPnGkBYkCONJlec7oxSGMTrf+1DQD66034hxzTKReee34ETXhrWaM2Y+ANFFpQN0x8VBxJlx5rwVB92TsJUGsb0qezXMD//uB8So28OBWfmDsJqWWwljMNIE7V7GNZ+gHQtOZmdL+2oaMuL7kiAW6y9H2+X5PHuch9YtVuSelaaxANfeOCHku7nt5NwnhhCMWPiUVJugz6+4Kj66VoniAHZgwwjHwV6MASL2e9G2ziPrpjh97tY8n5txwRwv4Wzon2UEqM7GCd89cG24yugN+7PsqMY2fIhlxqgWglsF/eLlti8Fn+HsuEGhe2oHI2KyFkBWDMeEkTEs5F/j9Hk2ApDIyRbW5B/xyPoJFISoYQBWEfhuDPju94Yvc/QQWPSOV3h+VRejCLgNzlfwfnwYr1Jq7u/DMs6OyLEwRt8mDqL+KmIEqR6Agsx4MgKkz30zr8LtiuetbtfoHgHIjkkAiJdyyturZrlunzA8rFAgByOMWPinZk6LgBgEz1P4XtpX05EChtFNh73nAsiEDD6zCDBeB38s9oTLK9boAMQQByRyVrg/L6gsGiv1RlCgLAXYgj3w+Y2tUD2zOEuGAnOmqQTEYIWR4qr3g7z+fwar8UNdB6iBcoQMbZoheQoZINzaA2M3kL8uZz29jiHh+V0okM0AdHcAvmq8jtgRmG3qk23VEV77c3FepDGMGRyQUashXLjg3ZSNVN/tSKU0nqvmvSp7V1JPaQPQnKz7Rz6QDp+7DT7b3D0fpdLwumCoavaziDWOpIiI1FQu654HEN7rlSG7fViNNUkiophy+grLRGDEw/aVXJ9nEYkQkXYzdShcAL5LokBC1sRrkqA0EikijbKjewm4SwJIhJeCcg+tfZxEikgrIPdLwcj52sqjG8aTSBGpLjvrmgjAtUjD6PGRKBFpWcy8IAFjp+NwoYFEiEjr4fprIYwOn+dTEhkizYULFbxnzV8Il3uggohIMTlY92s9lXSFp4REhChlwuuKcMTsTCRDsq7JJCJEKVUeu04f3acmIupP/wHYJhviTK/+pwAAAABJRU5ErkJggg==" style=""></div>
<div><br></div>
<h1>Report</h1>
<table style="letter-spacing: 0.00938em; width: 100%; font-size: 1rem;" class="demo">
    <tbody>
        <tr style="border-bottom: 2px solid black;" class="fiveReportHeaderRepeat-Level1">
            <td style="width: 28.1305%; background-color: rgb(153, 153, 153); color: rgb(255, 255, 255); text-align: left;">Name</td>

            <td style="width: 50.97%; background-color: rgb(153, 153, 153); color: rgb(255, 255, 255); text-align: left;">SKU</td>

            <td style="width: 18.254%; text-align: left; background-color: rgb(153, 153, 153); color: rgb(255, 255, 255);">Price</td>
        </tr>

        <tr class="fiveReportHelper" contenteditable="false">
            <td class="fiveReportHelper">{{#each @root.[Product].[Records] as | Product |}}</td>
            <td><br></td>
            <td><br></td>
        </tr>
        <tr class="" contenteditable="false">

            <td style="text-align: left;">{{Product.[Name]}}</td>

            <td style="text-align: left;">{{Product.[SKU]}}</td>

            <td style="text-align: left;">{{Product.[Price]}}</td>
        </tr>
        <tr class="fiveReportHelper" contenteditable="false">
            <td class="fiveReportHelper">{{/each}}</td>
            <td><br></td>
            <td><br></td>
        </tr>

    </tbody>
</table>
<div><br></div>

<div style="text-align: center;  display: flex; justify-content: center; align-items: center;">
    <div style="width: 150mm; height: 125mm; border: 1px dashed black; display: flex; justify-content: center; align-items: center;">   {{{_Chart 'ProductChart'}}}</div>
</div>
<div><br></div>
<div><br></div>
<div><br></div>
<div><br></div>

<table class="fiveReportFooter-everyPage" style="width: 100%; height: 10mm;">
    <tbody>
        <tr>
            <td style="text-align: right;"><span style="font-size: 12px;"><em>Page <five.pageNumber.current.arabic> of <five.pageNumber.total.arabic></em></span></td>

        </tr>
    </tbody>


</table>
10.12. Click on the Tick ✔️ icon to save your HTML.
10.13. Click on the Tick ✔️ icon to save your report.
A note on PDF reports: even though we used HTML, you could have created your report template using Five’s text editor. For this tutorial, it’s faster to copy and paste the HTML.
Step 11: Visual > Menus: Adding Menu Items to Your App
Next up, let’s add some additional navigation to our SQL app. Through Five’s Menus feature, we can add the chart and PDF report into our web application.
11.1. Go to Visual > Menus.
11.2. Click on the yellow Plus icon.
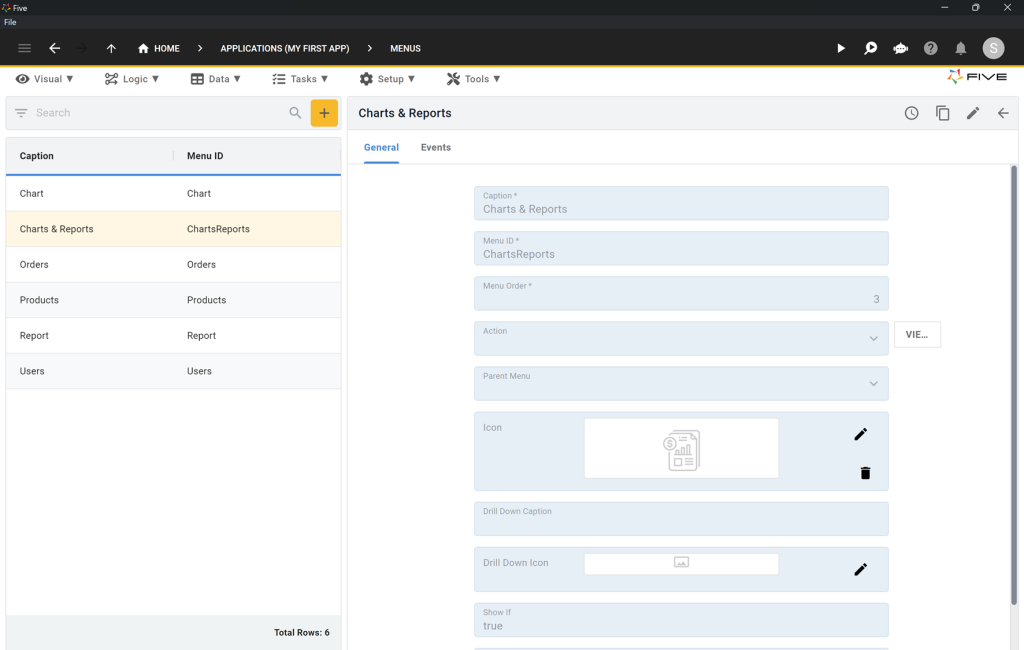
11.3. We will first create a parent menu called Charts & Reports.
11.4. Type Charts & Reports into Caption.
11.5. Type 3 into Menu Order.
11.6. Click on the Tick ✔️ icon to save your menu.
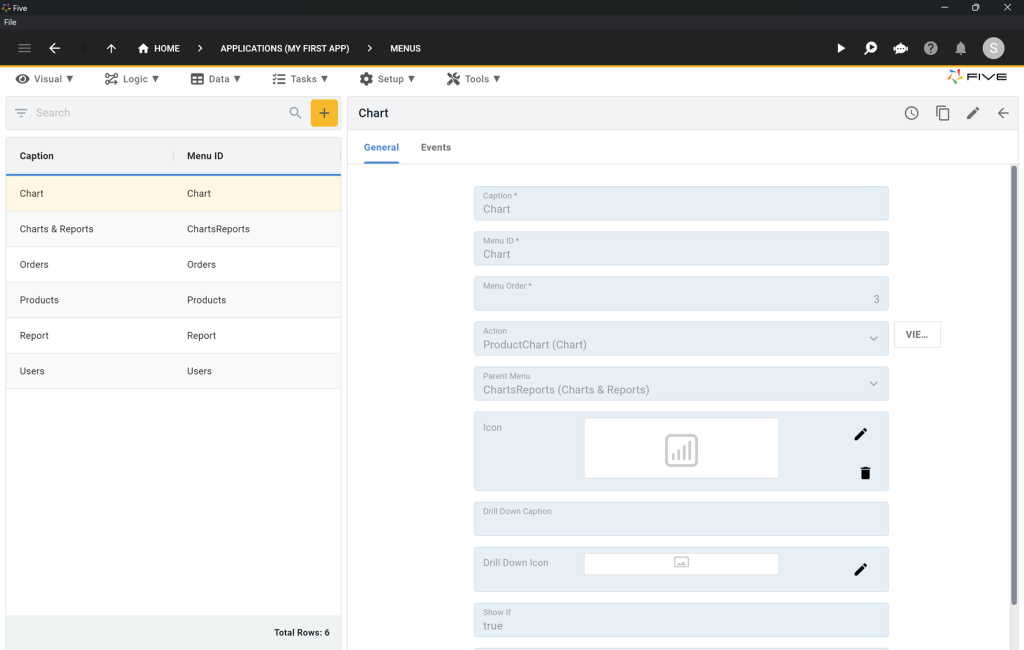
Next, we create menu items for our chart and report.
11.7. Click on the yellow Plus icon.
11.8. Here are the settings for your Chart menu. Make sure to fill in Caption, Action, and Parent Menu as shown.
11.9. Click on the Tick ✔️ icon to save your menu.
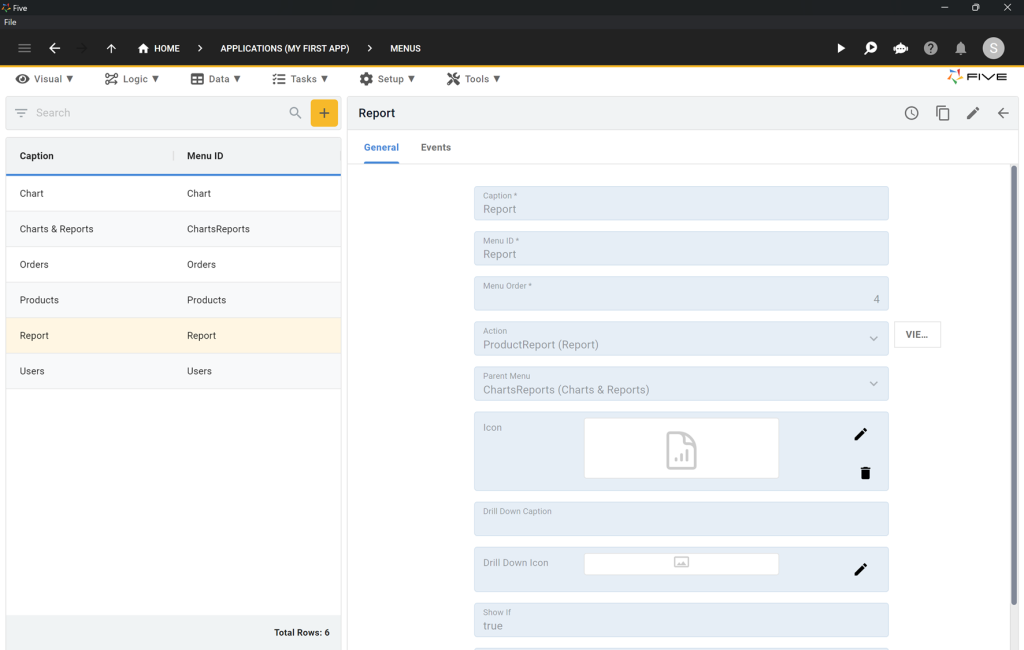
11.10. Here are the menu settings for your Report menu. Make sure to fill in Caption, Action, and Parent Menu as shown.
11.11. Click on the Tick ✔️ icon to save your menu.
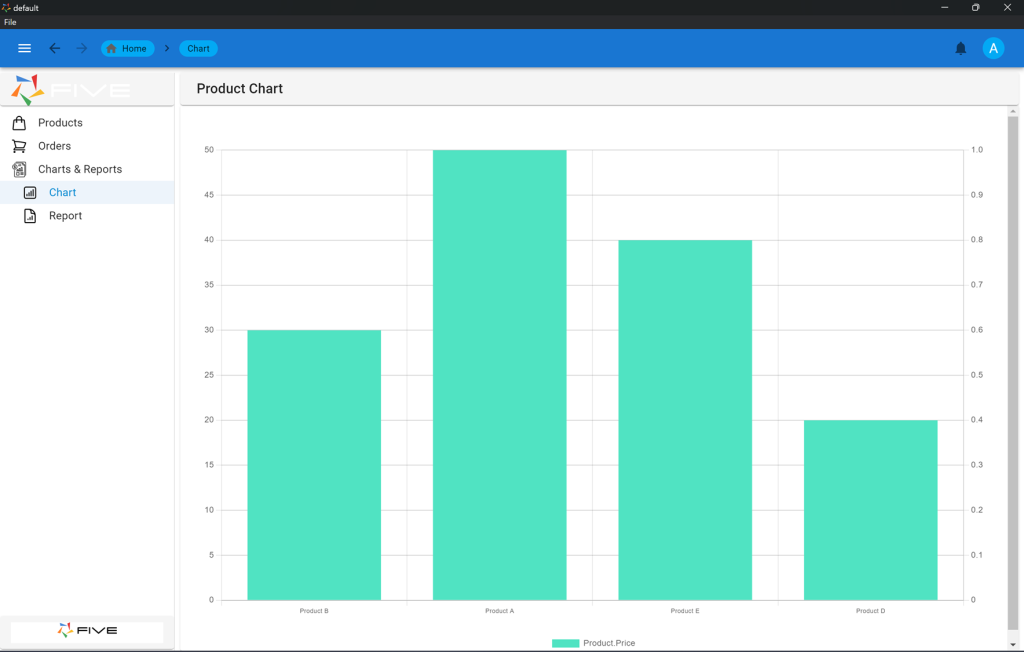
Third Checkpoint: Here’s What Your App Should Now Look Like
Run your app to make sure that your forms, charts, and reports are working. Here’s what your app should look like when clicking on Chart in the menu on the left. Also, test your report – you should be able to see a PDF document in your application.
Step 12: Applications: Turning Your App Into a Multiuser App
No SQL app would be complete without user authentication and permissions. As data gets shared with users online, deciding who has access to what is an essential part of the SQL app development process.
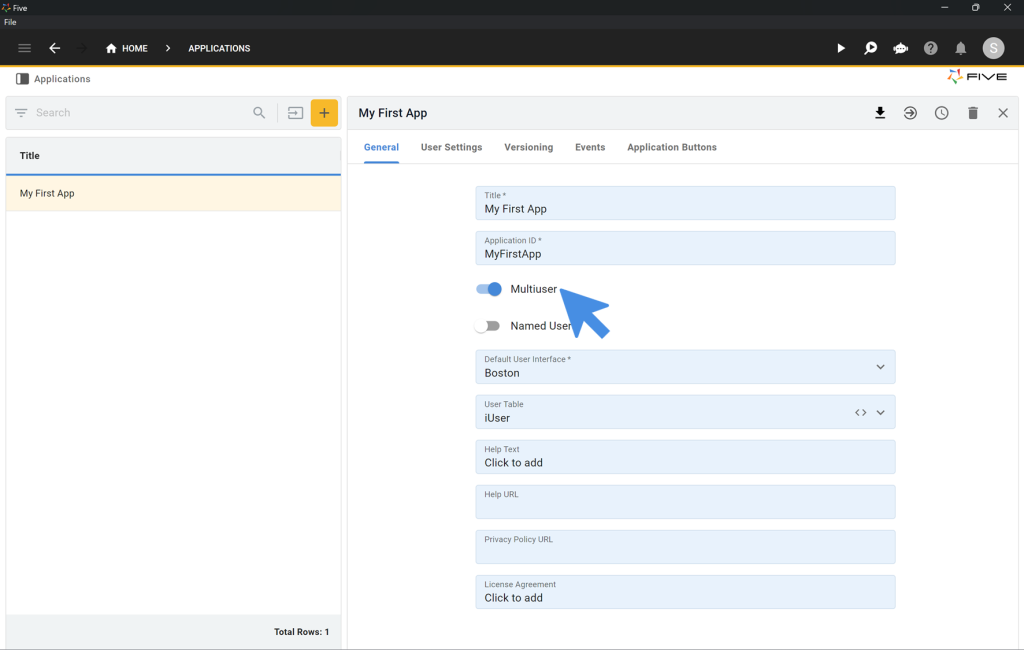
12.1. Click on Applications (My First App) in the top navigation bar of Five.
12.2. Activate the Multiuser switch to add a login screen and user management to your application.
12.3. Click on the Tick ✔️ icon to save.
Fourth Checkpoint: Logging Into Your Application For The First Time
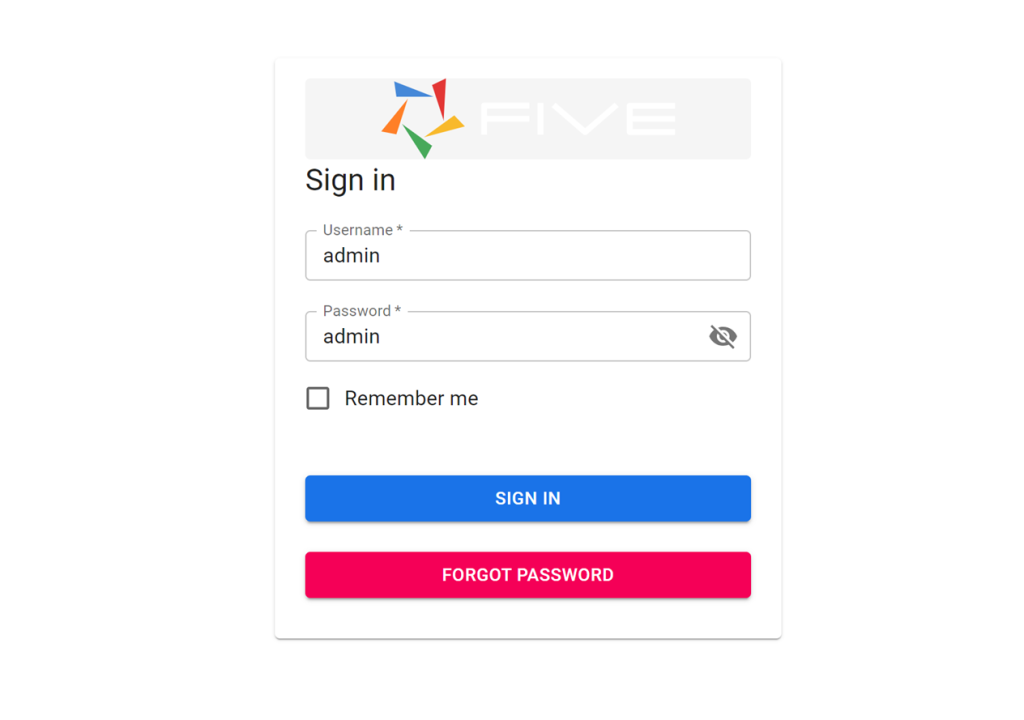
It’s time to deploy your application again by clicking the run button in the top right corner. Once clicked, the application opens in a new tab inside your browser and you will be presented with a login screen.
Use user name admin and password admin to log in to your application!
Step 13: Setup > User Roles: Creating Roles And Permissions
13.1. To create user roles and assign permissions, click on Setup > Roles.
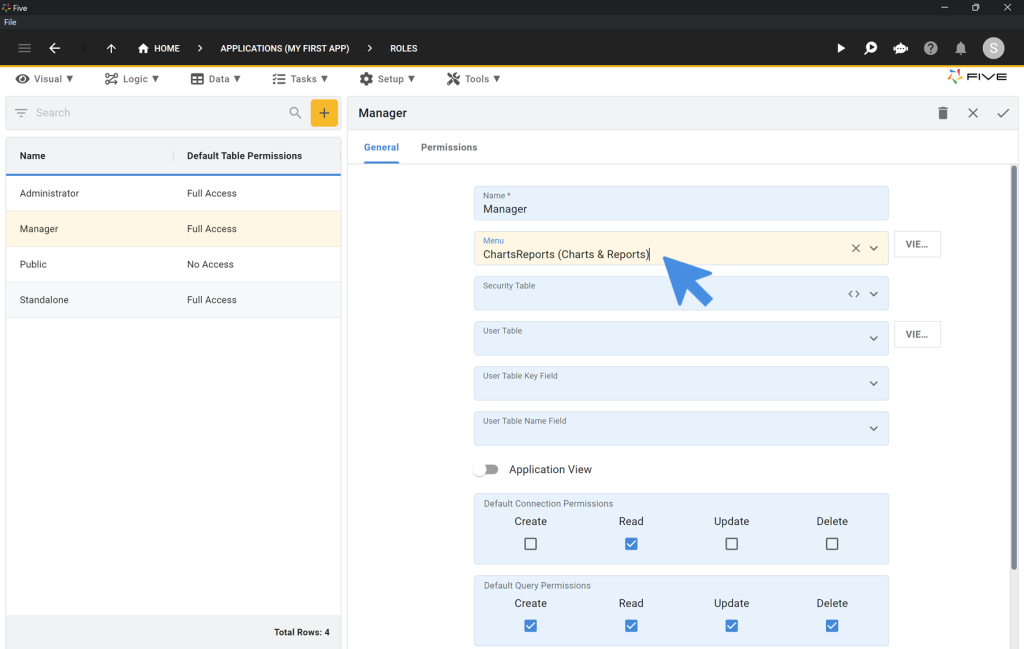
13.2. Click on the yellow Plus icon.
13.3. Type Manager into the Name field, select ChartsReports (Charts & Reports) as the Menu, and give full Create, Read, Update and Delete permissions for the Default Query Permissions as shown below.
13.4. Click on the Tick ✔️ icon to save.
Note how we can also use Five’s Roles feature to assign CRUD permissions to user roles. CRUD permissions determine what data users can create, read, update, or delete. We won’t be going into this as part of this tutorial, but if you’d like to create more granular user roles, keep this feature in mind!
Step 14: Setup > Themes: Give Your Application a Unique Look
14.1. To create a theme, go to Setup > Themes.
14.2. Click on the yellow Plus icon.
14.3. Type MyTheme into the Name field.
14.4. Click on Click to edit theme to open up Five’s theme editor.
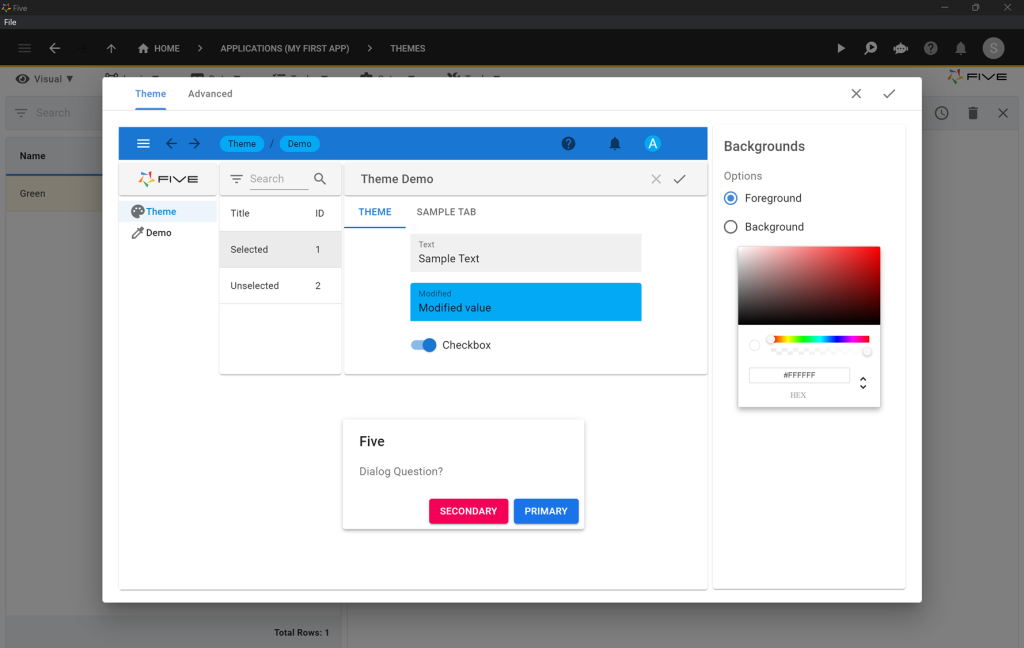
14.5. Click on Advanced at the top of theme editor.
14.6. Go to https://five.co/themes and download your favourite theme: copy the code and paste it into the Advanced theme editor, replacing all existing code.
14.7. Click on the Tick ✔️ icon to save your code.
14.8. Click on the Tick ✔️ icon again to also save your theme.
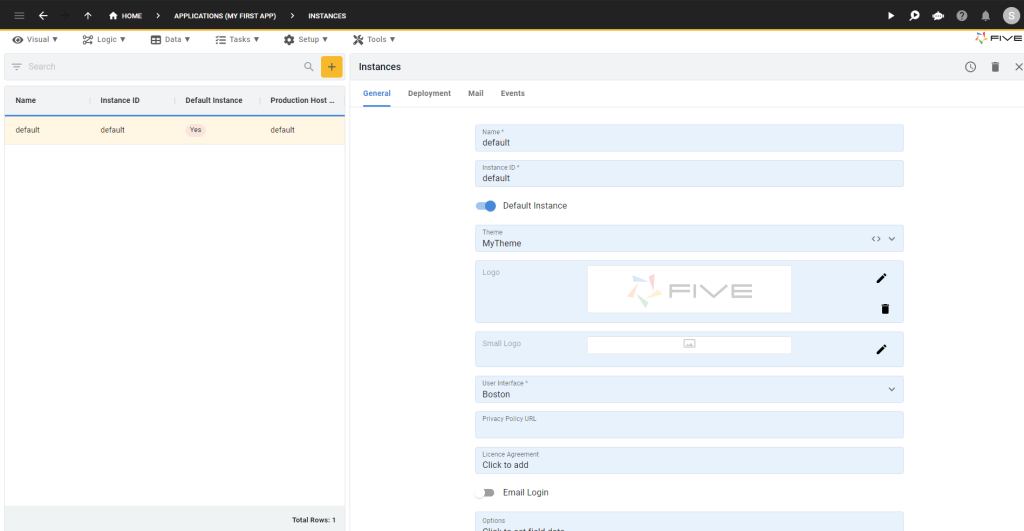
Step 15: Setup > Instances: Applying a Theme, Logos and Customizing the UI
15.1 To apply a theme. go to Setup > Instances
15.2 Select the default instance
15.3 Click on Theme and select MyTheme from the dropdown
15.4 Click on The ✏️Icon on Logo and Select an image/SVG as your logo
15.5 Click on User Interface and Select between Boston or New York
Congratulations: Creating a SQL App
In just 15 steps, we have created a full-stack application that
- runs on top of a dedicated MySQL database,
- connects the database to the front end through forms, charts and PDF reports,
- that utilizes a query as a data source for our chart,
- and that has a login screen with multiple user roles.
There is a lot more that you can do with Five: from adding in-app or email notifications to connecting to a REST API as a data source.
Finding Help in Five
In case you get stuck during the development process, we’re here to help! Continue developing your application by accessing these resources:
- Five’s User Community: Visit https://five.org to ask questions or get inspiration from other users.
- Five’s Documentation: Visit help.five.org to access Five’s comprehensive documentation.
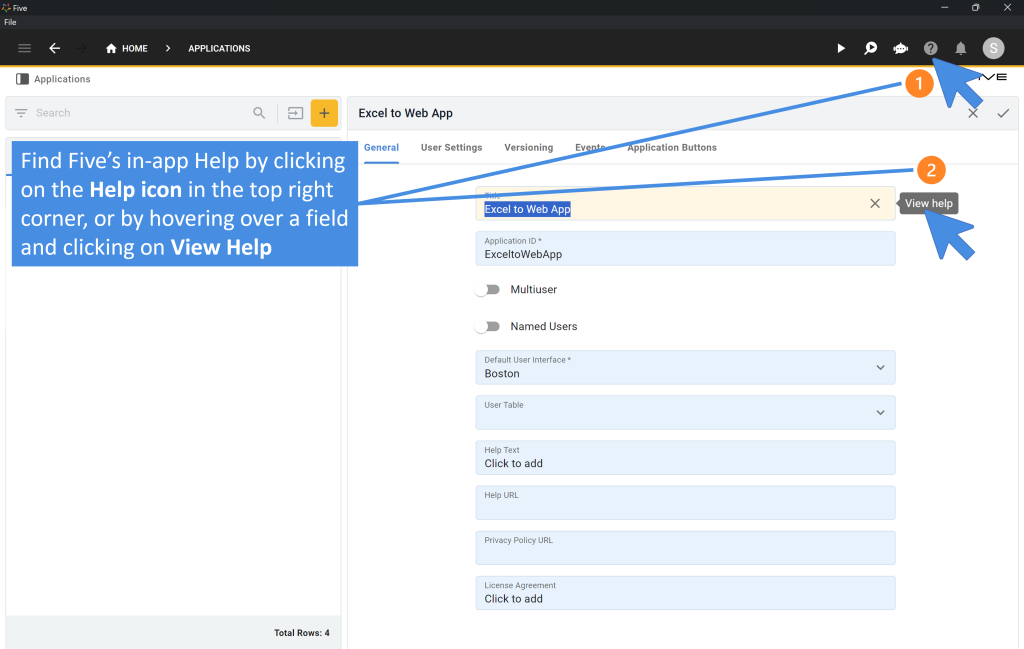
Five’s In-App Help
Last, find useful tips for your application development by clicking on Five’s in-app help available in the top right corner or on almost any field.
Host Your SQL App Online For Just US$29.99 Per Month
Five lets you deploy applications starting from as little as US$29.99 per application and month.