How To Create an Online Portal In 4 Steps
Create an Online Portal: Quick & Easy Guide
An online portal is a web-based platform that provides access to key information. Online portals consolidate information and services from multiple sources into one centralized location, making it easier for users to find what they need. These online portals can serve various purposes, including corporate, governmental, educational, and healthcare needs, among many others.
But creating an online portal can be difficult especially if you don’t have technical coding knowledge.
That’s why online portal builders like Five are becoming more prevalent.
Why Do You Need An Online Portal?
An online portal provides your clients, customers, or employees with 24/7 access to information and services. This convenience ensures that users can interact with your business at any time, from anywhere. This includes handling support requests, collecting feedback, and disseminating important information efficiently.
Components of Your Online Portal
When building your web portal, you likely have some key features in mind, but there are a few essentials you might not have considered.
Firstly, a robust login system is crucial for secure user authorization. This can include traditional username/password combinations, OAuth, or Single Sign-On (SSO) for enhanced security. Next, a user dashboard is essential for displaying relevant information, such as notifications, images, and links. This dashboard should also include tools for creating, editing, and publishing content.
A backend database, such as MySQL, PostgreSQL, or MongoDB, is necessary for storing user data, content, and transactional records. If database management seems daunting, tools like Five can simplify the process, making it easier to transition from a database to a fully functional online portal.
Additionally, incorporating search capabilities is important to help users find information quickly. Advanced filtering options can further refine search results, enhancing the overall user experience.
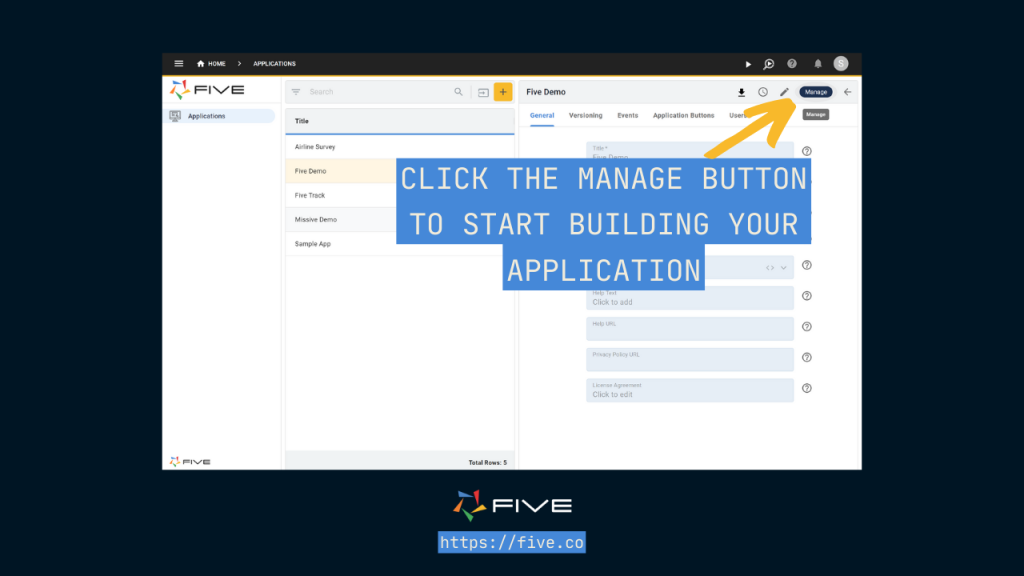
How to Create an Online Portal In 1 Day?
Building online portals used to be nearly impossible without extensive coding knowledge, leading many businesses to hire “expert developers” who often delivered subpar results. Customizations were either unattainable or required rehiring the developers, often doubling the initial cost.
Fortunately, times have changed, and creating online portals is now much easier with rapid portal builders like Five. These tools simplify the process, making it quicker and more accessible.
Using Five, you no longer need to learn various coding frameworks or spend hours researching the best web application tools. Instead, you can jump right in and have your online portal built and running in a single afternoon. While there is still a slight learning curve, this approach is objectively the best compared to traditional methods.
With Five, you can
1. Set up your database in minutes, and
2. Create a user-friendly, login-protected web interface for your portal.
3. You can also easily import your existing data, meaning you can get started quickly.
Get free access to Five here and start building your online portal.
Step by Step Guide On Creating an Online Portal
Step 1: Creating a New Online Portal
- Click on Applications and create a new application named “Online Portal.”
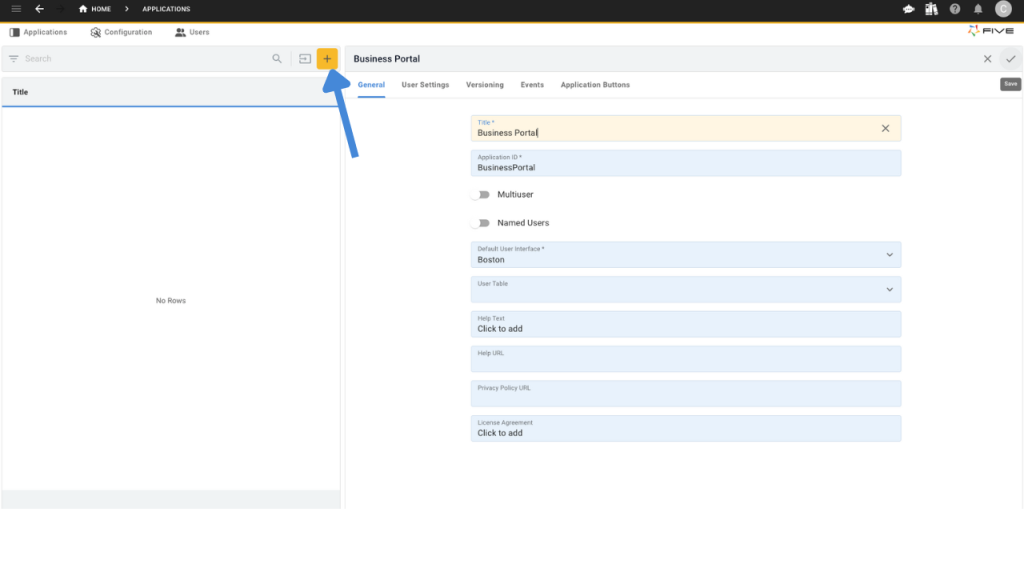
- Deploy your application using the Deploy to Development button.
- Click Run to preview your application.
Step 2: Setting Up Database Tables
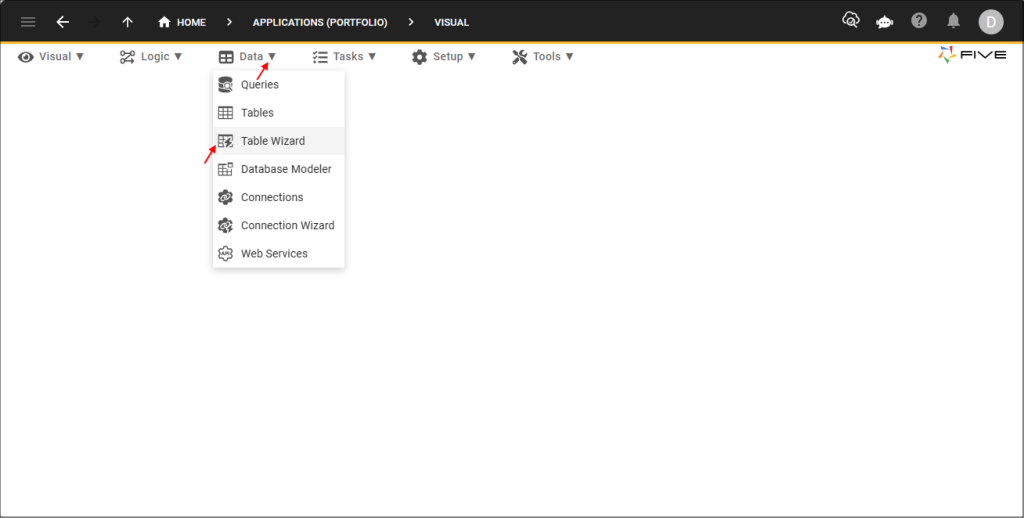
Navigate to the Table Wizard
- Go to Data > Table Wizard.
- Create tables for core entities like Products, Orders, and ProductOrders (for many-to-many relationships).
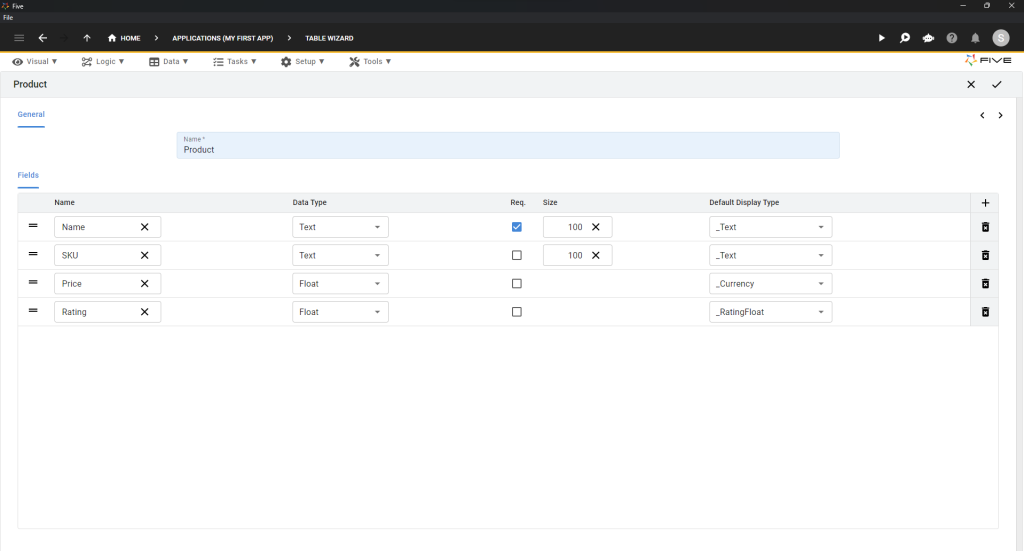
The Products Table
- In the Name field, enter “Product”.
- Add fields by clicking the Plus ➕ icon.
Example Product Table Structure:
| Name | Data Type | Req. | Size | Default Display Type |
| Name | Text | ✔️ | 100 | _Text |
| SKU | Text | 100 | _Text | |
| Price | Float | _Currency | ||
| Rating | Float | _RatingFloat |
- Once your table matches the structure shown, click the Tick ✔️ icon to save.
- Confirm in the Table Upgrade dialog by clicking Save.
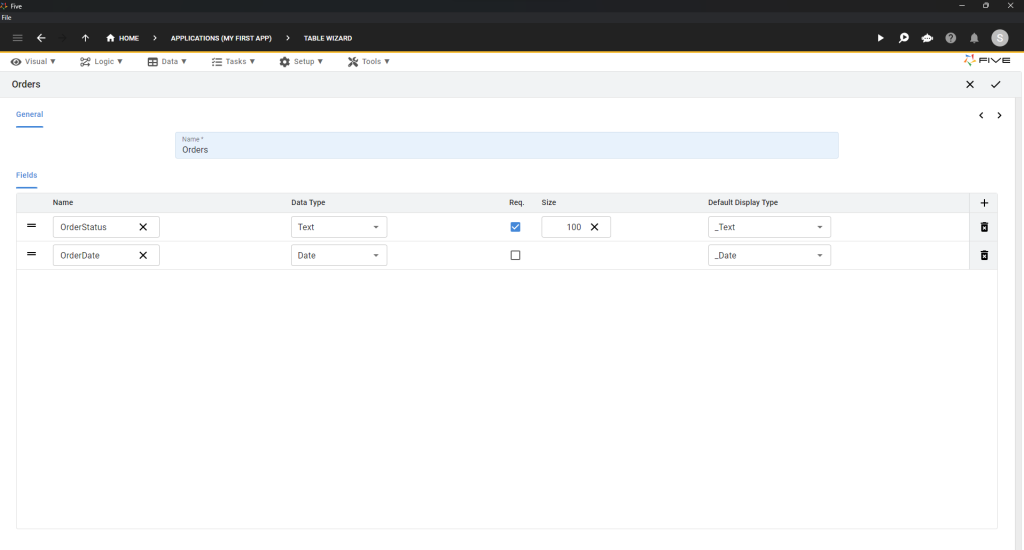
The Orders Table
- Repeat the above steps for your “Orders” table.
| Name | Data Type | Req. | Size | Default Display Type |
| OrderStatus | Text | ✔️ | 100 | _Text |
| OrderDate | Date | 100 | _Date |
2. Click the Tick ✔️ icon to save.
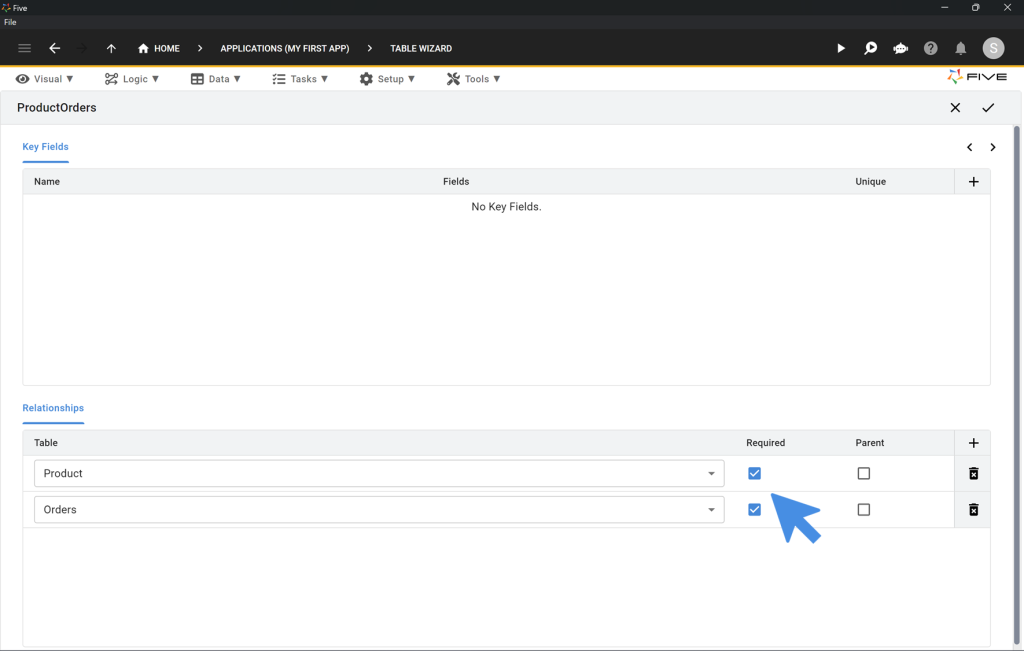
The ProductOrders Table
The ProductOrders table is a junction table for establishing a many-to-many relationship between Products and Orders.
- Open the Table Wizard.
- In the Name field, enter “ProductOrders”.
- Click the Right Arrow > icon.
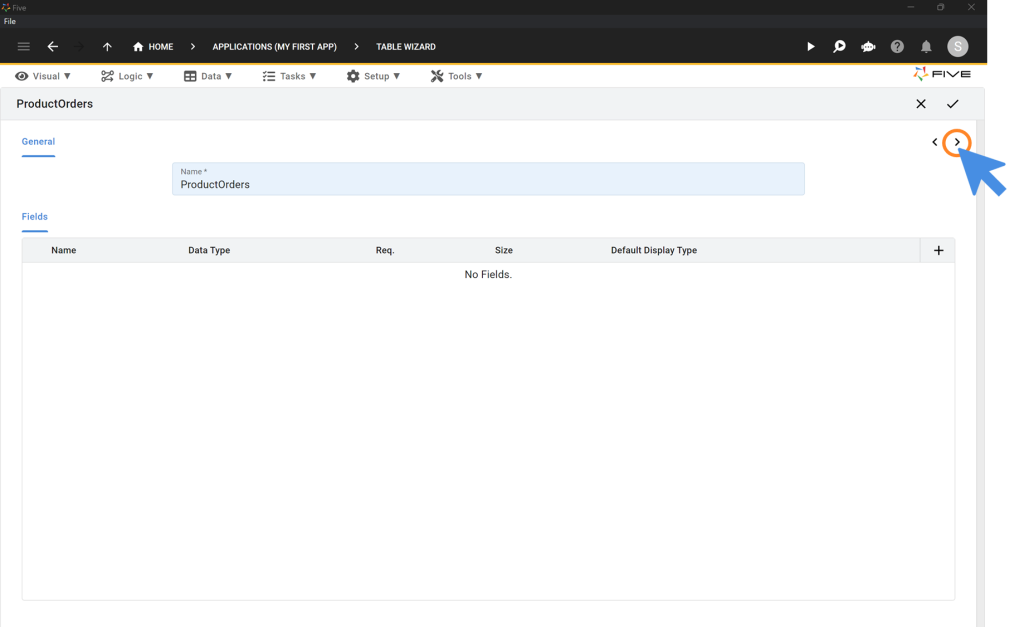
- In the Relationships area, click the Plus ➕ icon.
- Add relationships to the Product and Orders tables, marking both as Required.
- Once the relationships are defined, click the Tick ✔️ icon to save.
Step 3: Importing Data For Your Online Portal
- Import initial data using CSV files into your database tables (e.g., Products).
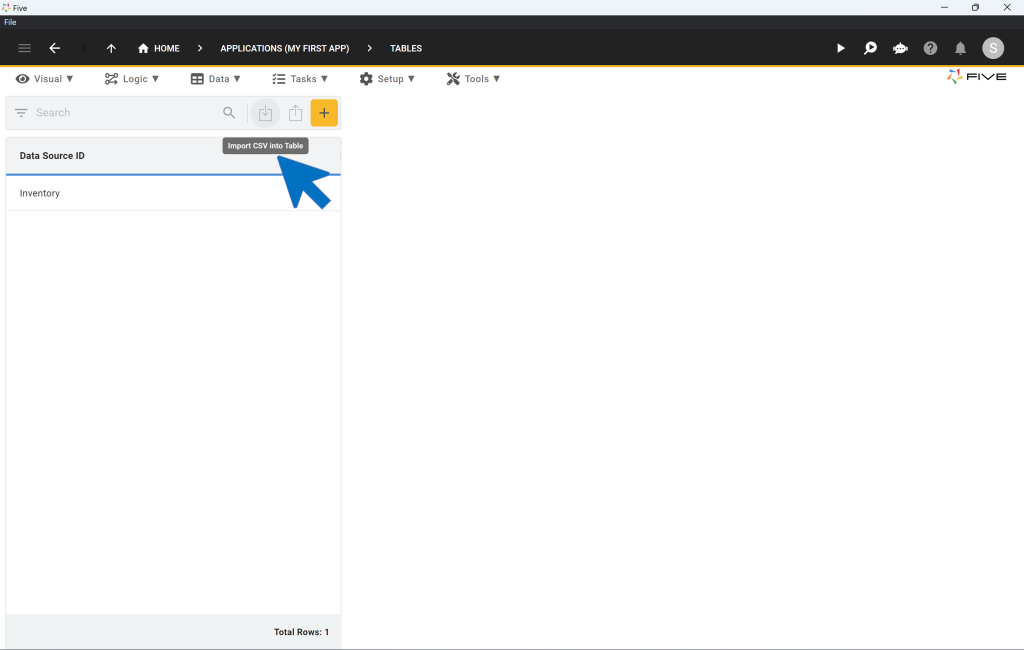
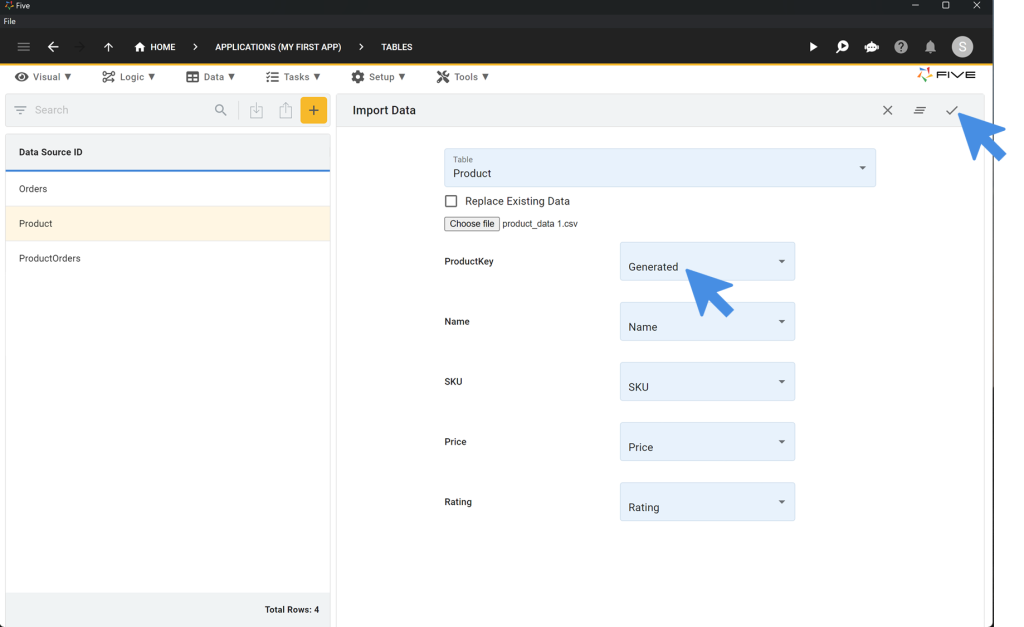
- From the dropdown menu, choose the Product table.
- Click on the Choose File button and select the CSV file available for download from the top of this guide.
- Select “Generated” for ProductKey. The platform will automatically map the remaining fields from your database to the corresponding columns in the CSV file.
- Click the ✔️ icon to confirm the data import. A confirmation pop-up will indicate, “CSV import completed successfully.”
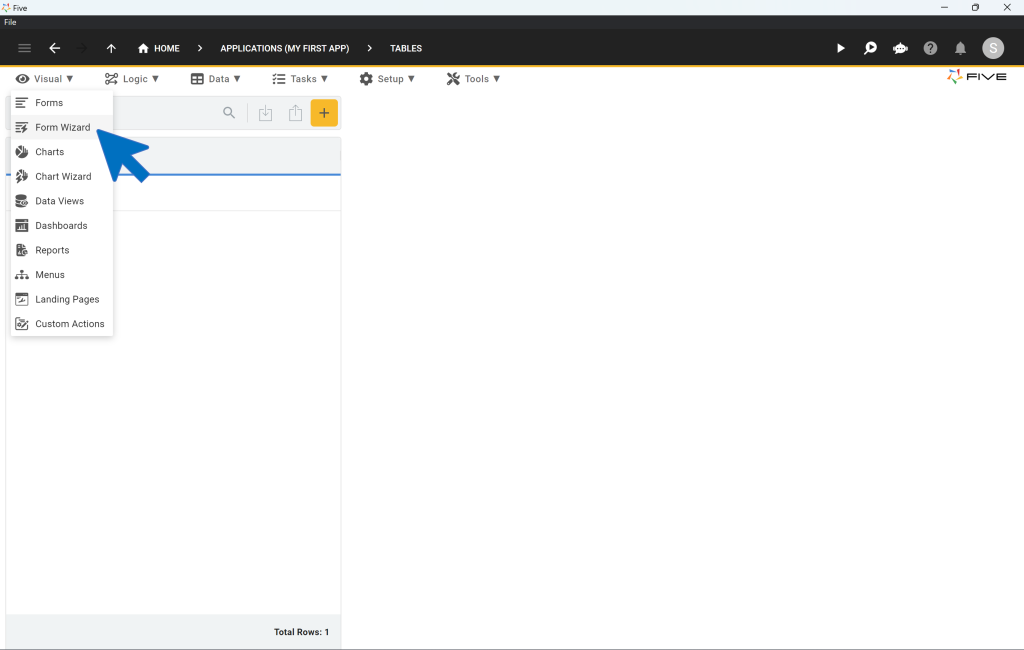
Use Form Wizard to Create Forms
Use Visual > Form Wizard to create forms for data entry and management (e.g., Products and Orders).
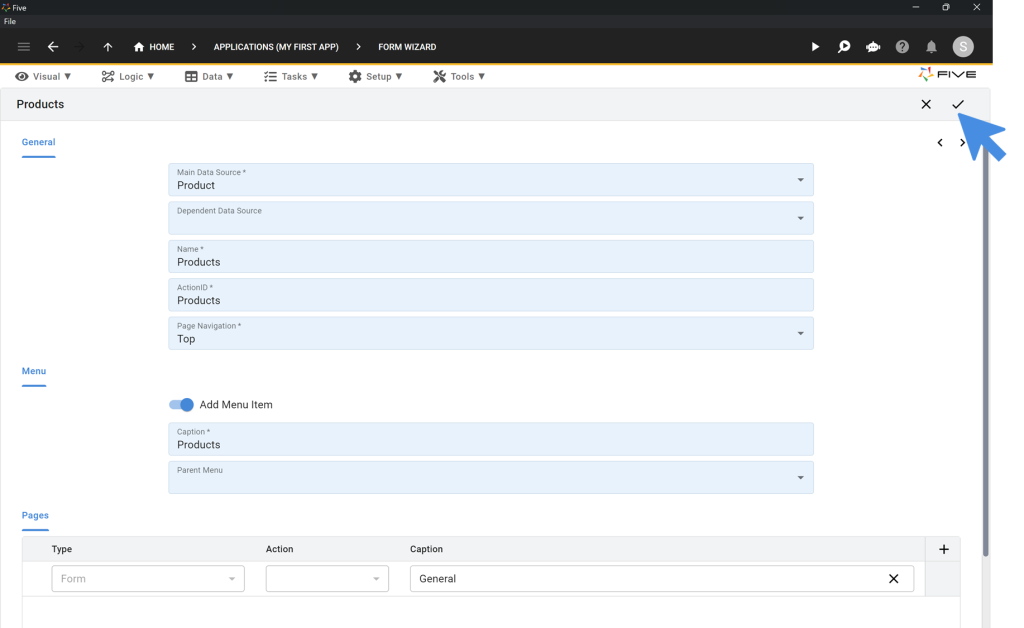
Create the Product Form:
- In the Main Data Source field, select Product.
- Click the Tick ✔️ icon to save.
Create the Orders Form:
- Repeat the same steps, selecting Orders in the Main Data Source field.
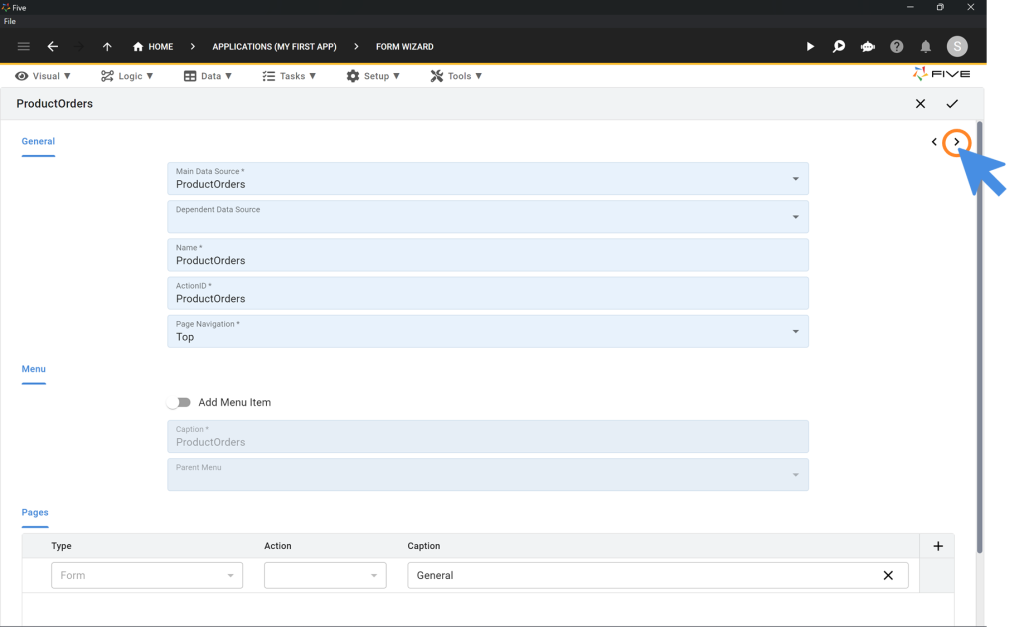
Create the ProductOrders Form:
- In the Main Data Source field, select ProductOrders.
- Toggle the Add Menu Item to off.
- Click the Right Arrow > icon.
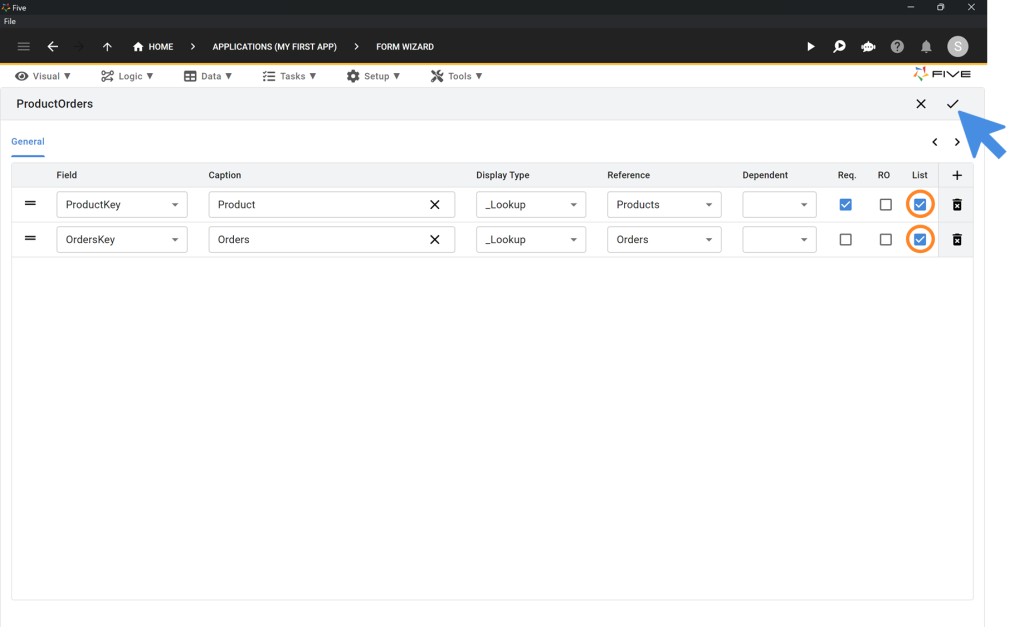
- Tick the List box for both fields: ProductKey and OrdersKey.
- Click the Tick ✔️ icon to save.
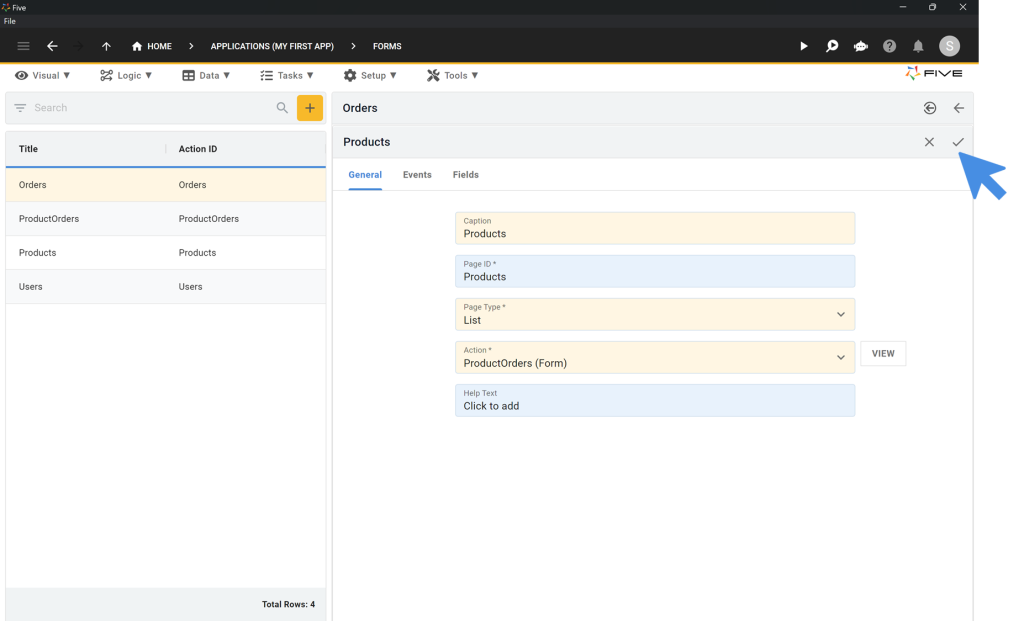
Adding a Page to a Form
- Click on Visual > Forms.
- Select the Orders form from the list on the left.
- Click on Pages on the right.
- Click the Plus ➕ icon.
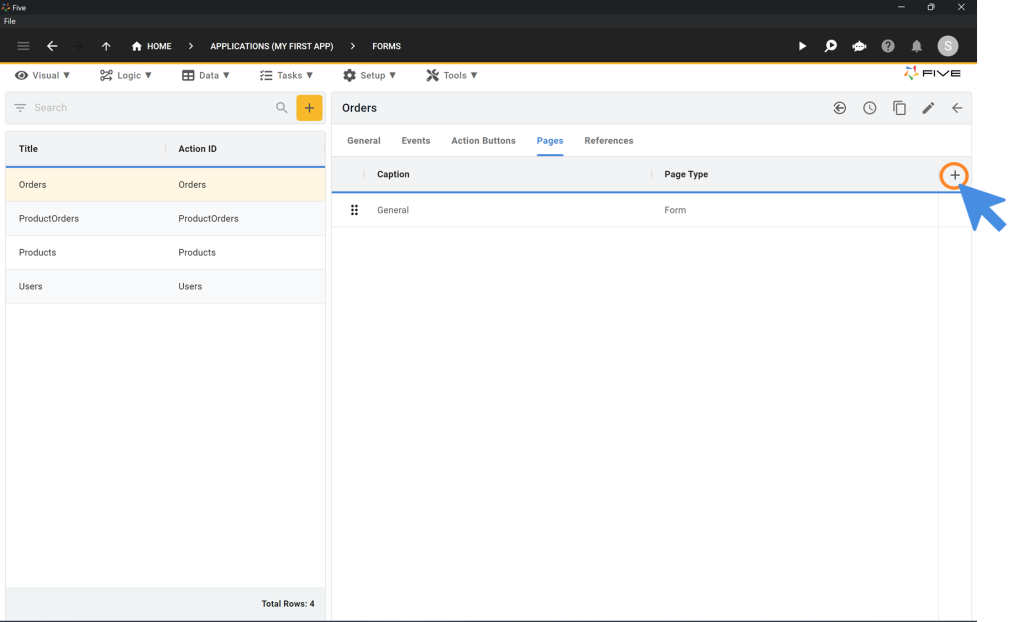
- Change the Page Type to List.
- Enter “Products” in the Caption field and select ProductOrders (Form) as Action.
- Click the Tick ✔️ icon to save.
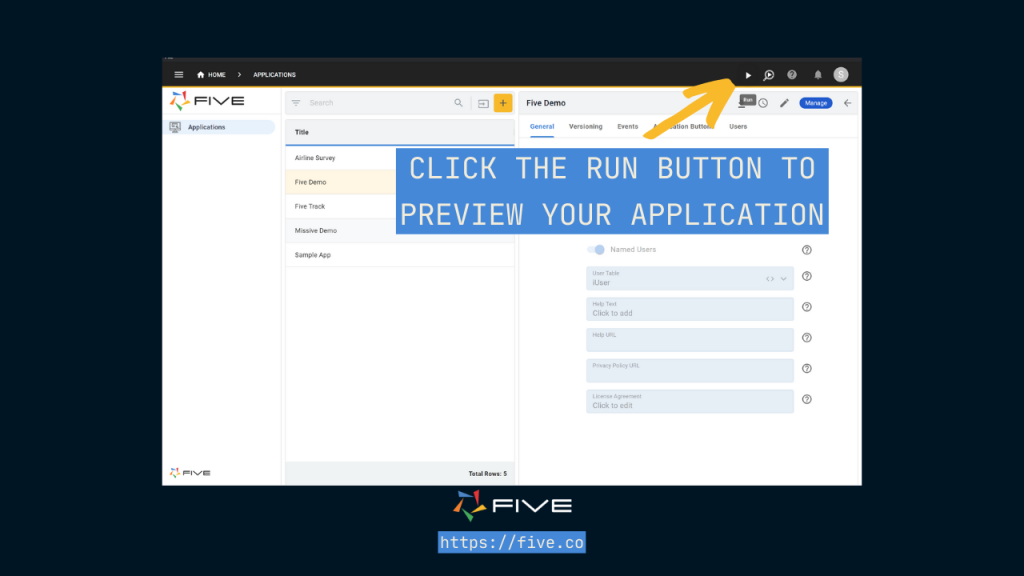
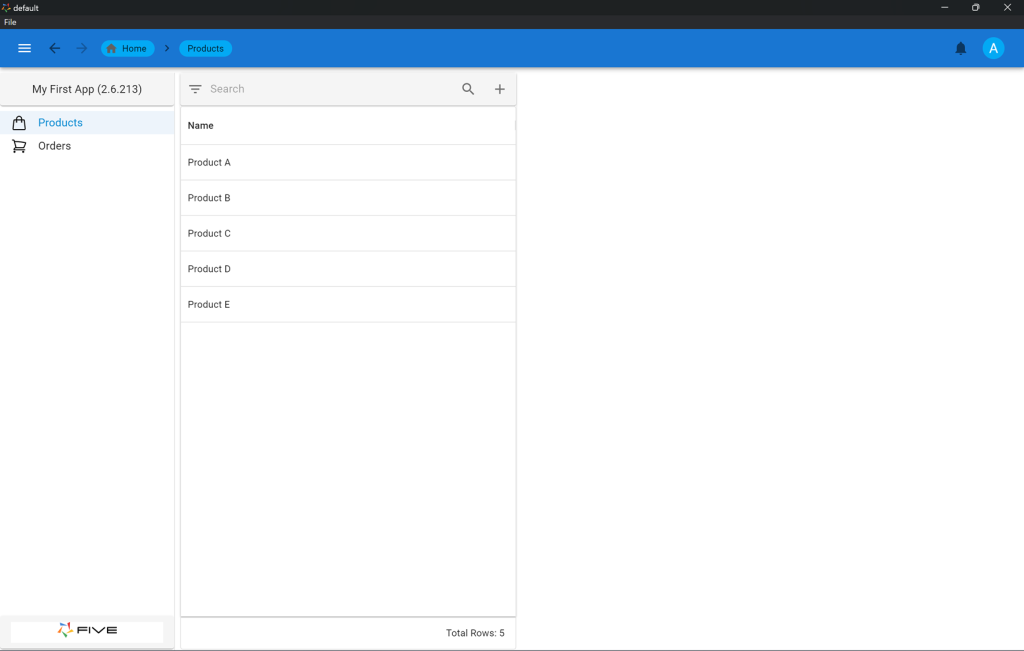
Step 4: Preview Your Online Portal
- Click on the Run ▶️ icon in the top right corner to preview your application.
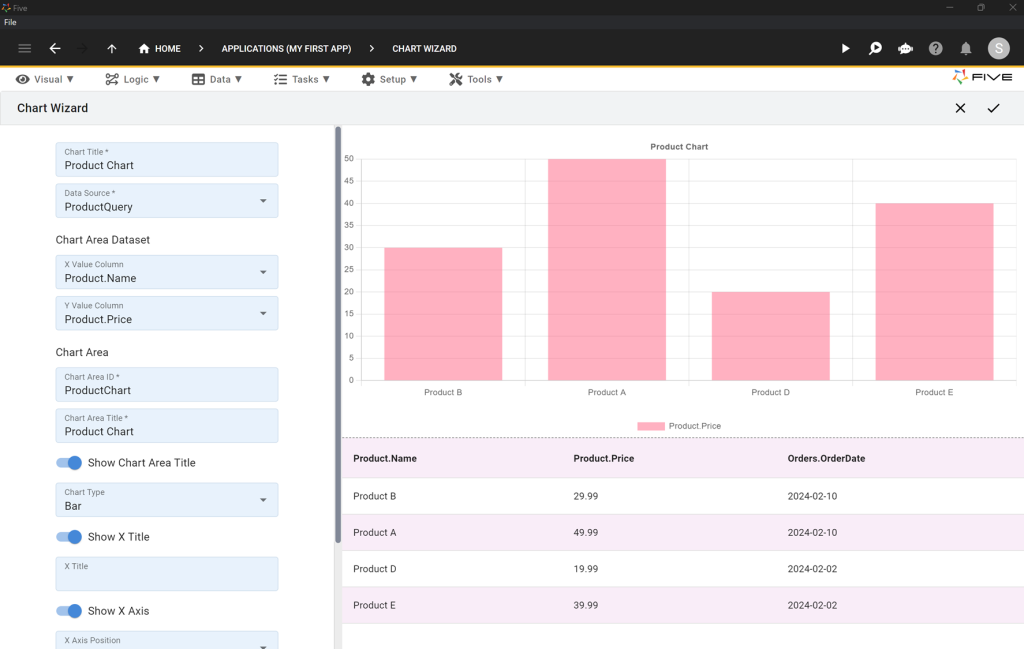
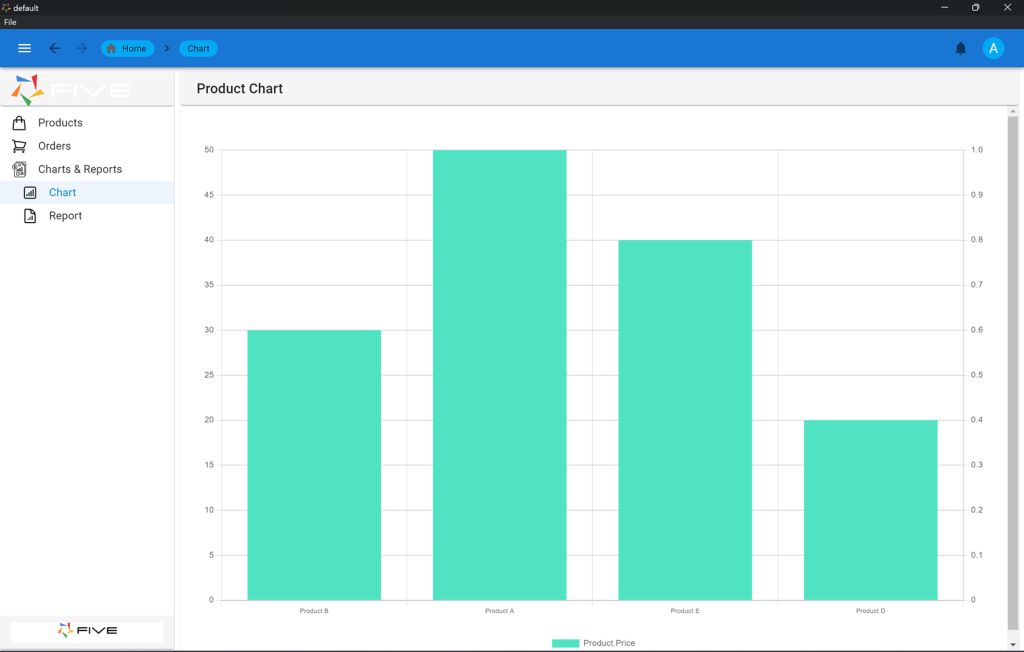
Generating Charts For Your Online Portal
- Utilize Visual > Chart Wizard to create visual representations (e.g., sales trends).
- Fill in all required fields, choosing your X Value Column and Y Value Column.
- Save by clicking the Tick ✔️ icon in the top right corner.
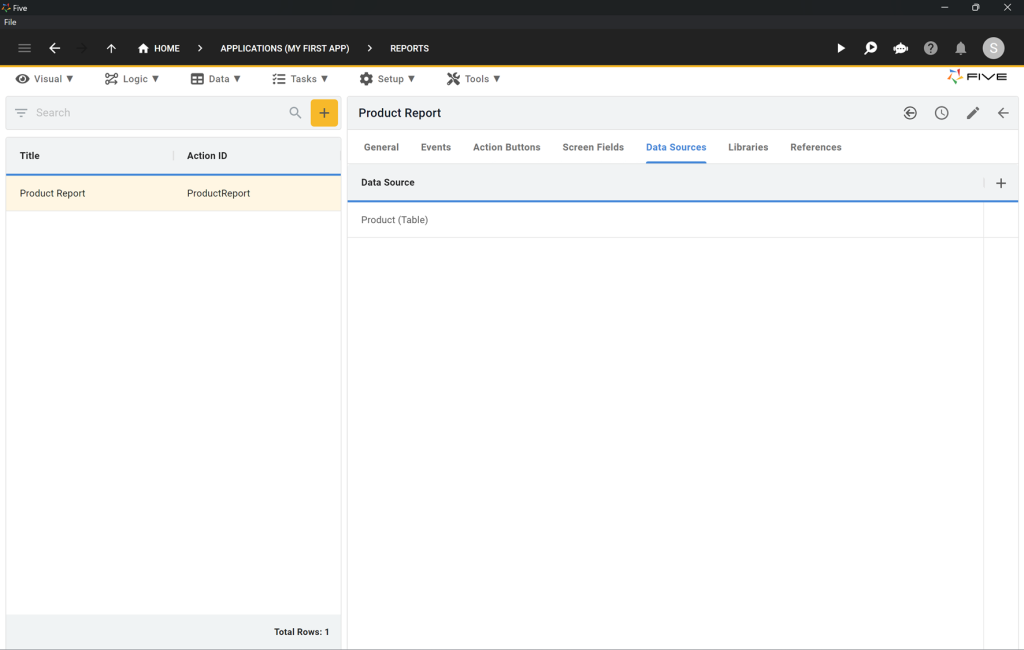
Creating PDF Reports
- Click on Visual > Reports.
- Click on the yellow Plus icon.
- Enter “Product Report” in the Title field.
- Click on Data Sources.

- Click the Plus ➕ icon to add a data source.
- Select Product (Table) as the Data Source.
- Click the Tick ✔️ icon to save.
- Return to General.
- Click on the Template field to open Five’s report template editor.
- Click on the </> icon.
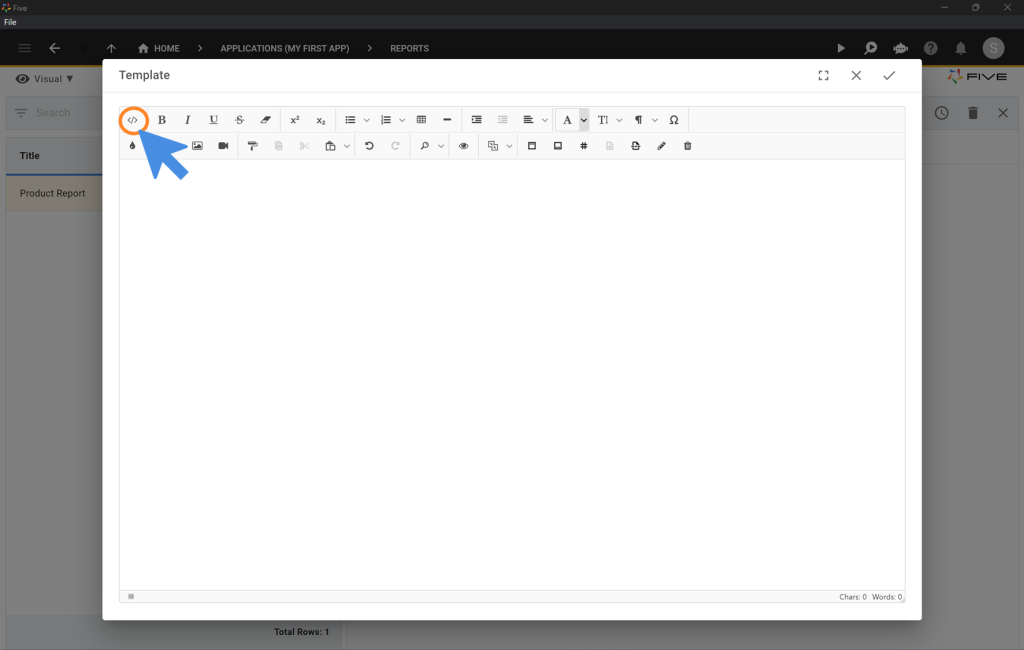
- Delete all code in the editor and replace it with the HTML provided.
<style>
    .demo tr {
      background-color: lightgrey
    }

</style>

<div><img src="data:image/png;base64,iVBORw0KGgoAAAANSUhEUgAAAKMAAAAtCAYAAADC1tsoAAAABmJLR0QA/wD/AP+gvaeTAAAHlklEQVR42u2cbWxTVRjHLxvv8hJQM1HRgdB2dLyE3rYMQizQtRs4hA8V1iIqiQu+EBK/EAHZ5YOsiwtRfIkjSIIGWW9AhX2g3YAFPhiNiy8gbEMmuHUImYKArN0YOz6nux13d/d2ve29t3M7/+SfLO2559777JfnnOeck1LUABCiqLQWs7kgaKUrKCIiMeWX/vak2hAGLSZXk4W+0GyhEfgnEnUiUTm89d/keutrwZudu89PVqrf80bjyKCFXt9sMV3kIIz6NIk6kahySxvKAETEOZRbWs/aSy7aKYSGJdpnk9X8SrOZbhFAyNlUSaJOJA5jSf1GHox8N8B3W5a9ey5Dbp8AXak4iNjmgyTqRKLCWVACxqg7Hd66agDTZWNqhscFI01bpGAMWsyfkKgTiSqvpC6zHxj5boFh3AsAT++naBkG4F2RyIxeEnUiUTEMSgPIwjKAxL6Ps6Xd27A+Z3fzGNF5o4XeLQYjfL6NRJ1Iet7ora+TCSPfN+2lDeVOb8Ncfp8tNL1IYqh+k0ScKMa8saEyCRj5rnWU1BXZmPPj8PqiWEWNl3tIxIkktbTswtMAkUkpL9tVp4sUMmb6o77DtGkViTiRbKGt2RnJXB+0mpb0zYzzl5LIEskD8R1DDtqhW51UHy5XOlTP1/kw/mGdbyLRJZKREbOmoGJ9I2JmTEi2Lxiqy3tlR6t1psKPi3eK1oK3aODHBPd+ClzEs5RywKNS+C/FMVoS4/s08ErBu6hlGSAymaMBxO9RsU6Rbbsmq8nBh/F3qzVD4UDjF0QaWZjVCwTfi8kGDoFPgCekAMSR4APc870u0aZMwxjKgLFY/xkYIUa/QZEsa7MNBwhbe4DMyRmjcLDLBzCMc8C3eN+f5bKpVpoEPsW7/32wS6TdDwMORsTo3uJA7ERvz3hUqYgEzfR+DsYOFQLOh/EfcK2KzpIJ43jwcUGbP8G0BiBOA18Q3PsqeLZI21pemxvgRhUdF4h2APEeB+MpJaMC5xlXcDC2qgzjMY2HwHiGabyfv1fQ7l/w8yo+lxl8TXDPWFmZDyOT2oKFMWQChK0RELF3GDYp2X+tyTQCquobAGPjEIQxWkDgf3IXr20nVxQpLbyOe1fwXFX9zFcHBoyIMY4DAM89AFHfhbY9M1Xp+zRb6S9UOuX9f4AxqpfA7YJryrnsqYQ2c/NCfv/7wCP6yxcphxGfroEhme0BMTJEG75T415450XqlHeH3zhXIRjPcEWGWh6bJIxYeNH/puA6f5KVdjp4j6DPLhlg8WH8ADxdRUtVzoadvUDszoxqDB3UZZtttPBgLao2TQwFjIfCAWNXyG98dRBW01Iygq8Irv0FnMiI9BD4qKCvMLhQzkwqpdU0FCyrIkOyEMbter1ambhpAb0y+ndbddYCgLARjDh3tvuN7iECI8UtoAuXVFrA85Ps4y/wYrnT+pTBiLbPzALwbvUBkdGfVXVaAGuOiHWlA3RbAL4OHogPgAxkrxkiMEaz2jFBH3fAzyWYXS+BdYnUmCmBEQqWyQDdpT4gRmzYqSaMbYHsqeFA9mkRCPnGkBYkCONJlec7oxSGMTrf+1DQD66034hxzTKReee34ETXhrWaM2Y+ANFFpQN0x8VBxJlx5rwVB92TsJUGsb0qezXMD//uB8So28OBWfmDsJqWWwljMNIE7V7GNZ+gHQtOZmdL+2oaMuL7kiAW6y9H2+X5PHuch9YtVuSelaaxANfeOCHku7nt5NwnhhCMWPiUVJugz6+4Kj66VoniAHZgwwjHwV6MASL2e9G2ziPrpjh97tY8n5txwRwv4Wzon2UEqM7GCd89cG24yugN+7PsqMY2fIhlxqgWglsF/eLlti8Fn+HsuEGhe2oHI2KyFkBWDMeEkTEs5F/j9Hk2ApDIyRbW5B/xyPoJFISoYQBWEfhuDPju94Yvc/QQWPSOV3h+VRejCLgNzlfwfnwYr1Jq7u/DMs6OyLEwRt8mDqL+KmIEqR6Agsx4MgKkz30zr8LtiuetbtfoHgHIjkkAiJdyyturZrlunzA8rFAgByOMWPinZk6LgBgEz1P4XtpX05EChtFNh73nAsiEDD6zCDBeB38s9oTLK9boAMQQByRyVrg/L6gsGiv1RlCgLAXYgj3w+Y2tUD2zOEuGAnOmqQTEYIWR4qr3g7z+fwar8UNdB6iBcoQMbZoheQoZINzaA2M3kL8uZz29jiHh+V0okM0AdHcAvmq8jtgRmG3qk23VEV77c3FepDGMGRyQUashXLjg3ZSNVN/tSKU0nqvmvSp7V1JPaQPQnKz7Rz6QDp+7DT7b3D0fpdLwumCoavaziDWOpIiI1FQu654HEN7rlSG7fViNNUkiophy+grLRGDEw/aVXJ9nEYkQkXYzdShcAL5LokBC1sRrkqA0EikijbKjewm4SwJIhJeCcg+tfZxEikgrIPdLwcj52sqjG8aTSBGpLjvrmgjAtUjD6PGRKBFpWcy8IAFjp+NwoYFEiEjr4fprIYwOn+dTEhkizYULFbxnzV8Il3uggohIMTlY92s9lXSFp4REhChlwuuKcMTsTCRDsq7JJCJEKVUeu04f3acmIupP/wHYJhviTK/+pwAAAABJRU5ErkJggg==" style=""></div>
<div><br></div>
<h1>Report</h1>
<table style="letter-spacing: 0.00938em; width: 100%; font-size: 1rem;" class="demo">
    <tbody>
        <tr style="border-bottom: 2px solid black;" class="fiveReportHeaderRepeat-Level1">
            <td style="width: 28.1305%; background-color: rgb(153, 153, 153); color: rgb(255, 255, 255); text-align: left;">Name</td>

            <td style="width: 50.97%; background-color: rgb(153, 153, 153); color: rgb(255, 255, 255); text-align: left;">SKU</td>

            <td style="width: 18.254%; text-align: left; background-color: rgb(153, 153, 153); color: rgb(255, 255, 255);">Price</td>
        </tr>

        <tr class="fiveReportHelper" contenteditable="false">
            <td class="fiveReportHelper">{{#each @root.[Product].[Records] as | Product |}}</td>
            <td><br></td>
            <td><br></td>
        </tr>
        <tr class="" contenteditable="false">

            <td style="text-align: left;">{{Product.[Name]}}</td>

            <td style="text-align: left;">{{Product.[SKU]}}</td>

            <td style="text-align: left;">{{Product.[Price]}}</td>
        </tr>
        <tr class="fiveReportHelper" contenteditable="false">
            <td class="fiveReportHelper">{{/each}}</td>
            <td><br></td>
            <td><br></td>
        </tr>

    </tbody>
</table>
<div><br></div>

<div style="text-align: center;  display: flex; justify-content: center; align-items: center;">
    <div style="width: 150mm; height: 125mm; border: 1px dashed black; display: flex; justify-content: center; align-items: center;">   {{{_Chart 'ProductChart'}}}</div>
</div>
<div><br></div>
<div><br></div>
<div><br></div>
<div><br></div>

<table class="fiveReportFooter-everyPage" style="width: 100%; height: 10mm;">
    <tbody>
        <tr>
            <td style="text-align: right;"><span style="font-size: 12px;"><em>Page <five.pageNumber.current.arabic> of <five.pageNumber.total.arabic></em></span></td>

        </tr>
    </tbody>


</table>
By following these steps, you’ll have a fully functional database with an intuitive interface and robust reporting capabilities, all set to enhance your user experience.
Final Touches To Your Online Portal
Creating Menus
Navigate to Menus:
- Go to Visual > Menus.
- Click on the yellow Plus icon.
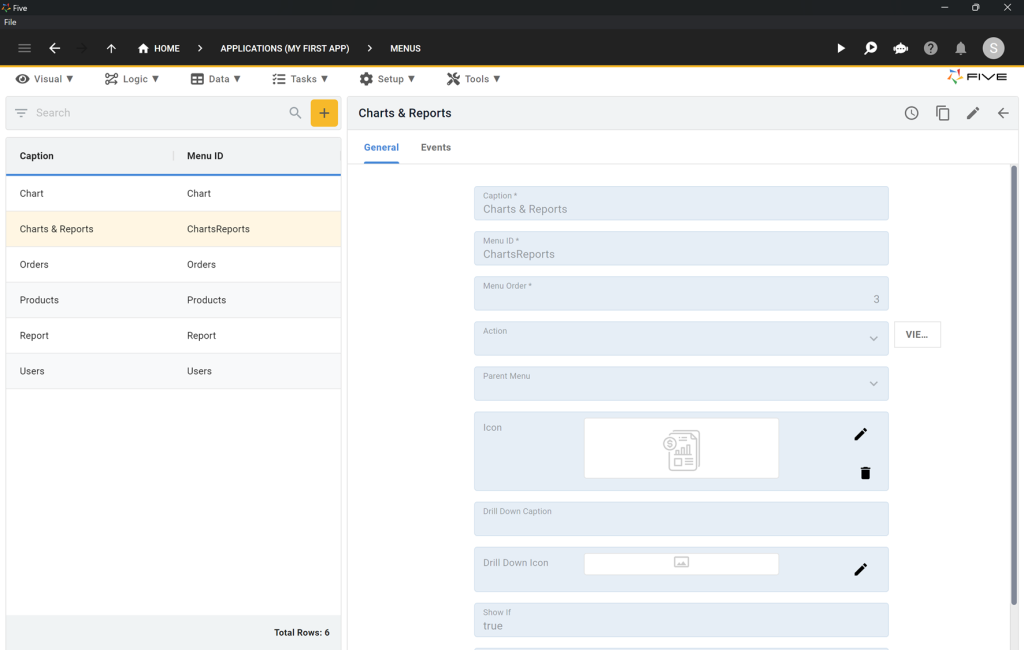
Create a Parent Menu:
- Type “Charts & Reports” into the Caption field.
- Enter “3” into Menu Order.
- Click the Tick ✔️ icon to save your menu.
Add Menu Items:
- Click the yellow Plus icon again to create new menu items for your chart and report.
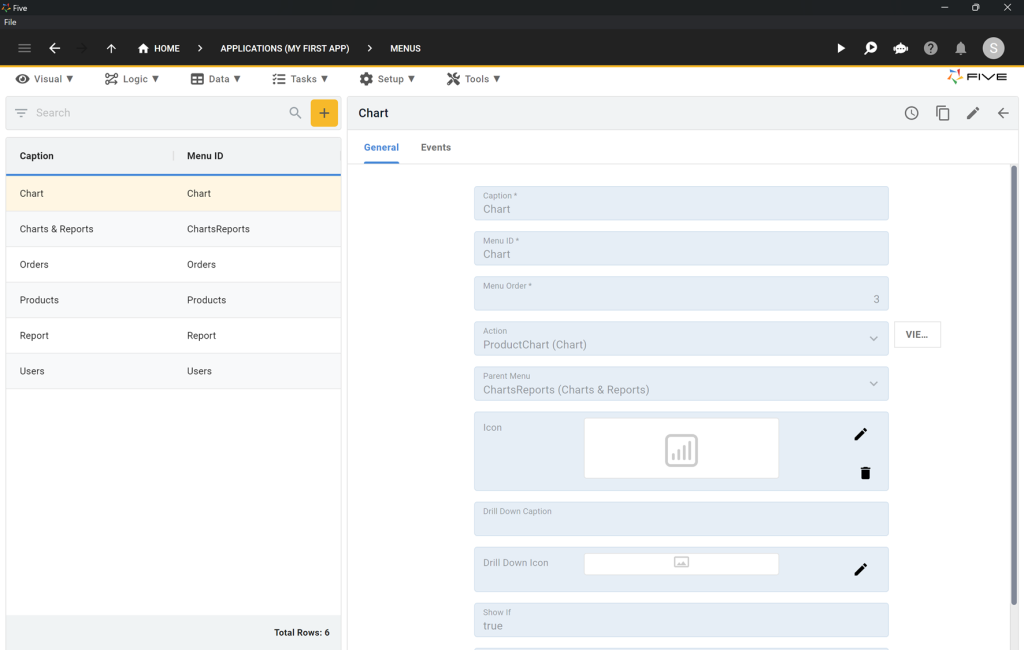
Chart Menu Settings:
- Caption: Chart
- Action: (select the appropriate action for your chart)
- Parent Menu: Charts & Reports
- Click the Tick ✔️ icon to save your menu.
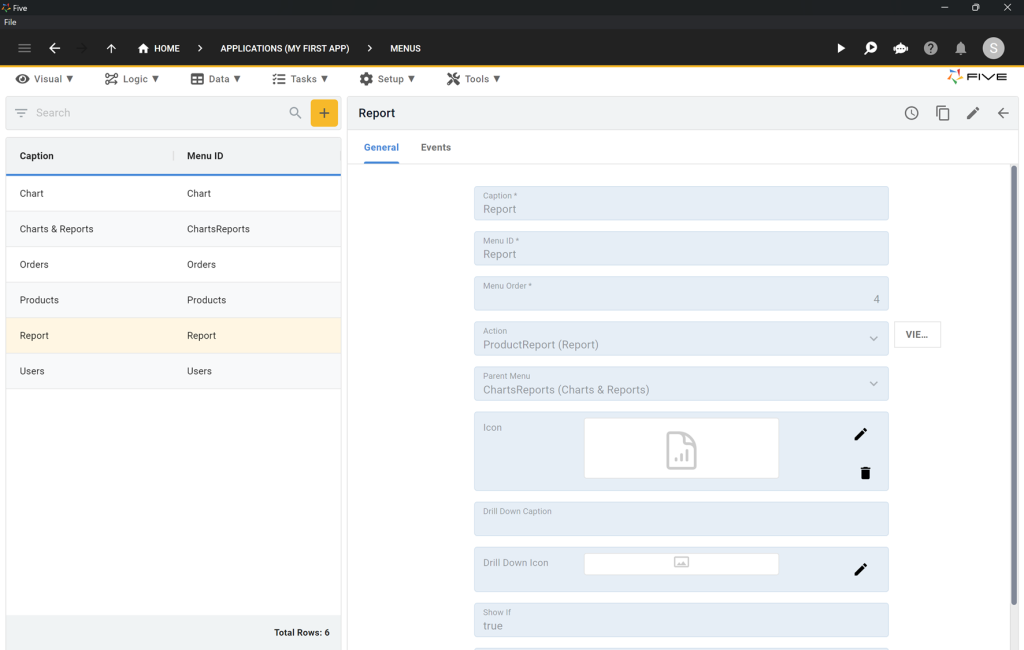
Report Menu Settings:
- Caption: Report
- Action: (select the appropriate action for your report)
- Parent Menu: Charts & Reports
- Click the Tick ✔️ icon to save your menu.
Testing Your Application
Run Your App:
- Ensure that your forms, charts, and reports are functioning correctly.
- Verify that clicking on Chart in the menu on the left displays your chart.
- Test your report to confirm that you can view a PDF document in your business portal.
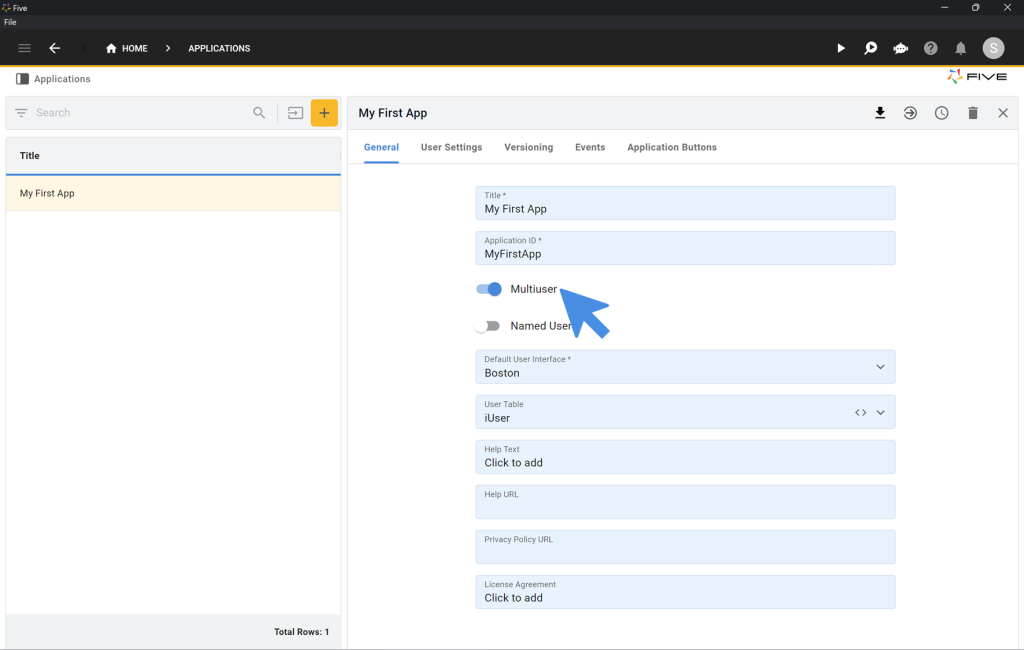
Adding User Management and Logins
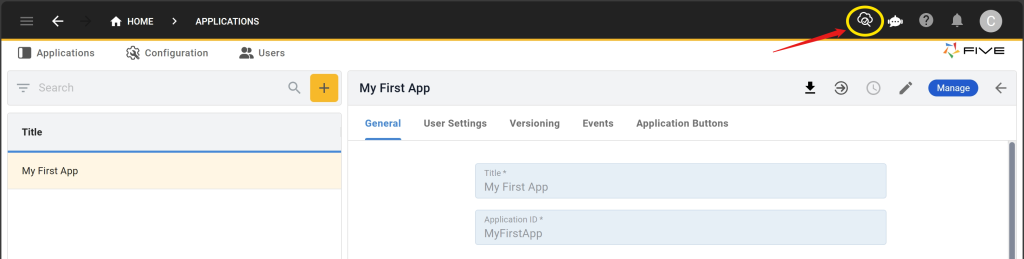
Enable Multiuser Functionality:
- Click on Applications (My First App) in the top navigation bar.
- Toggle the Multiuser switch to “On” to add a login screen and user management to your application.
- Click the Tick ✔️ icon to save.
By following these steps, you can finalize and deploy your web portal, ensuring it includes user-friendly navigation, comprehensive data visualization, and secure user management.
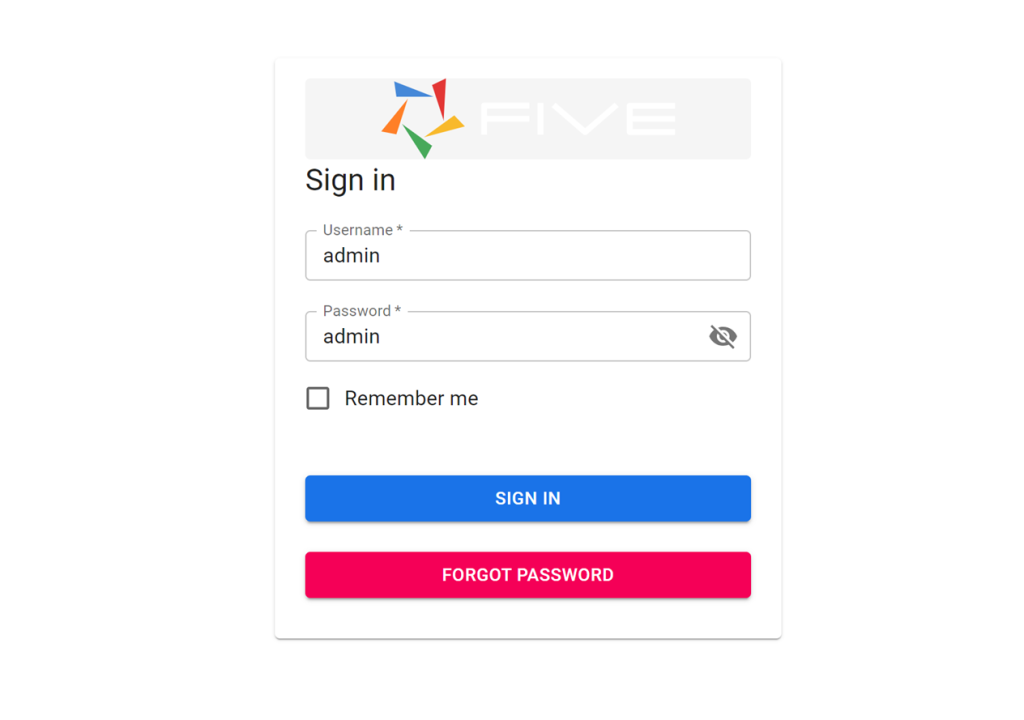
Run your web portal again. You will be greeted by a login screen.
Use user name admin and password admin to log in to your application!
Conclusion: How to Create an Online Portal
Follow this full tutorial to continuing building you first web app: Code-Along: Build & Deploy a Full-Stack Web App
Finding Help in Five
In case you get stuck during the development process, we’re here to help! Continue developing your application by accessing these resources:
- Five’s User Community: Visit https://five.org to ask questions or get inspiration from other users.
- Five’s Documentation: Visit help.five.org to access Five’s comprehensive documentation.