Excel to Web App [Quick, Easy & Free 3-Step Tutorial]
Convert Your Excel Spreadsheet into a Web Application [Excel to Web App – Part 1]
Are you planning to go from Excel spreadsheet to web app?
Here’s a quick and easy tutorial explaining how to convert an Excel spreadsheet into a web application. We will be using Five’s free trial to build our prototype application – so before we get started, make sure to sign up for a free trial.
This beginner’s guide does not require a background in coding.
Let’s go!
Ready to Convert Your Spreadsheet to a Web App?
Transform your Excel files into powerful, secure web applications without the coding headache. Our experts will convert your spreadsheet with:
Free consultation & fixed-price quote
Convert Your Spreadsheet Into a Beautiful Web App
This blog post is part 1 of a 5-part series on converting Excel spreadsheets to web apps. To view the other parts, follow the links here:
- Part 2: Excel to Web App – Calculating a Field
- Part 3: Excel to Web App – Adding a Theme
- Part 4: Excel to Web App – Adding Logins to Your App
- Part 5: Excel to Web App – Creating Charts and Dashboards
Step 1: Clean Up Your Spreadsheet
Before we start building our web app, our Excel spreadsheet must store data in the correct format.
To do so, ensure that your spreadsheet’s first row contains descriptive names of the data stored in each column.
For example, let’s say your spreadsheet contains information on Products, Prices, and Quantities. Here’s what your Excel spreadsheet should look like:
| Product | Price | Quantity |
| Product 1 | 4.99 | 100 |
| Product 2 | 5.99 | 4 |
| Product 3 | 100.99 | 58 |
Unfortunately, the real world is rarely as well-structured as this spreadsheet. So here are a few points to note:
1. If your plan is to import data , make sure that your header row (row 1) only contains descriptive names for what is stored in each column.
In our case, our header row contains Product, Price, and Quantity. Pick descriptive names for your columns and avoid adding unnecessary additional content.
2. Do not repeat the same information in multiple columns.
For example, it is not advisable to have one column for “Products (non-perishable)” and another column for “Products (perishable)“. Instead, have one column for “Product“, which lists all your products. Then, add another column that classifies each product as “Perishable” or “Non-Perishable”.
3. Make sure that each cell only contains one piece of data.
For example, in the table above, it might be tempting to add information about discounts to our pricing column, such as “5.99 (discounted to 4.99)“. Don’t. If you do so, this data point is no longer usable in a calculation. Always make sure that every column only has one type of data such as text, numbers, options, or currencies, and that every record only stores one piece of data.
In our example, the correct way to deal with discounts would be to create three separate columns: Price, Discount and Discounted Price, a calculated field.
4. Even if you have multiple values of the same item, do not put all of them into the same cell.
For example, sometimes we might have more than one email address for a customer. How should we deal with this scenario in our spreadsheet? The correct way is having multiple “Email” columns, such as “Primary Email“, “Secondary Email“, or “Work Email” and “Personal Email”. Do not store multiple emails in one cell.
Expert Tip: Useful Excel Commands For Cleaning Up Your Spreadsheet
To convert an Excel spreadsheet into a web app without too much trouble, it is worth reviewing your existing data and ensuring it is clean. As the saying goes: a stitch in time saves nine!
Here are our three favorite Excel functions for cleaning up data:
- TRIM: Excel’s TRIM function deletes all leading, trailing, and in-between spaces except for a single space character between words. This works great for misspelled names.
Say some of your customers have misspelled their names when signing up on your website, such as “JohnDoe”, or “Jane Doe □□□“. The trim function will convert these two entries to “John Doe” and “Jane Doe”. - CLEAN: The CLEAN function removes all nonprintable characters from text. This is useful if your database contains names with special characters that weren’t pasted correctly into your Excel, or if you have line breaks in your cell.
- PROPER: The PROPER function converts the first character to upper case and all other characters into lower case.
For example, the function will convert “JOHn DoE” into “John Doe”.
Later in this article, we will introduce you to a few helpful features that will make it easier for you to collect clean data in your web app.
CHECKLIST: Does your Excel spreadsheet fulfill the criteria above?
| Question | Status |
|---|---|
| The header row (row 1) only contains descriptive column names? | ✅ |
| Every column contains unique information related to the column header? | ✅ |
| Every cell in the same column contains only one piece of data of the same data type, such as a piece of text, numbers, etc.? | ✅ |
| Multiple data points of the same category are split across multiple columns? | ✅ |
| Your data has been cleaned up using some of Excel’s built-in functions? | ✅ |
If so, it’s time to move to Step 2 to convert your Excel to a web app: setting up your database.
Step 2: Setting Up Your Database and Importing Data
Thanks to the work we just did in Step 1, going from Excel to a web app will be much easier. Let’s move on to Step 2: setting up your database.
Having a database as your application backend is a critical step in converting Excel spreadsheets to web apps. We recommend MySQL, the world’s most popular open-source database.
To create our database, we will use Five, which has a handy and easy-to-use visual database designer. Using Five’s database designer, we can create a database table entirely in point-and-click.
1. Create a New Application in Five
Sign up for free access to Five. Login to your development environment. You’ll be greeted by Five’s welcome screen:
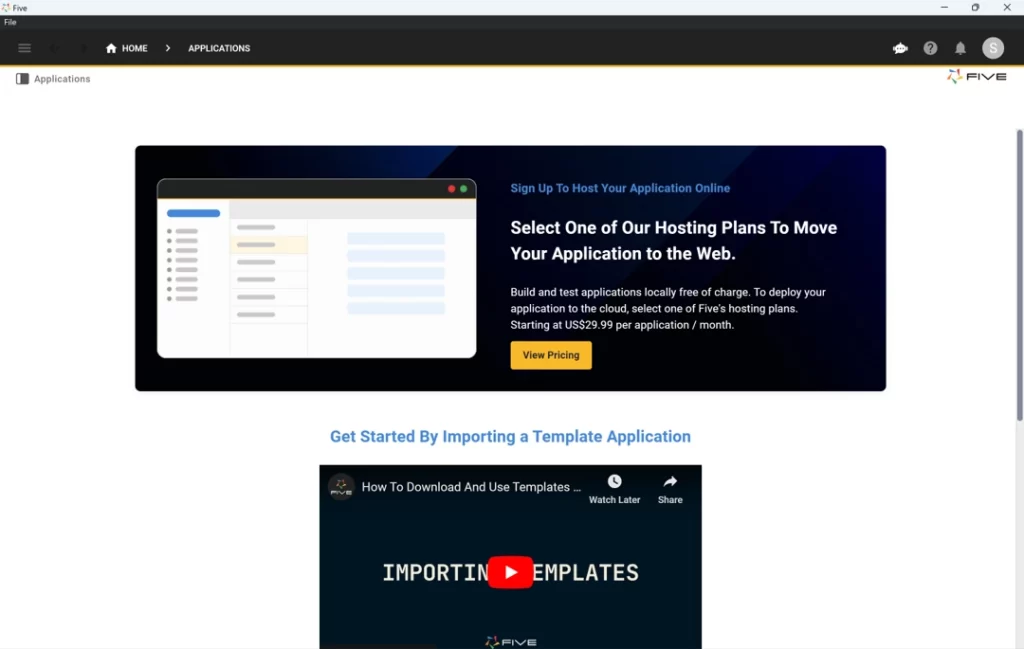
- Click on Applications near the top left corner of the screen, and right below the hamburger menu icon.
- Now, click on the yellow Plus icon. A new window “New Applications Record” will appear.
- Give your application a Title, such as “Web App” or “Excel to Web App”. Feel free to pick something more descriptive for your app.
- Save by clicking the Tick mark in the top right corner.
Here’s what your screen should now look like:

2. Create Your Database and Import Data
It’s time to build your database and import your data.
1. To start click the blue Manage button on the top right of the screen near the Five logo.
2. Now click on Data and then on Table Wizard.
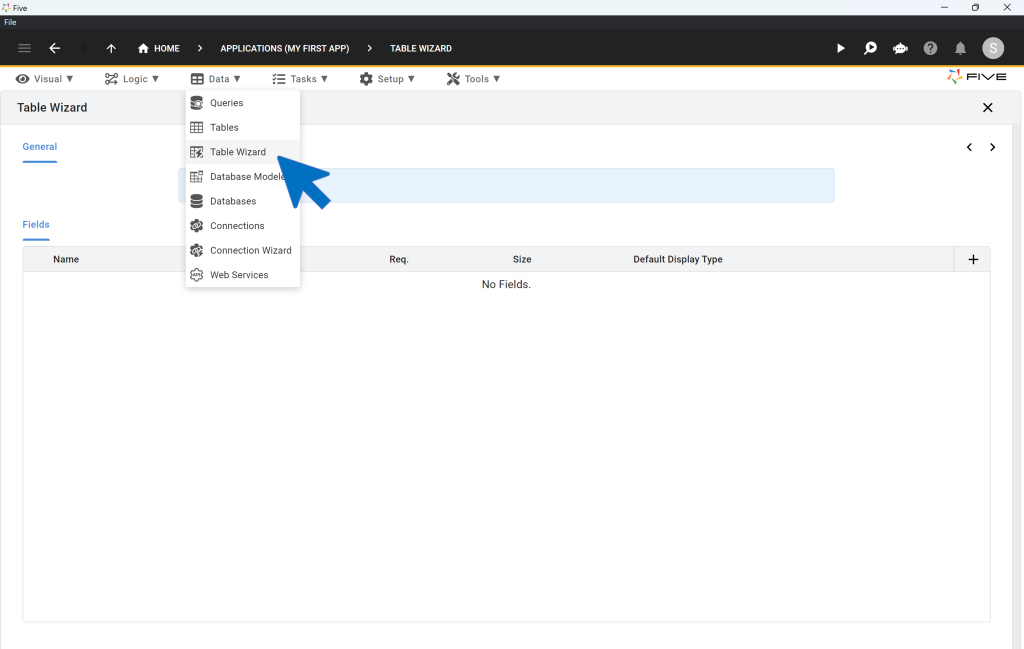
Let’s go ahead and create our first database table.
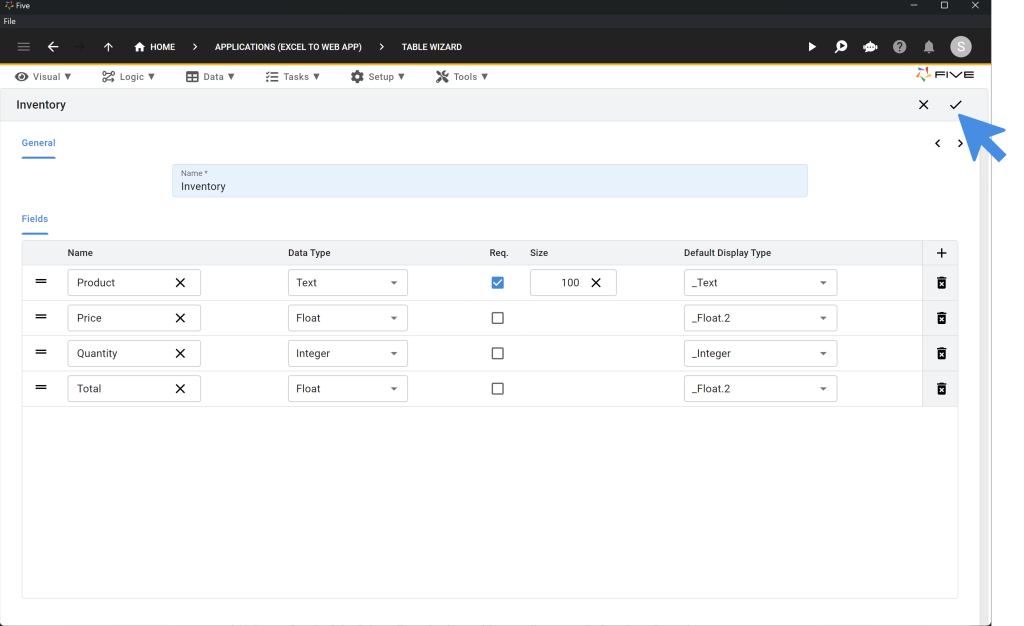
1. Give your table a Name. Let’s go with Inventory.
2. Now click on the Plus icon on the right side of the screen. Click the plus icon four times to create four database fields:
Field 1 will hold information about our products, so we give it the name Product and select text as its data type.
Field 2 will hold information about Price. Its data type is float and its display type is float.2.
Field 3, Quantity is an integer for its data and display type.
Field 4, Total will be used to perform a calculation in the second part of the application development process.
3. Save by clicking the Tick mark. Before you save, make sure that your table looks exactly as shown on this image:
4. A popup asking about a Table Upgrade appears next. Click on Save.
Now let’s import our data from our Excel spreadsheet.
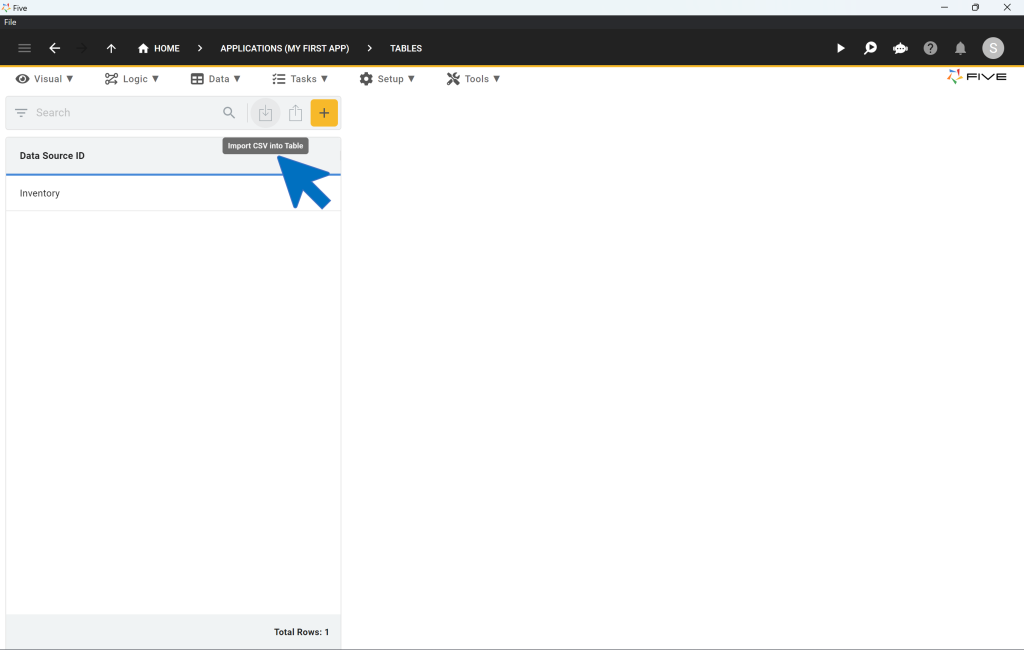
5. First, go to Data > Tables.
6. Now click the Import CSV into Table icon to get started. It’s located to the left of the yellow plus icon with a small arrow pointing down into a box. See the image below to find it:
To import your data, make sure it is stored in a CSV file. If you’d like to work with sample data, download our CSV file here.
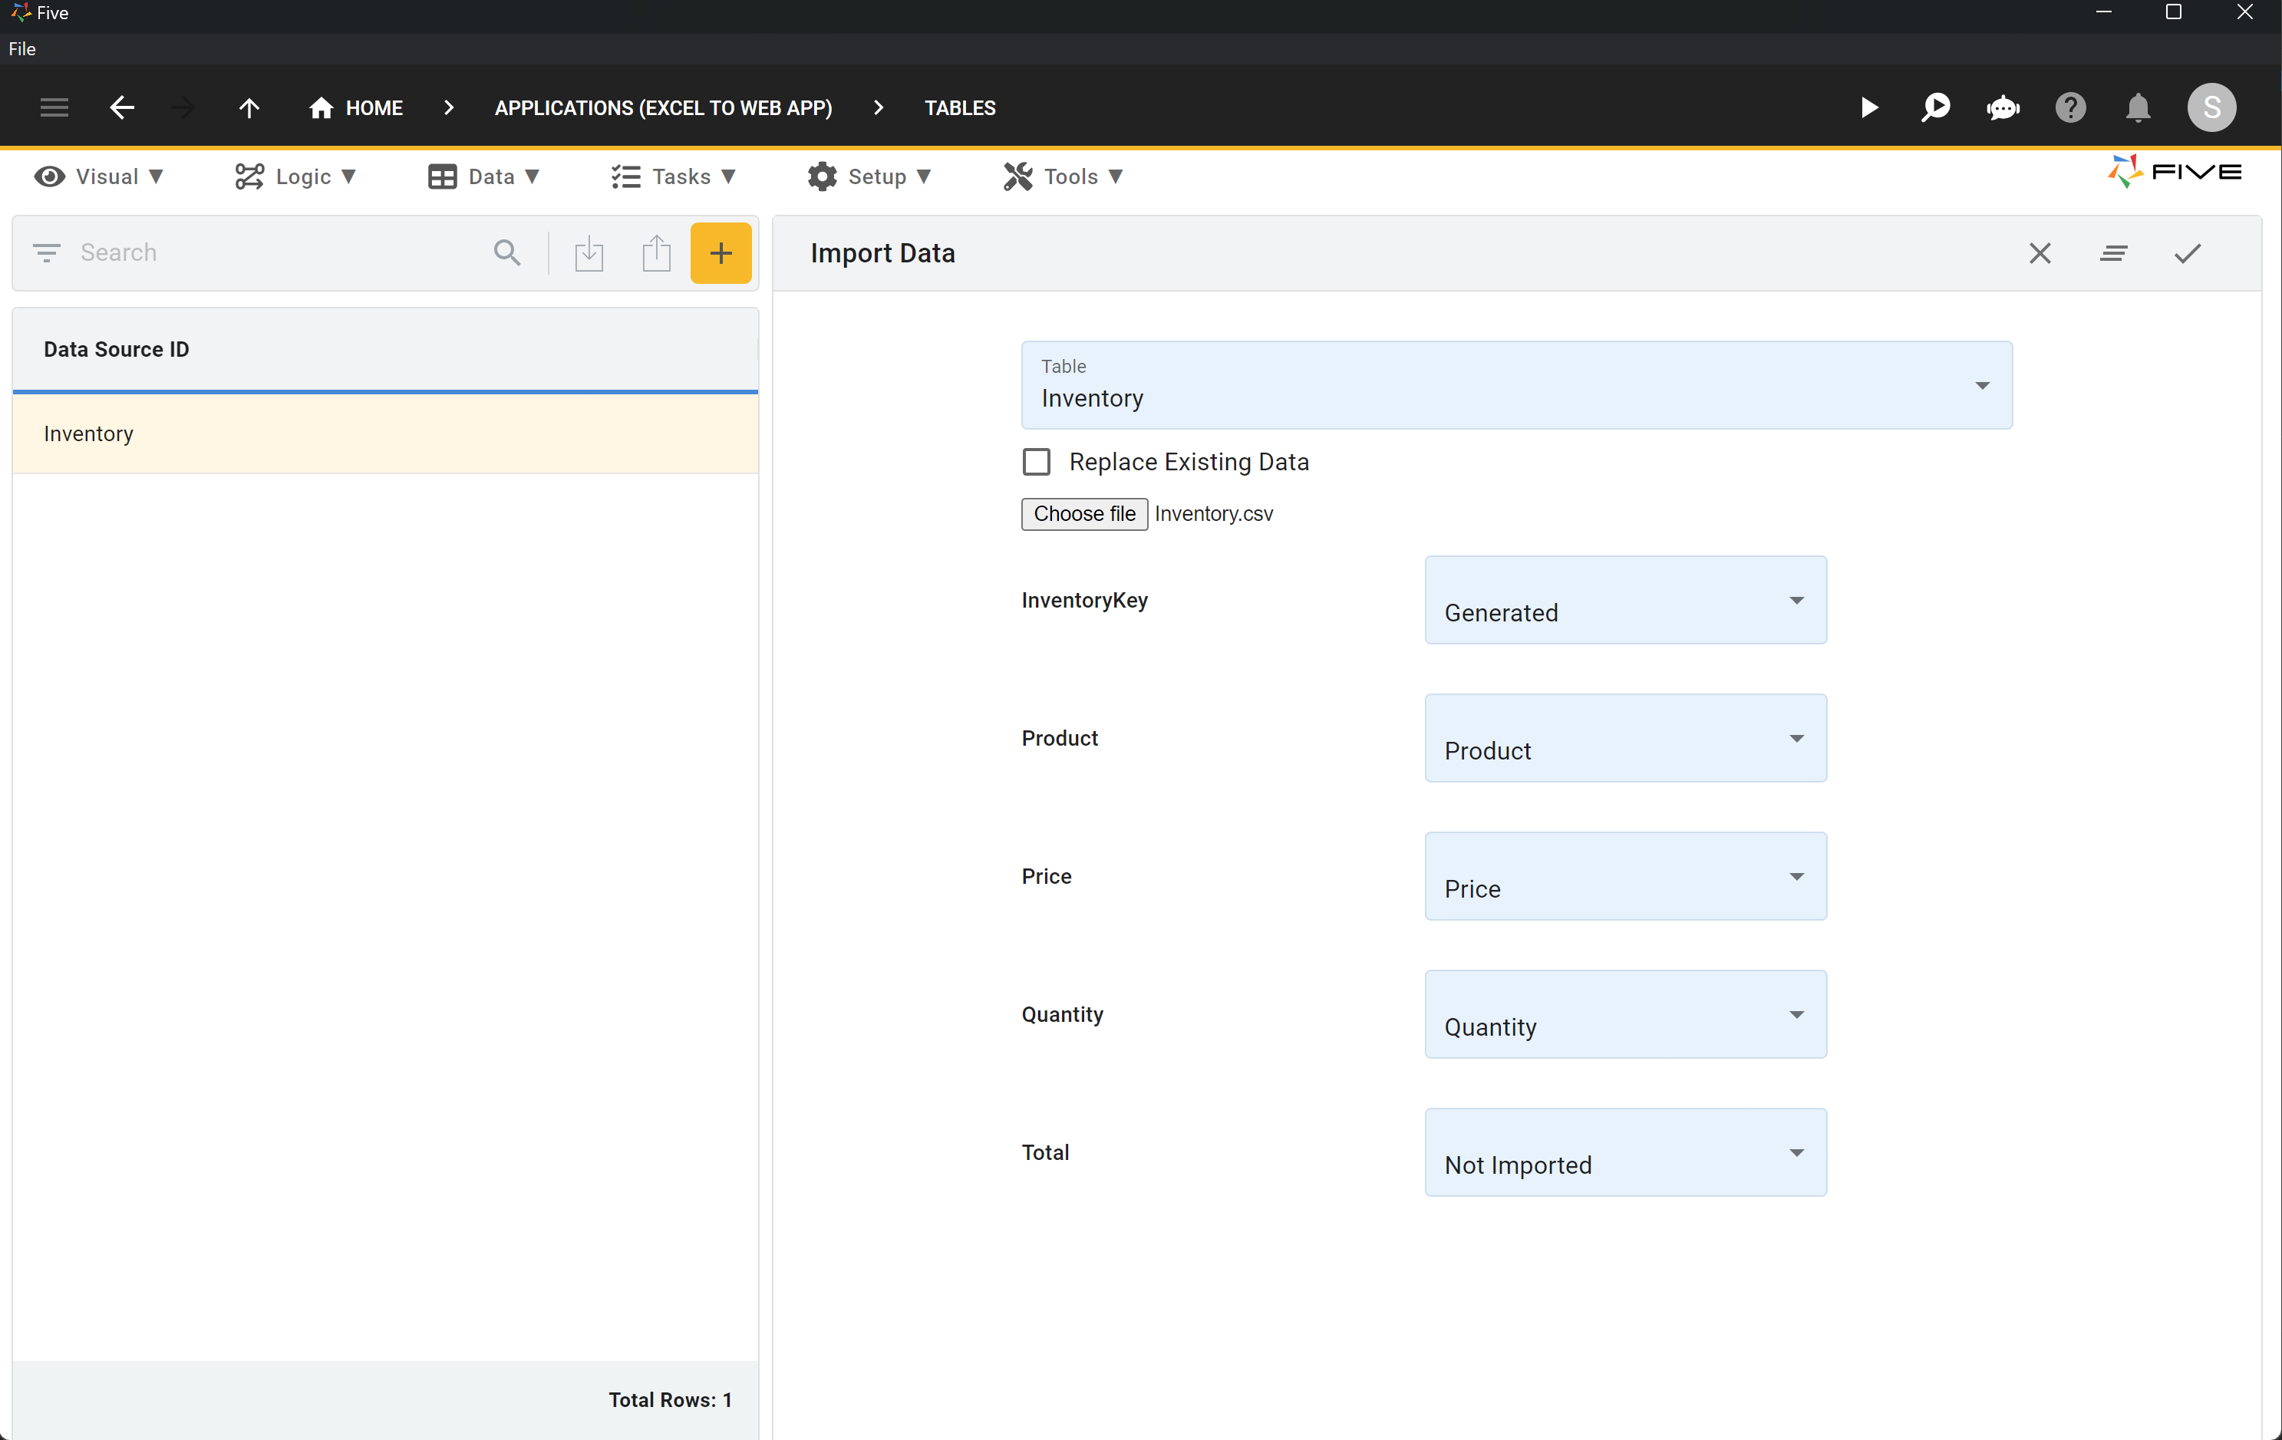
8. Five’s Import Data feature lets you select the database table you’d like to import data into.
In our case, there is only one table: our Inventory table. So go ahead and select it from the dropdown box.
9. Next, click on Choose File and find the Inventory.csv file. Upload it.
10. Five will automatically map the fields of your CSV file to your database fields, provided you have been following this tutorial and your database fields have the same name as the top row of your CSV file.
11. For InventoryKey select Generated. Five will now automatically generate a unique primary key for every record in your CSV file.
12. For Total, select Not Imported from the dropdown box.
13. Click on the Tick mark to upload your data.
Congratulations! You have now created a database table in a MySQL database and have populated it with data! If you require a more complex database structure with multiple tables or relationships, follow our how-to articles on database design here.
In the third and last step, we will add a form to our application, and finally launch and preview it.
Step 3: Adding a Form and Previewing Your Application
We have already created our application backend: a relational database with a single table that stores information about our products, prices, and quantities. But a database is not a web app. Our database needs a front-end or graphical user interface (GUI) so that users can interact with the data. So in the next step, we will replace the Excel GUI with a web app GUI.
So let’s move on to step 3 of converting our Excel to a web app.
1. Adding a Form
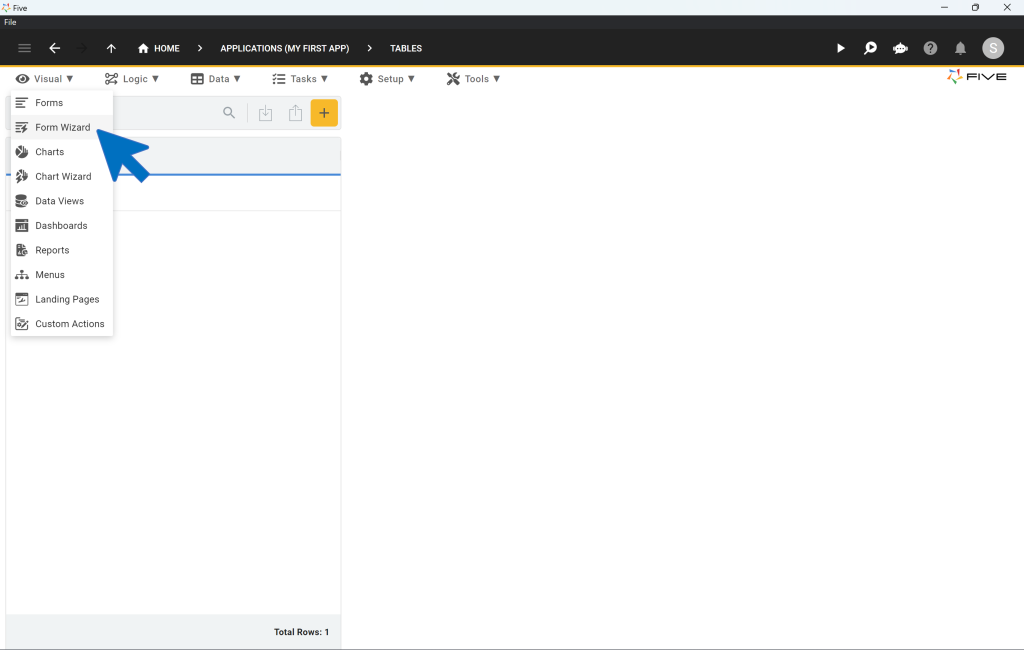
Five makes it easy to build a form for your end-users. To get started, click on Visual and then on Form Wizard.
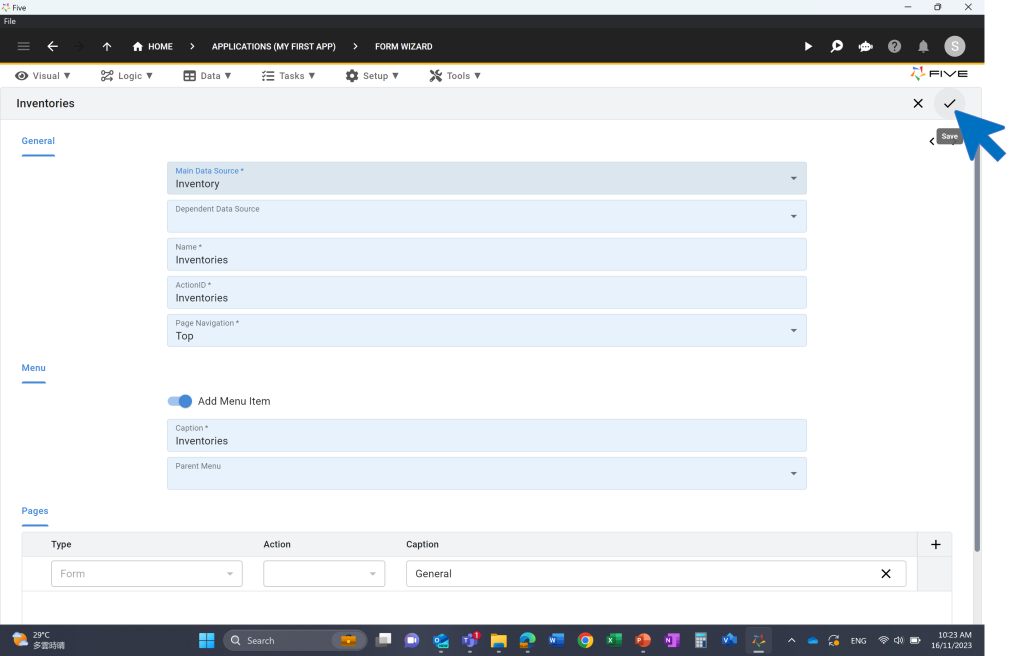
There’s only one thing you need to do in the form wizard. Select Inventory as your Main Table.
Save by clicking the Tick mark.
It is time to preview our application!
2. Preview Your Application
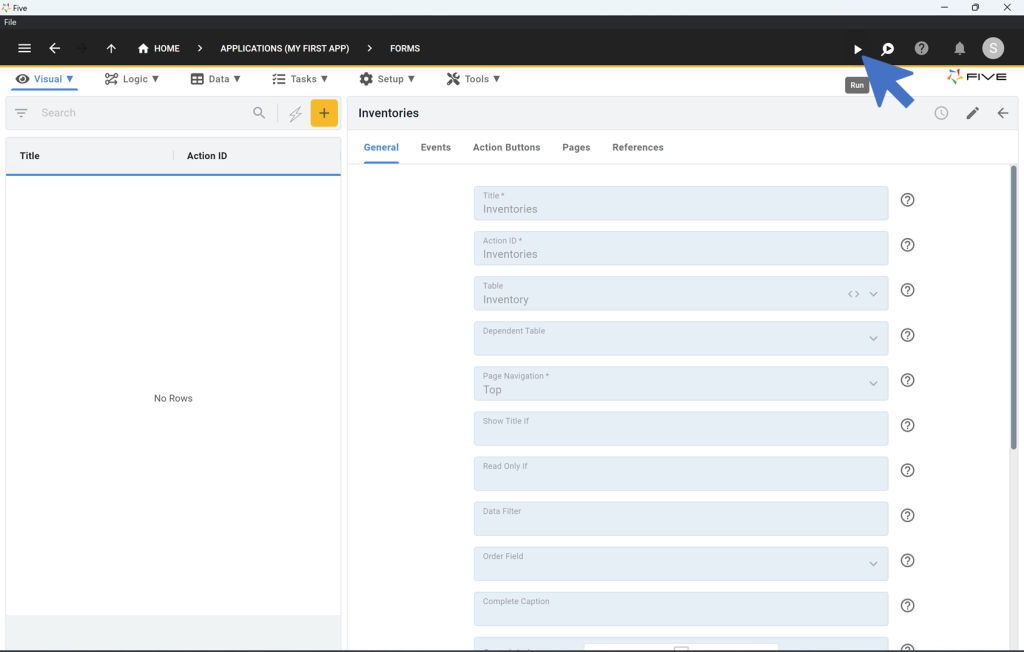
Click on the Run button at the top right corner. If you cannot see the Run button, you need to activate it first. Here’s how to do this:
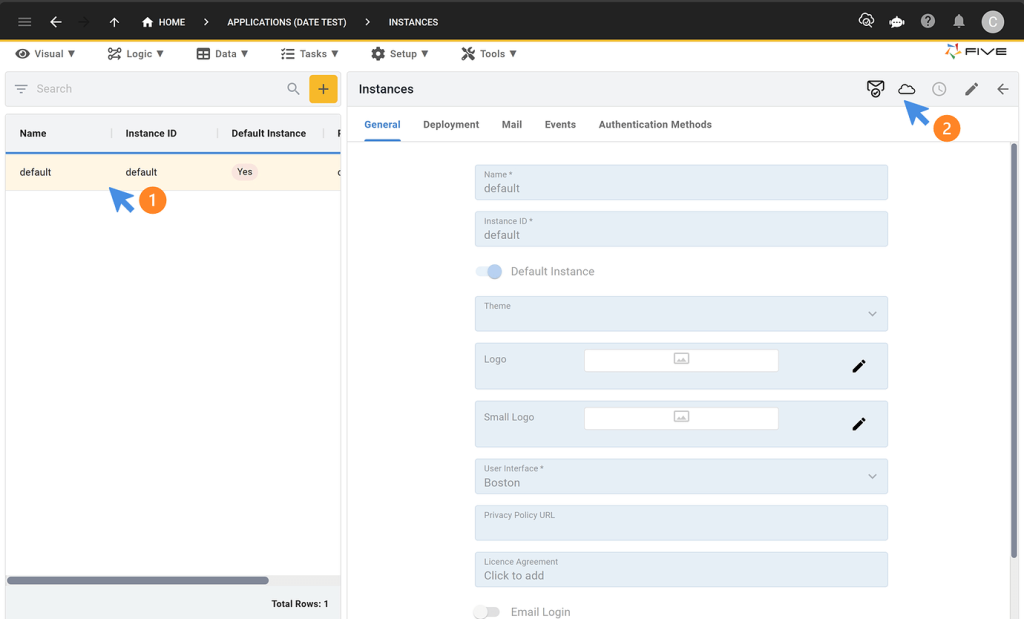
- Click on Setup, and then on Instances.

2. Select the Default instance, and then click on the Cloud icon:
3. This is the screen that you will see now. To preview your application inside your browser, click the button shown here:

4. Launching your application for the first time will take a few seconds. Once launched or deployed successfully, your screen will look like this.
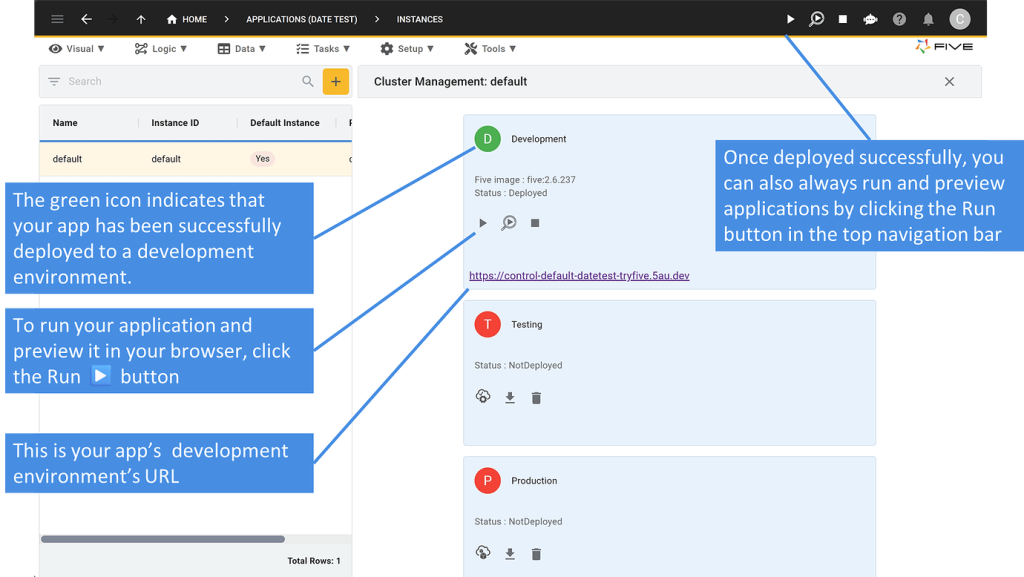
5. Now, click the Run button to launch and preview your application in your browser.
Here’s what your application looks like:
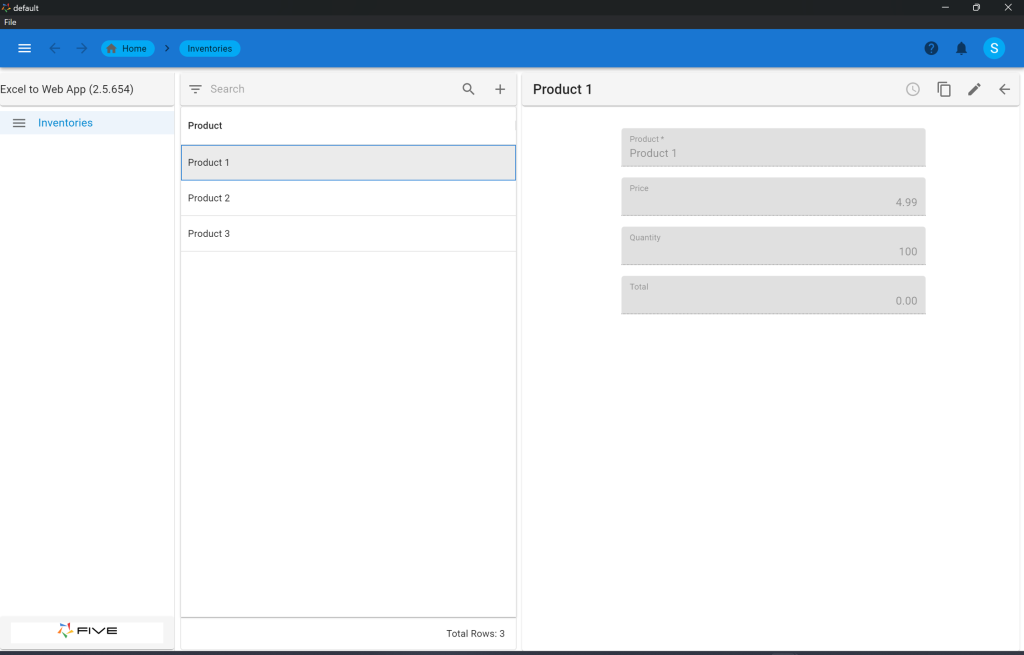
Five gives you a fully auto-generated front-end, including the form that you have just developed using Five’s Form Wizard, as well as:
- A menu on the left,
- A search bar on the top,
- A filter next to your search to filter through your data, and
- The ability to add, edit, or delete records from your database through the graphical user interface.
In short, we have just created the prototype of a web application that runs on a searchable online database. Our Excel GUI has been successfully replaced by a web-based interface that allows us to interact with our data.
To keep building this application, follow the tutorial’s next steps below.
Excel to Web App: Next Steps
Well done! You have successfully built and deployed your first web application in Five. Instead of managing your data in an Excel spreadsheet, you can now use a modern web application to store, retrieve, and process your data. And it took only three steps to go from Excel to web app!
Five’s prebuilt user interface has automatically created an Inventories menu item for you. You can also see your Products in the list to the left of the screen. Last, by selecting one of the products, you can see its details, and make changes to them as necessary. Five also comes with a pre-built search and filtering feature.
What else can you develop in Five? Plenty of things!
In Part 2 of this guide, you will learn how you can add calculations to your application. For example, let’s calculate the Total field in our form.
You can also change the design of your application by adding a theme to it. This will make your web app look more professional and unique.
You can also add a login and terms & conditions consent screen to your application and give users different roles and permissions to access data.
With charts or dashboards, you can let users perform analytics and provide business intelligence.
Last, you can show your data in an editable grid by following our Northwinds tutorial.
Remember how at the top we spoke about capturing clean data? Why not add a few data validation rules to your application?
In short, we have barely scratched the surface of what’s possible in Five! For further inspiration on what can be built in Five, visit our Use Cases or keep following our tutorial by adding a calculation to your application.
Finding Help in Five
In case you get stuck during the development process, we’re here to help! Continue developing your application by accessing these resources:
- Five’s User Community: Visit https://five.org to ask questions or get inspiration from other users.
- Five’s Documentation: Visit help.five.org to access Five’s comprehensive documentation.
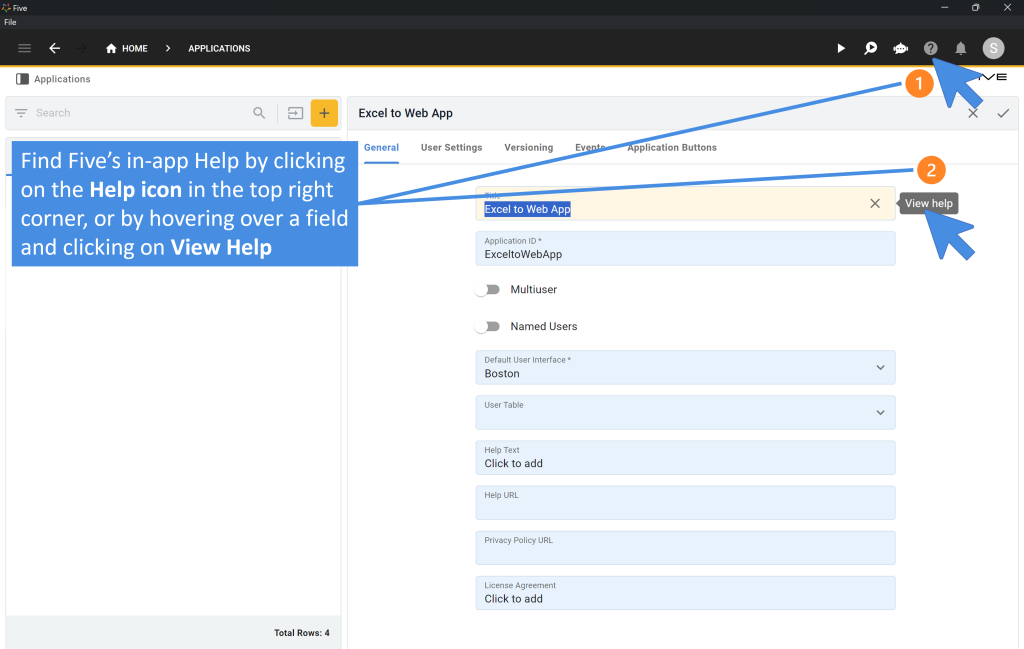
Five’s In-App Help
Last, find useful tips for your application development by clicking on Five’s in-app help available in the top right corner or on almost any field.
Get Your App Online For US$29.99 Per Month
To deploy your application online, sign up for one of our paid plans, starting from US$29.99 per month and application.
Host Your App Online
Select one of our hosting packages.
Starting from US$29.99 per app and month.