How to Create a Web Portal (Quick & Easy Guide)
Learn How to Create a Web Portal In 5 Steps
Web portals are increasingly popular with businesses. Whether it’s enabling vendors and suppliers to manage their profiles or providing internal staff with a self-service interface, web portals create a centralized hub for seamless interaction. This enhances collaboration, communication, and efficiency.
In this guide, we will walk you through the five essential steps to develop a custom web portal tailored for your audience—be it clients, employees, students, or other users. Whether you are aiming to streamline processes or offer an enhanced user experience, this guide will simplify the journey to creating a functional and user-friendly web portal.
Step 1: Gather Information For Your Web Portal
Start by identifying the key information and documents your clients regularly need. Consider the following:
- What are the top 5 pieces of information clients frequently request?
- What documents do clients need access to repeatedly?
- What manual client interactions could be automated through a self-service portal?
Try to pinpoint the most time-consuming client requests and interactions. This helps prioritize the essential features and content for your portal.
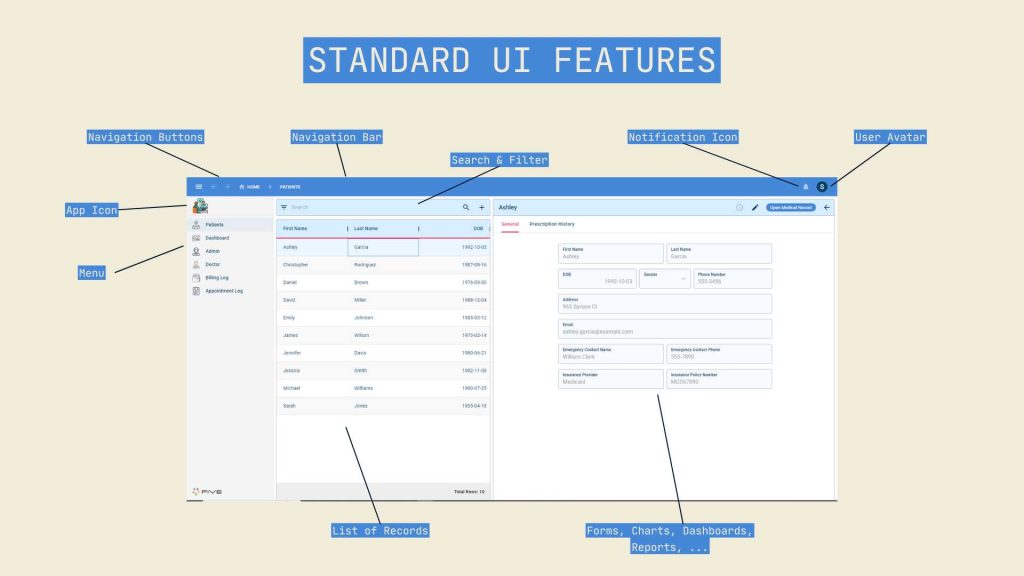
Step 2: Select an Intuitive User Interface
For B2B (business-to-business) portals, an admin panel layout, as shown below, is often ideal.
It provides a clean, professional design that allows clients to easily navigate and access information. Most users will also be immediately familiar with the layout as it resembles popular business systems, such as CRM or ERP systems. More dynamic interfaces could be better for students or community members, where user interface design rather than functionality is a bigger consideration.
Five gives you the flexibility to generate both. It auto-generates a customizable admin panel interface for intuitive and a ready-to-use web portal.
Step 3: Develop Core Portal Functionality
With your requirements in place, begin building the portal. Modern rapid application development platforms like Five can help quickly translate your requirements into functional software.
Key features to consider include:
Secure User Authentication and Access Controls
Five, for example, supports role-based access control (RBAC), single sign-on or two-factor authentication.
Document Management and File Sharing
Often, web portals are used to streamline communication and document sharing. With Five, documents can be uploaded or made accessible to portal users. This streamlines version control and ensures that the right users have the right documents available when needed.
Billing and Payment Information
Is your web portal designed to support a checkout process or require the collection of payment information? By integrating a web portal with popular payment gateways, such as Stripe, you can add checkout processes or securely manage payment information.
Project/Order Status Tracking
Often, web portals are designed to reduce manual or admin work. For example, many businesses regularly share spreadsheets with pricing, project, or order information with vendors, suppliers, and customers. A web portal can serve as a centralized hub for sharing this information, making teh use of spreadsheets redundant.
Support Resources, Ticketing, and FAQs
If your business or organization supports customers, then a web portal can be the perfect interface for providing support resources, FAQs, or managing support requests with tickets.
Data Visualizations and Reporting
Dashboards are a great way to illustrate and share information visually. They let users keep track of metrics that are relevant to their role, business, or organization. Web portals for membership systems, for example, can visualize attendance data. Vendor or supplier portals can visualize sales, order fulfillment, or interactions.
With Five, you can create custom dashboards where each portal user can view metrics or KPIs relevant to their role.
Start with the highest priority features and iterate as needed.
Step 4: Customize the Portal Design
Ensure your web portal reflects your company’s branding to create a cohesive experience:
- Use brand colors and logos throughout the portal
- Set up a custom domain for the portal URL
- Create branded signup and login pages
- Customize email templates for portal notifications
A well-designed, branded portal underscores your professionalism and attention to detail.
Step 5: Test and Refine The Web Portal
Before launching, conduct thorough testing:
- Perform internal testing with employees across departments
- Gather feedback and identify any usability issues or missing features
- Refine the portal based on testing results
Full Tutorial For Building a Web Portal
With the right development tools, a web portal can be built in just a few days. And unlike in traditional development, you don’t need to be a full-stack developer to build and launch your portal.
Five, a rapid application development platform, makes it easy to create custom portals without extensive coding. Sign up for a free trial and follow the tutorial below to start building your web portal today.
Explainer: Building a Web Portal with Traditional Development Tools
With traditional development tools, building a web portal requires a wide range of technical expertise. We don’t recommend this approach unless you already are or plan to be a full-stack software developer.
First, you need to know front-end technologies like HTML, CSS, and JavaScript, often paired with frameworks such as React, Vue.js, or Bootstrap for faster development.
On the back end, proficiency in a programming language and framework is necessary to handle functionality and server-side logic. Additionally, you’ll need database management skills to set up and maintain systems like MySQL or PostgreSQL.
Finally, deploying and maintaining the portal on a server demands sysadmin skills, including knowledge of hosting, server configuration, and security. This complexity makes traditional development time-consuming and resource-intensive.
Luckily, all-in-one tools like Five, a rapid application development platform, provide everything you need to create a web portal in one place: user authentication, automated deployment, an auto-generated user interface, and a fully customizable database.
Key Elements of a Creating a Web Portal
Most custom web portals consist of the following elements:
- Database for Storing Data
- A database is essential for storing all your data securely and efficiently.
- Forms for Data Entry
- Create user-friendly forms to facilitate easy data entry and management.
- Calculations for Processing Data
- Implement calculations to process and manipulate data as needed for your portal’s functions.
- PDF Reports, Charts, and Dashboards for Visualizing Data
- Use visual tools like PDF reports, charts, and dashboards to present data in an accessible and understandable format.
- User Logins and Authentication for Controlling Access to Data
- Ensure secure access to your portal with user login systems and authentication protocols.
- Notifications (Email or In-App) for Notifying Users of Data Changes
- Set up notifications to keep users informed about important data changes or updates.
The Business Partner Web Portal
As mentioned, web portals differ in design and purpose but share common features.
In this code-along guide, we demonstrate how to build a fully functional business partner portal using Five’s low-code platform.
How to Create a Web Portal: Follow these Steps
✅ Create a Database: Start by defining and modeling your database, including tables for storing business partner details, products, and orders.
✅ Design the Portal: Use Five’s prebuilt components to create a web-hosted user interface. Customize the layout to include key features like partner login, dashboards, and data forms.
✅ Add Business Logic: Incorporate calculations, workflows, and validations to reflect your specific business needs, ensuring accuracy and automation.
✅ Launch and Test: Deploy your portal securely online, test for functionality, and invite partners to start using it.
With Five, building a web portal is quick and flexible, allowing you to tailor it to your business’s requirements.
Conclusion: How to Create a Web Portal
Creating a web portal doesn’t have to take months, even for non-technical users.
By leveraging all-in-one tools like Five, you can simplify development with built-in features like authentication, deployment, and a customizable database. There is still a learning curve, but compared to the traditional route, you can reduce your development time for a custom-built web portal from months to days.
Follow this full tutorial to continue building your first web portal: Code-Along: Build & Launch a Business Partner Portal
Finding Help in Five
In case you get stuck during the development process, we’re here to help! Continue developing your application by accessing these resources:
- Five’s User Community: Visit https://five.org to ask questions or get inspiration from other users.
- Five’s Documentation: Visit help.five.org to access Five’s comprehensive documentation.