How to Build a Shopify Admin Panel
How to Build a Shopify Admin Panel: Fast & Easy Guide
Understanding and monitoring your sales is crucial for gaining performance insights, spotting trends, and making informed strategic decisions. Here’s a comprehensive guide on how to build a Shopify admin panel.
What is a Shopify Admin Panel?
A Shopify admin panel is a comprehensive dashboard where you can manage your store, track sales, monitor inventory, and analyze customer behavior.
Steps to Build a Custom Shopify Admin Panel
Creating a Shopify admin panel involves several steps, from data capture to analysis. Here’s a step-by-step guide to building a Shopify admin panel using Five, a rapid application builder:
This guide will help you create a custom admin panel for your Shopify store using Five. By the end, you’ll have a fully functional web application to manage and track your sales activities. Here’s what you need:
- Access Five: Get free access to Five
- Connect to Shopify: Integrate Five with your Shopify store to use it as a data source.
- Create Forms: Build forms within Five to capture and manage sales, inventory, and customer data.
- Design Dashboards: Utilize Five’s tools to create interactive dashboards for visualizing sales metrics and performance.
- Generate Reports: Develop comprehensive reports to analyze key performance indicators (KPIs) such as conversion rates, sales cycle duration, and average order value.
- Automate Workflows: Set up automated workflows to streamline data entry and processing, reducing manual effort.
By following this guide, you’ll be equipped to build an efficient Shopify admin panel, enabling you to track and manage your sales activities effectively. If you prefer a ready-made solution, you can download our free Shopify admin panel template here.
Configuring Your Shopify Admin Panel: Step-by-Step Guide
Building a robust Shopify admin panel requires configuring your sales data source and setting up the Shopify API. Follow these steps to get started:
Step 1: Configuring the Shopify API
For Shopify users, follow these steps to configure the Shopify API:
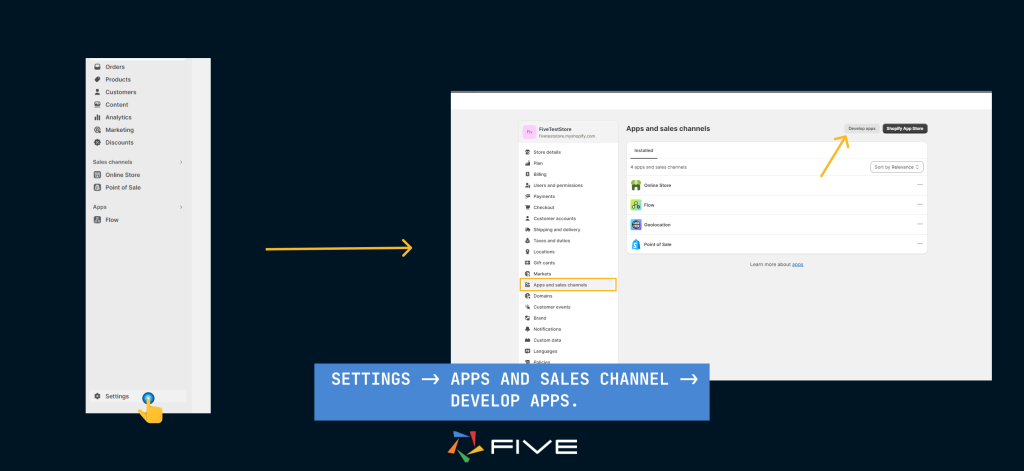
- Log into Your Shopify Admin Dashboard: Navigate to your Shopify admin dashboard and go to Settings -> Apps and Sales Channels. This section displays all the applications currently installed in your store.
- Create a New Custom Application: Click on the Develop apps button located at the top right of the page to create a new custom application.
- Assign a Name to the Application: Name the application (for this guide, we’ll use ‘fiveteststore’). Use this name consistently throughout the setup process.
- Configure API Access Scopes: Go to the Configuration section and specify the API access scopes for the data you want to share with an external system. These can include Products, Orders, Inventory, etc.
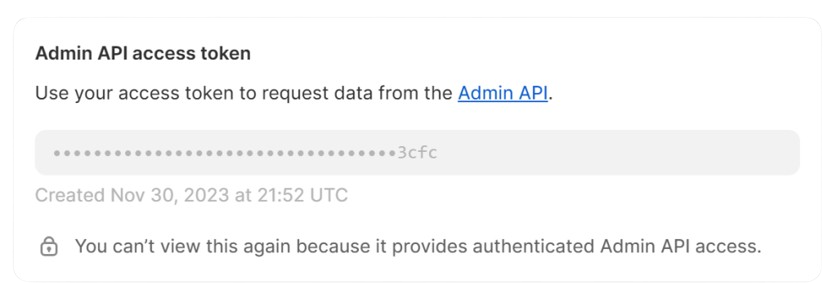
- Generate API Credentials: After completing the configuration, navigate to the API Credentials tab. Shopify will prompt you to install your application. Once installed, Shopify will generate an Admin API access token. This token is only displayed once, so make sure to save it securely for future use.
By following these steps, you’ll be able to configure your sales data source and set up the Shopify API, paving the way for a functional and efficient Shopify admin panel. Let’s get started!
Step 2: Integrating Shopify with Five
Follow these steps to create a custom Shopify admin panel using Five and the Shopify API.
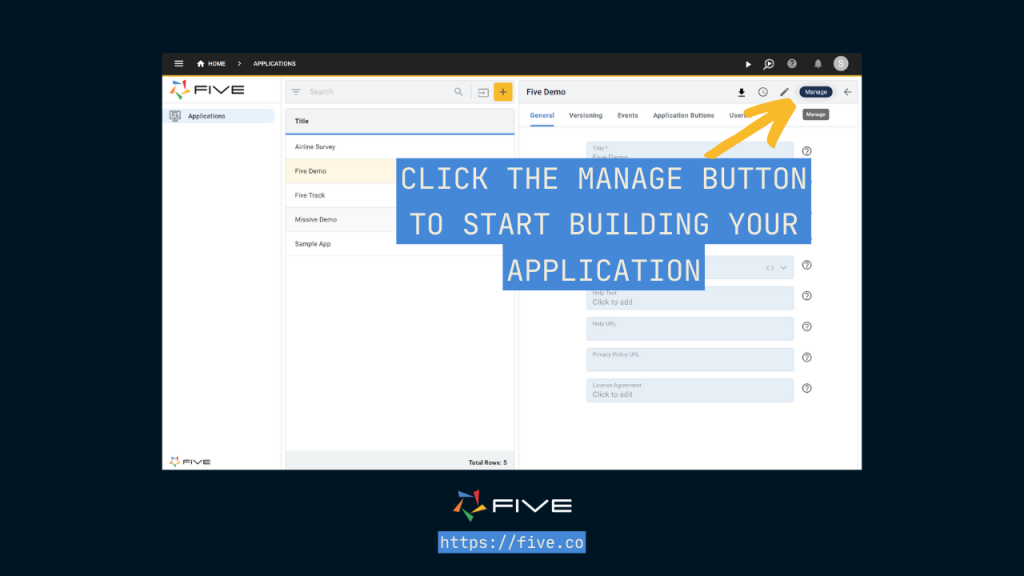
- Launch Five and Create a New Application
- Open Five and click the yellow + button to create a new application.
- Give your application a name and press Save.
- Select Manage to start developing your application. This is your starting point for creating a custom app using Shopify data.
- Set Up the Shopify API
- Begin by clicking on Data -> Connection Wizard.
- The Connection Wizard in Five simplifies linking to REST APIs and setting up API endpoint mappings.

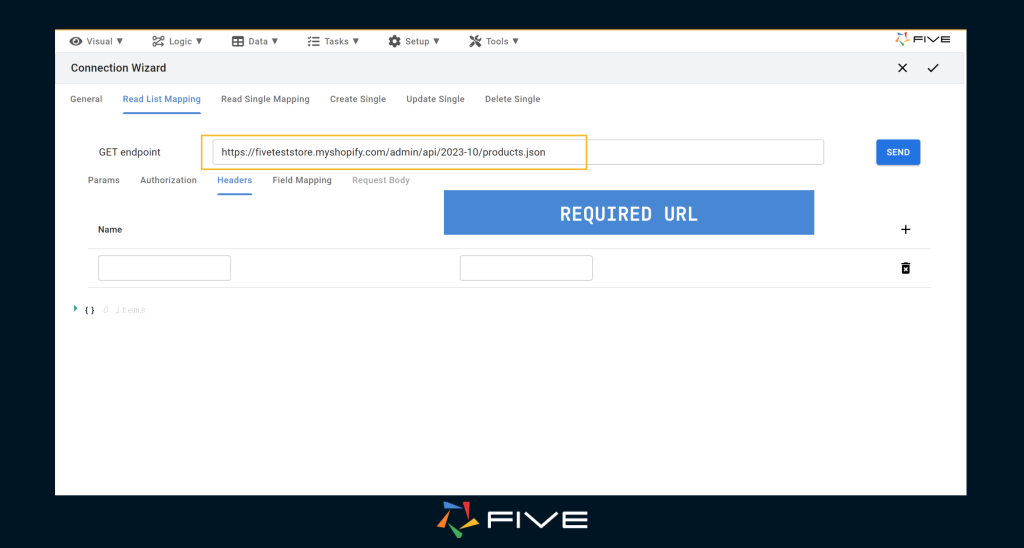
- Configure the Connection Wizard
- Inside the Connection Wizard, click on the Read List Mapping tab. Here, enter the URLs for your API. The URL structure is:
https://{your_store_name}.myshopify.com/admin/api/{api_version}/products.json- Replace
{your_store_name}with your store’s name and{api_version}with the latest API version. You can find the latest API version here. - (Note: This guide retrieves product details. Ensure product access was granted to the API during the initial setup.)
- Add Your URL to Five’s Connection Wizard
- Your URL should look like this:
https://{your_store_name}.myshopify.com/admin/api/{api_version}/products.json- Add your Admin API access token as a header. Click on the Headers tab just below the URL field.
- Use
x-shopify-access-tokenas the name and paste your Admin API access token as the value.
- Retrieve Product Details
- Click Send, and a list with details of all your products will appear.
- Field Mapping
- Navigate to the Field Mapping tab to see how Five interprets your data.
- Five converts the JSON data from Shopify into a format similar to a traditional database table, which is useful for querying in SQL.
- In Field Mapping, you can modify the data and display types of your fields. Five will automatically recognize the ID field as the primary key. If it doesn’t, tick the checkbox labeled primary key next to the ID field.
- Repeat for Other Actions
- Repeat this process for the other actions: read single, update, and delete.
- Use the following URL format for these actions:
https://{your_store_name}.myshopify.com/admin/api/{api_version}/products/:id.json- This format is necessary because these actions require a specific product ID. The
:idvariable allows Five to dynamically handle this requirement.
Step 3: Utilizing the Shopify API as a Data Source
With our custom app now linked to our Shopify store, we can use the Shopify API within Five to create various features, including forms, charts, data views, and reports.
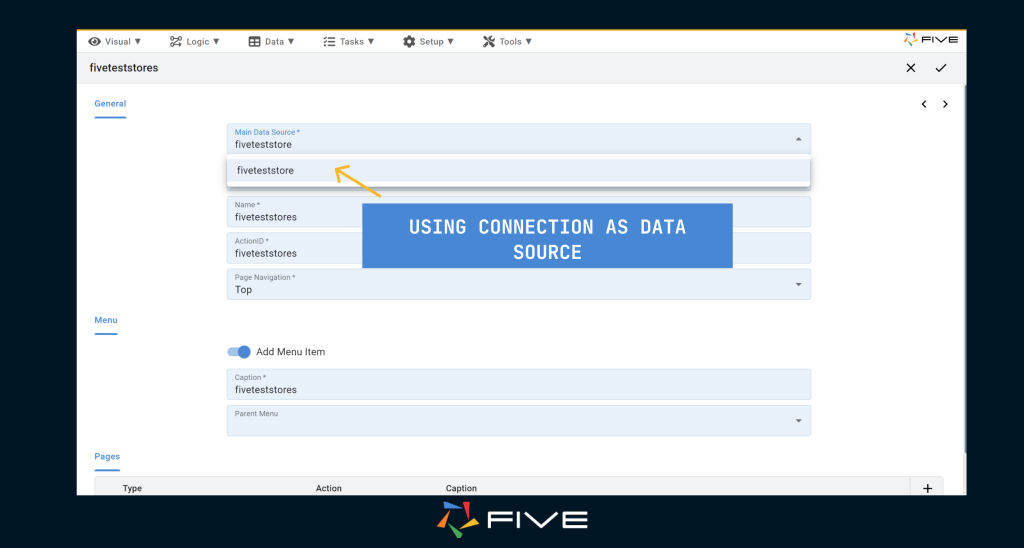
Navigate to Form Wizard
- In Five, go to Visual -> Form Wizard.
- Select your Shopify connection in the primary data source lookup.
Populate Form Details
- Five will automatically populate most of the details for you.
- Adjust any settings as needed.
Save and Run Your Application
- Click Save to store the form.
- Run your application by clicking the Run button in Five’s top navigation bar.
- This action will open a new window where you can preview the application you have developed.

Interacting with Your Products
- In the end-user application, you’ll see a form that lists all the products from your store.
- You can view details of each product, make changes, add new products, and delete existing ones.

Enhancing Your Application with Charts and Reports
To further analyze your sales data, you can add charts and reports. Refer to this article for detailed steps on integrating these features.
Conclusion: Building a Shopify Admin Panel
In this tutorial, you learned how to:
- Integrate a Shopify store with Five using the Shopify API and the Connection Wizard.
- Develop a custom application to perform CRUD operations on your Shopify products.
By leveraging Five’s capabilities, you can access, analyze, and manage your Shopify store data efficiently. Additionally, Five allows you to create advanced features like charts, data views, and reports to enhance your sales tracking and management. With these tools, you can build a powerful Shopify admin panel to streamline your store operations.